Photo of my Jotul Oslo in action, plus my woodpile

  • Active since 1995, Hearth.com is THE place on the internet for free information and advice about wood stoves, pellet stoves and other energy saving equipment.

    We strive to provide opinions, articles, discussions and history related to Hearth Products and in a more general sense, energy issues.

    We promote the EFFICIENT, RESPONSIBLE, CLEAN and SAFE use of all fuels, whether renewable or fossil.
Status
Not open for further replies.

JotulOslo

Member
Aug 26, 2006
46
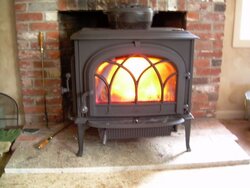
Some time ago the folks here helped me with installing my Jotul Oslo, and I should have posted a picture of my installation in appreciation for all the suggestions. The problem is that I didn't have a digital camera until today, so I wasn't able to get any evidence. I stopped by Staples and picked up a Nikon Coolpix L4 for $119.00, along with an HP photo printer that you get for free after the rebate. So, now I have the capability, here is a picture of the stove in action this afternoon, along with my woodpile.

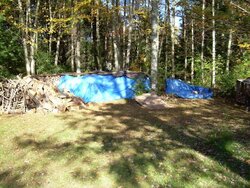
The blue tarp covered portion is wood we gathered about this time last year, and is more than ready to go. Prior to moving most of the right hand side there are 40 feet of wood 4 feet deep and four feet high. No wet bits in this pile, which is built on concrete blocks holding up pallets to allow circulation and reduce the prospect of infestation of crawly things. The uncovered pile is wood we hauled the weekend before last. We're going out tomorrow for a number of additional loads. I'd like to get six cords this year to burn next year.

Right now it is 45 F out, and about 80 F in.

JotulOslo
 

Attachments

  • DSCN00140001.JPG
    DSCN00140001.JPG
    41.9 KB · Views: 1,121
  • DSCN00070001_1.JPG
    DSCN00070001_1.JPG
    106.3 KB · Views: 1,050
that stove is humming along real nice thanks for sharing the pictures. do you use that pot on your stove to boil water. you can buy pine drops and add that to the water to give your house a nice pine smell :)

Jason
 
Jason,
My girlfriend and I boil it to keep the humidity up. Sometimes she puts potpourri in it. I'll try the pine drops.
I really like this stove. When I cools down and I can get the camera in behind it I will take pictures of the block off plate I fabricated.

JotulOslo
 
i look forward to seeing it. also did you split all that wood with a mull? i remember when i got my first digital camera last year man did it feel good not to having to go to the camera shop to get my film developed,

and the colors on my digital where so much better id never use film again. enjoy that nice camera of yours.


Jason
 
Jason,
The wood was split with a hydraulic splitter. My friend's dad has one, and we load it up in the bed of my Toyata Pickup. When we get to my house, the splitter stays in the bed, the ram is tilted vertically, and away we go! I cut all the wood first, and then do all the splitting so I only use the splitter for a weekend.

Works slick.
 
Jotul said:
Jason,
The wood was split with a hydraulic splitter. My friend's dad has one, and we load it up in the bed of my Toyata Pickup. When we get to my house, the splitter stays in the bed, the ram is tilted vertically, and away we go! I cut all the wood first, and then do all the splitting so I only use the splitter for a weekend.

Works slick.
Hey , Splitter set to vertical in the back of a pick up truck ............ I think your on to something ! Awesome .

Very nice setting for your Jotul Oslo , stove looks great. Good ideal getting a head on your wood , with in the trees might post some issues of normal drying time.
 
Nice, I like the looks of those hearth stoves over the inserts.
 
Rock n roll! That looks like a happy stove. Nice job JO!
 
Thanks for the comments. My girlfriend and I just returned from our second load of wood today. Hopefully two more tomorrow. The stacked wood dried wonderfully where it is. I put sheets of ratty plywood over the top to protect from rain and snow, and the breeze blows through and under the stacks easily. The randomly piled wood will be split and stacked in the next month or so, just like the stuff behind it. I used the blue tarp to protect the stacked wood recently when we had some driving rain, and haven't removed it. I think I am going to keep it on during the heating season to prevent the exposed wood from getting wet.

Soon I'll have to build another set of racks for the wood in the wood pile. I'd really like a semi-permanent structure with a roof that overhang a foot or so on each side, but have not yet seen one that I like.

The stove installation wasn't too bad, did it myself. I extended the heart another 26" in front of the brick fireplace. Removed the carpeting and put down a piece of Durock cut like the piece of granite directly on top of it. Another 10" wide piece of granite mad up the difference between the height of the hearth and the base piece of granite. I only needed a little shim under one of the feet to stop the rocking due to the uneven surface of the brick.

I enjoy sitting in front of the fire watching the secondary burn flames moving across the front of the stove.

JotulOslo
 
I just purchased an Osolo 500 and I am curious how the stove works. Not really much in the manual on this. Where is the air intake on this stove? What is the deal with 2nd burn steel pipes on the roof of the stove? How do they work?

Thanks Bob
 
Status
Not open for further replies.