
Pic of inside my masonry chimney. Do I have a lot of Creosote?
- Thread starter NewtownPA
- Start date
-
Active since 1995, Hearth.com is THE place on the internet for free information and advice about wood stoves, pellet stoves and other energy saving equipment.
We strive to provide opinions, articles, discussions and history related to Hearth Products and in a more general sense, energy issues.
We promote the EFFICIENT, RESPONSIBLE, CLEAN and SAFE use of all fuels, whether renewable or fossil.
You are using an out of date browser. It may not display this or other websites correctly.
You should upgrade or use an alternative browser.
You should upgrade or use an alternative browser.
- Status
- Not open for further replies.
T
theheatelement
Guest
Depending on what state you live in, you can technically run a piece of 5 foot oval pipe and be done with it.... I would highly advise against it... the insulation part.. that's a different story... some say it's great other's say it doesn't matter.... I say your putting a rust resistant product in an area prone to water and your going to eventually end up with an insulated wet matter. What I would probably do in your situation is run a piece of ovalized to round flex from your insert to your cap... You'll have better draft and a safer fireplace.... let me know if you have any questions... others that have chimed in have added valuable insight as well...
WILDSOURDOUGH
New Member
'Chain Whip' your chimney 
NEVER-NEVER let that company near your chimney again !
They will probably crack and damage your liner (big bucks) and charge you 400.00 bucks for their pleasure.
Might not even tell you that they broke it. It is only clay tile you know- can be scrubbed with a wire brush but it has never done anything to warrent a 'Chain Wipping'- It is just plain stupid.
Looks clean, for safety you might want to consider a liner and new thimble connection, cap looks good from here.
Best o Luck
(sorry for yelling, NEVER-NEVER, but I still mean it.)
Hogwildz
Minister of Fire
My uncle chain whips his chimney every year. No problems there so far.
I'd still recommend the liner though.
I'd still recommend the liner though.
sweeper
Member
Ichain whip or cable whip problem flues everyday for around 99.00. Been doing this for many many years and have never damaged or used this as a reline tactic ever. Please remember all sweeps are not out to get you... Some of us actually enjoy making people safe.
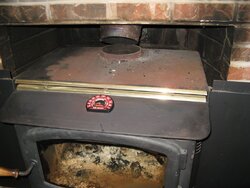
It looks like I don't have much obstruction from the damper. Then again this is the first fireplace I've ever looked at in detail. Am I right?
-Nathan
-Nathan
Gooserider
Mod Emeritus
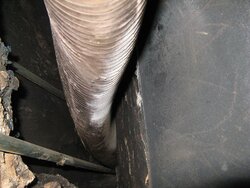
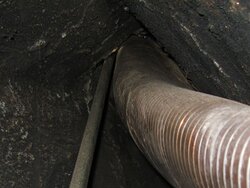
What do the pipes in the pictures do? They seem like something strange that I haven't heard of in a chimney before...
Looks like you might be able to get a round liner through the damper, or you might have to cut it, not sure.
Given that your current chimney looks like it meets code standards for fire safety - it has clay tiles that appear to be in good condition, etc. I would say that you don't need the insulation from the standpoint of fire protection. The liner will basically improve your cross sectional area situation (which might be a code requirement depending on just what size the existing tiles are) It would probably improve your draft but the difference might not be needed / worth the extra cost.
One option that some folks do when they can't fit an insulated liner down, is to make sure they have a really good block off plate install, then pour the area around the liner full of vermiculite. This works very nicely, but it can get REALLY messy if anything disturbs the blockoff plate.
Gooserider
No problem getting anything through that damper. They opened that sucker up big-time. The pipes are in there to support the oval section of flex so it doesn't slide back down into the fireplace.
Everybody has an opinion but here is mine. Properly connected to the top of the stove and with a good sealed block off plate you can probably burn the stove just fine. BUT, now that you have the chimney pretty clean and the stove disconnected etc., etc. for $400 bucks you can now get a chimney liner kit from one of the guys on eBay and do top notch full reline. It will take the liner two or three days to get there and you can line that pup in a days time.
At that point you have a nice safe installation that will get more mileage out of your wood, let you sleep better at night and be a no brainer to clean every season with no disconnecting anything to clean it. Given that half or more of the chimney is sandwiched between the house and the garage I would just pack insulation in the top five or six feet. Those are 8X12 tiles and an insulation blanket and liner ain't going down it no way no how. In fact getting a 6" liner down it is going to be a groan so I would go with a 5.5 inch liner kit. When you order it you would need to tell them to ship it with a "appliance adapter" in place of a tee.
Put in the liner, install a block off plate and paint the top of that stove and you are done for a long, long time. Don't do it and you will be going through this drill at least once a year from here on until you get tired of it and line it anyway. And liner kit prices go up every year in the interim.
Right, wrong or sideways that is the way I would do it. That is the way I did do it. With both flues.
I was up there this morning and took some measurements:
Chimney INNER measurements: 6.5" X 11"
Chimney OUTER measurements: 8" X 12.5"
I know for a fact that the inner clay tiles do NOT line up perfectly so that 6.5" would more likely be 6" so I think BrotherBart is right about getting a 5.5" diameter liner. Is that going to affect the drag going from 6" to 5.5"? Do all kits come with adapters from the smaller 5.5" to 6" or do I need to specify this?
- Does anybody know if I can feed the liner up from the bottom, or does it need to go down from the top? (I really don't like heights on an incline but I'll do it ONCE if I absolutely have to.)
If anyone is interested in helping out I'd be more than happy to accept some assistance!") Hogwildz has already offered!
Hogwildz has already offered!
-Nathan
Chimney INNER measurements: 6.5" X 11"
Chimney OUTER measurements: 8" X 12.5"
I know for a fact that the inner clay tiles do NOT line up perfectly so that 6.5" would more likely be 6" so I think BrotherBart is right about getting a 5.5" diameter liner. Is that going to affect the drag going from 6" to 5.5"? Do all kits come with adapters from the smaller 5.5" to 6" or do I need to specify this?
- Does anybody know if I can feed the liner up from the bottom, or does it need to go down from the top? (I really don't like heights on an incline but I'll do it ONCE if I absolutely have to.)
If anyone is interested in helping out I'd be more than happy to accept some assistance!
Hogwildz has already offered!-Nathan
Yeah you are in 5.5 territory. The six inches is the inside diameter of the liner with the outside being 6 1/4" territory so you would end up having to "ovalize" (read: mash) it to get it in. A 5.5 is going to draft just as well or better than a mashed up 6".
Get the full kit with cap, top plate and appliance adapter. It will be cheaper than buying an appliance adapter and a length of flex. It will come with a top plate to seal the top of the chimney and the liner will pass through that and the cap will attach either to the liner or the top plate collar which will act as a rain shield to keep water out of the chimney. Tell the liner peddler that the adapter has to be 5.5 to 6.
You can feed it up from the bottom but it is kinder to the thin metal of the liner to feed it from the top. If Hogwildz is there he will zip up there and feed it down to you. I think he is really Tarzan incognito.
BrotherBart said:Yeah you are in 5.5 territory. The six inches is the inside diameter of the liner with the outside being 6 1/4" territory so you would end up having to "ovalize" (read: mash) it to get it in. A 5.5 is going to draft just as well or better than a mashed up 6".
Get the full kit with cap, top plate and appliance adapter. It will be cheaper than buying an appliance adapter and a length of flex. It will come with a top plate to seal the top of the chimney and the liner will pass through that and the cap will attach either to the liner or the top plate collar which will act as a rain shield to keep water out of the chimney. Tell the liner peddler that the adapter has to be 5.5 to 6.
You can feed it up from the bottom but it is kinder to the thin metal of the liner to feed it from the top. If Hogwildz is there he will zip up there and feed it down to you. I think he is really Tarzan incognito.
Thank you BrotherBart for all your suggestions!
Ok, so is Rockford a good place to buy the liner kit from? They seem to have a good price $425 for 25feet 5.5" kit.
http://chimneylinerinc.com/red_chimney.htm
Dunadan
New Member
The 2 pics that have me curious are the most recent one you posted of the flue collar connection, and the original one.
Does that liner come down and fit easily into the top of your insert?
In your original picture, it looked like it wasn't in all the way, and I believe you said it had pulled out.
In the most recent picture, where you show the pipe out of the collar, it looks to me like the angle is wrong (i.e. the hole in the stove isn't far enough back for the pipe to insert easily).
Am I reading too much into your picture? Or is the alignment slightly off?
I ask because when my insert was installed, the installer ran into the same problem. The round liner couldn't bend enough after it came into the firebox to match up to my flue hole. Instead of bending the liner, an offset box needed to be installed.
If you do have this problem, you may need to plan to correct it.
I don't need the "T" that comes with kits, right? I'm just going to run the liner straight up from the top of the stove up up up and end at the top of the chimney. Pretty simple.
The appliance adapter should NOT be the crimped kind that I have right?
The appliance adapter should NOT be the crimped kind that I have right?
Dunadan said:The 2 pics that have me curious are the most recent one you posted of the flue collar connection, and the original one.
Does that liner come down and fit easily into the top of your insert?
In your original picture, it looked like it wasn't in all the way, and I believe you said it had pulled out.
In the most recent picture, where you show the pipe out of the collar, it looks to me like the angle is wrong (i.e. the hole in the stove isn't far enough back for the pipe to insert easily).
Am I reading too much into your picture? Or is the alignment slightly off?
I ask because when my insert was installed, the installer ran into the same problem. The round liner couldn't bend enough after it came into the firebox to match up to my flue hole. Instead of bending the liner, an offset box needed to be installed.
If you do have this problem, you may need to plan to correct it.
Yes the flue collar connection with the crimps is very hard to get to fit right. I'm not happy with it either - just another reason to go with the full liner and all new connections.
Dunadan
New Member
Not sure if that question was in regard to my post of just a general question.
If it was for me, no I don't think you need a T. What you need to determine is if a round liner (inserted properly into your stove) will be able to "bend" in a way to make it up through your damper area. The fact that you now have an oval liner makes me wonder if that was used because a round liner wouldn't make it up into the chimney.
Again, this is what happened in our case and the installer needed to cut away some of the masonry to allow the liner to get up into the chimney. Even doing this, I needed the offset box. The installer didn't know I'd need it until the very end of the installation, so you may not be able to tell until you get to that point. On the other hand, you may be able to since you already have a liner of sorts that you can play around with.
Dunadan it looks like he has plenty of room to "bend" a single ply liner with the big space through the former home of the damper frame.
Lots of people seem to have had good luck getting kits from Brian at Rockford. I ordered a specific piece from him and he sent something else so I am done with him. He now appears to be selling the Forever Flex kit from Olympia Chimney Supply that has that stupid pyramid shaped top plate that won't work on your chimney without you smashing out the top flue tile. If he will substitute a flat top plate it should be fine.
Be sure you get good measurements on length and get a liner with a few feet to spare.
The guy on here from Magnaflex talks about getting good deals for Forum members but the week he signed on I was looking for a new kit to replace one of mine and all he did was steer me to an overpriced, don't wanna deal with no stinkin DIY, 45 mile away yuppie fireplace shop so I bought a Simpson DuraFlex kit from the fine folks at Hart's Hearth and had it on the front porch in exactly 19 hours.
EDIT: My bet is that they went with the oval flex because that is what would fit into the rectangular flue tiles.
Dunadan said:Not sure if that question was in regard to my post of just a general question.
If it was for me, no I don't think you need a T. What you need to determine is if a round liner (inserted properly into your stove) will be able to "bend" in a way to make it up through your damper area. The fact that you now have an oval liner makes me wonder if that was used because a round liner wouldn't make it up into the chimney.
Again, this is what happened in our case and the installer needed to cut away some of the masonry to allow the liner to get up into the chimney. Even doing this, I needed the offset box. The installer didn't know I'd need it until the very end of the installation, so you may not be able to tell until you get to that point. On the other hand, you may be able to since you already have a liner of sorts that you can play around with.
Was just a general question but thanks for answering
The damper area is pretty well clear. Actually I was surprised how much of the damper they cut away so I'm positive that a round liner will work.
I understand what you mean about the offset box. I don't think I'll need one if the liner is flexible (the oval liner that I have isn't very flexible at all from side-to-side - I think it has to do with the oval shape itself.
Dunadan
New Member
I don’t think I’ll need one if the liner is flexible.
I have a flexible liner, which is a bit of a misnomer.
Yes, it's flexible, but in the sense that it will bend over a span of several feet, at moderate angles.
No chance of making a sharp turns, at least with the flex liner I had, which in my case is what was needed to make the connection without offset box.
Dunadan said:I don’t think I’ll need one if the liner is flexible.
I have a flexible liner, which is a bit of a misnomer.
Yes, it's flexible, but in the sense that it will bend over a span of several feet, at moderate angles.
No chance of making a sharp turns, at least with the flex liner I had, which in my case is what was needed to make the connection without offset box.
Well I hope I won't need one - but I'll cross that bridge if I get to it.
Thanks for the heads up though.- Status
- Not open for further replies.
Similar threads
- Replies
- 10
- Views
- 2K
- Replies
- 14
- Views
- 2K
- Replies
- 6
- Views
- 1K
- Replies
- 14
- Views
- 1K