Pics- Hearth Remodel and Hampton I300 install

  • Active since 1995, Hearth.com is THE place on the internet for free information and advice about wood stoves, pellet stoves and other energy saving equipment.

    We strive to provide opinions, articles, discussions and history related to Hearth Products and in a more general sense, energy issues.

    We promote the EFFICIENT, RESPONSIBLE, CLEAN and SAFE use of all fuels, whether renewable or fossil.
Status
Not open for further replies.

nlittle

New Member
Sep 8, 2009
115
Southern NH
Well, after much help from this forum check out my new install. :)
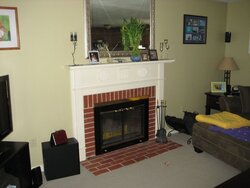
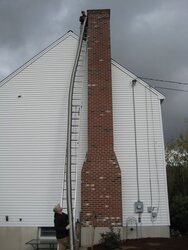
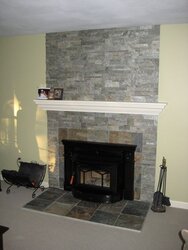
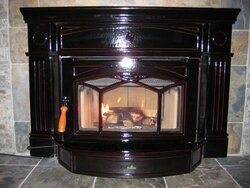
You can see my old hearth, the 40 foot ladder/ 35 foot liner, the new hearth and insert and the first fire....
How satisfying!
Thanks for all the help and encouragement, I hope I can return the favor to future members!
 

Attachments

  • old.jpg
    old.jpg
    36.2 KB · Views: 1,315
  • 40.jpg
    40.jpg
    48.8 KB · Views: 1,329
  • new.jpg
    new.jpg
    39.3 KB · Views: 1,431
  • 1st.jpg
    1st.jpg
    54 KB · Views: 1,410
that is one long liner! I only had to put in a 20ft liner.

the surround and hearth extension came out great, very up to date looking. nice insert too.

did you fire it up yet?
 
BucksCoBernie said:
that is one long liner! I only had to put in a 20ft liner.

the surround and hearth extension came out great, very up to date looking. nice insert too.

did you fire it up yet?

Thanks! I guess the break in fire was so small you can't even see it in the last picture. LOL
 
Sweet! I really like the new look over the old look. The colors in the tile blend very nice with the Timberline Brown. Did you have to remove all the previous brick or did you go right over it?
 
nlittle said:
BucksCoBernie said:
that is one long liner! I only had to put in a 20ft liner.

the surround and hearth extension came out great, very up to date looking. nice insert too.

did you fire it up yet?

Thanks! I guess the break in fire was so small you can't even see it in the last picture. LOL

oh geez you're right. i didnt even see it in the picture haha.
 
stejus said:
Sweet! I really like the new look over the old look. The colors in the tile blend very nice with the Timberline Brown. Did you have to remove all the previous brick or did you go right over it?

We went right over it. It is a masonry fireplace so we did not want to damage any of it. Removed the mantel and they went over it.
I am very happy with it and have more than enough clearance now.
 
Oh!!!! This Hampton insert is the prettiest stove I've ever seen. I'll never forget the first time I saw one of these. It was love at first sight.

I want to know if it operates as well as it looks!!
 
ControlFreak said:
Oh!!!! This Hampton insert is the prettiest stove I've ever seen. I'll never forget the first time I saw one of these. It was love at first sight.

I want to know if it operates as well as it looks!!

Operates?! I don't want to get it dirty by burning in it! :)
I am just doing my break ins right now....hopefully by next week I will be able to open her up a little. From others here it performs quite well, so I am looking forward to it.
 
Had the second fire today, got it not quite 1/2 full. No smell, I wonder if it is because they put the insulation behind the faceplates....or maybe I am not getting it hot enough... We shall see tomorrow!
 
nlittle said:
Had the second fire today, got it not quite 1/2 full. No smell, I wonder if it is because they put the insulation behind the faceplates....or maybe I am not getting it hot enough... We shall see tomorrow!

Hmmm, I don't have the enamal finish so I'm wondering if you will smell the paint cure. Maybe it's done at the factory for the enamal finish...
 
stejus said:
nlittle said:
Had the second fire today, got it not quite 1/2 full. No smell, I wonder if it is because they put the insulation behind the faceplates....or maybe I am not getting it hot enough... We shall see tomorrow!

Hmmm, I don't have the enamal finish so I'm wondering if you will smell the paint cure. Maybe it's done at the factory for the enamal finish...

That could be.... I got it hot enough for the blower to come on auto low yesterday....can't wait to start a nice fire tonight.
:)
 
I forgot to ask and I didn't see you mention it. Did the liner get insulated and do you have a cap on that liner?
 
stejus said:
I forgot to ask and I didn't see you mention it. Did the liner get insulated and do you have a cap on that liner?

It does have a steel damper plate, top plate and cap. No insulation. I asked about that when I bought it and they said they don't normally do that. They are a reputable shop so I didn't push. I think they would have had a REALLY hard time getting the liner down with insulation on it, so if I retro it I guess it will be the pour down stuff I have read about. Since I have such a long outside chimney I think may realize later I need it. It does draw well though once it gets going.
So, you think I should have one?

By the way, where is your thermometer?
 
nlittle said:
stejus said:
I forgot to ask and I didn't see you mention it. Did the liner get insulated and do you have a cap on that liner?
It does draw well though once it gets going. So, you think I should have one?

By the way, where is your thermometer?

Seeing the chimney is external, it is recommended to have it insulated. The biggest reason is creosote. A warm liner will not allow gases to cool and condense on liner. A cool liner will cool gases off and form more creosote. The second reason is you will get a much better draft. Warm liners draft better. This will allow you to close off the air much sooner reducing the amount of wood you burn. If you have to burn with the air open or 1/2 open to create the draft, you're going though your wood faster.

The insulation I used is called Everguard Insulation Mix. You add water to it, mix it up so it's like damp cat litter and pour it down your chimney. Some don't like to do this in fear of pulling the liner out some day. My sweep told me it can be done, it's just a little messy. I don't plan to remove it. I'll let the next owner deal with it if they want to.

Thermometer - There's some debate on where to put these. I have mine on the top shelf towards the back near the top surround piece. It's the Rutland thermometer. Because the Hampton has a top shelf, the temp is not reflective of what the internal stove temp is. This is due to the space between the shelf and the top of the stove. When you have the blower on, the temp on the shelf gets even lower because your moving heat away from the surface. I really don't use this as a guide anymore, but temps should be above 300 degrees to get effective heat out of the stove.

I've had temps go to 500 but this was with a full load on a bed of coals and the blower off during the first 15 minutes of burning. Once you start to close off the air, you will notice the temp rise because you are letting less heat up the stack. Once you turn the blower on, you will notice the temp falling slowly. The nice thing about the auto blower setting is that it will shut off once the stove is too cool to produce heat. This is a great feature so be sure to use it.

I've been told this Rutland thermometer can scratch the stove surface. It hasn't scratched mine, but mine is a metalic finish. I guess it's the coil on the back side of the Rutland that can flex open and closed and when it's on the surface, it can leave a little scratch. If you do a search, you may find more on this subject.

Unfortunately, the weather is like late November around here. Cold, wet and windy. It's too early for this kind of weather but having the stove create the warm environment makes it all the better. Now we'll just have to wonder what kind of winter we have and will we have enough wood. ;-)
 
Nice looking insert. That surround really adds to the look. The stonework came out great too.
Good Luck with it.
Let us know how you like it.
 
stejus said:
Seeing the chimney is external, it is recommended to have it insulated. The biggest reason is creosote. A warm liner will not allow gases to cool and condense on liner. A cool liner will cool gases off and form more creosote. The second reason is you will get a much better draft. Warm liners draft better. This will allow you to close off the air much sooner reducing the amount of wood you burn. If you have to burn with the air open or 1/2 open to create the draft, you're going though your wood faster.

Thermometer - There's some debate on where to put these. I have mine on the top shelf towards the back near the top surround piece. It's the Rutland thermometer. Because the Hampton has a top shelf, the temp is not reflective of what the internal stove temp is. This is due to the space between the shelf and the top of the stove. When you have the blower on, the temp on the shelf gets even lower because your moving heat away from the surface. I really don't use this as a guide anymore, but temps should be above 300 degrees to get effective heat out of the stove.

I've been told this Rutland thermometer can scratch the stove surface. It hasn't scratched mine, but mine is a metalic finish. I guess it's the coil on the back side of the Rutland that can flex open and closed and when it's on the surface, it can leave a little scratch. If you do a search, you may find more on this subject.

Yeah, I'm going to look into the insulation thing.. I can't do it with a chimney 40' up!
Regarding the thermometer, I am worried about scratching the enamel, I was thinking maybe putting it under the shelf, and using a flashlight to see it... Seems like it would be OK under there and give me accurate temps.
 
Under the shelf would work. Let me know if you can see it with a flashlight. I may do this if you can see it ok.

Edit - I forgot to mention. The cost to add the insulation after the liner was installed is minimal. It cost $350 for the time and material. In your case, it may be less because you already have the block off plate installed.
 
stejus said:
Under the shelf would work. Let me know if you can see it with a flashlight. I may do this if you can see it ok.

Edit - I forgot to mention. The cost to add the insulation after the liner was installed is minimal. It cost $350 for the time and material. In your case, it may be less because you already have the block off plate installed.

Cool thanks for the ballpark...how come you did the solid stuff and not the loose stuff...or maybe it is the same?
 
THAT'S WHAT I'M TALKING ABOUT!!! Sorry, I had to get that out. I'm getting ready to fire mine up tonight, cold and rainy down here in the South. I ran home yesterday to clean out the chimney liner, just had a thin coating of creosote, about a quarts worth came down. Feelin' pretty good about it, and that was after burning some less than ideal wood at the end of last year. Enjoy that Hampton!
 
[quote author="stejus" date="1255632944"]Under the shelf would work. Let me know if you can see it with a flashlight. I may do this if you can see it ok.
Hi
I just did this.
Opened the door, placed the rutland just inside on the box, under the shelf. I did it backwards so I can see where the needle is easier.
I think it may work even without a flashlight. :)
 
nlittle said:
stejus said:
Under the shelf would work. Let me know if you can see it with a flashlight. I may do this if you can see it ok.

Edit - I forgot to mention. The cost to add the insulation after the liner was installed is minimal. It cost $350 for the time and material. In your case, it may be less because you already have the block off plate installed.

Cool thanks for the ballpark...how come you did the solid stuff and not the loose stuff...or maybe it is the same?

I used the loose stuff called EverGuard. It's like kitty litter and you wet it to mix it up. Then it pours like wet kitty litter down your chimney. It will harden once it dries off. My clay tile chimney was too tight (8x12) to insulate with the blanket around the liner.
 
FWIW, we got a 10" poured masonry liner, and then I ran the 6" ss liner down inside that. I've got a 25' external chimney, but I consider it "semi-insulated" because of the poured liner. I just cleaned out my liner yesterday, and I had just a little bit of creosote come down, maybe a quart, and that's with our frequent startups down here.....
 
stejus said:
Under the shelf would work. Let me know if you can see it with a flashlight. I may do this if you can see it ok.

I have a fire going right now and with a flashlight you can see the temps. I put it so the curve is forward, reading upside down. Seems to work OK.
Top down, first time, worked perfect!
 
nlittle - I moved my temp gauge onto the top of the stove and with 3 good size splits I'm getting 600 degrees. Much higher temp reading here than on top of the shelf. I have not loaded it up yet and I'm curious to see what the reading will be with a full load in a coal stage.
 
Status
Not open for further replies.