Preventing Unsightly Bulges

  • Active since 1995, Hearth.com is THE place on the internet for free information and advice about wood stoves, pellet stoves and other energy saving equipment.

    We strive to provide opinions, articles, discussions and history related to Hearth Products and in a more general sense, energy issues.

    We promote the EFFICIENT, RESPONSIBLE, CLEAN and SAFE use of all fuels, whether renewable or fossil.
Status
Not open for further replies.

WarmGuy

Minister of Fire
Jan 30, 2006
519
Far Northern Calif. Coast
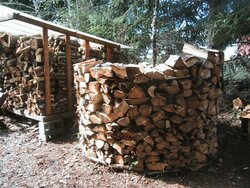
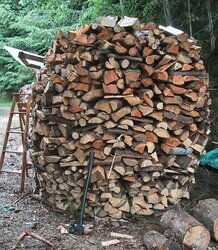
I'm starting on Holz #2, and I'd like to avoid bulges and collapses. With Holz #1, I started out with straight vertical walls, but these ended up bulging out and I had a collapse on one side.

So this time I'm thinking of having a continuous taper, starting right near the ground. Or perhaps I won't go as high. Other suggestions?
 

Attachments

  • HolzHausenMarch092007.jpg
    HolzHausenMarch092007.jpg
    102.5 KB · Views: 393
  • HolzHausenDone2.jpg
    HolzHausenDone2.jpg
    74.6 KB · Views: 411
I'm sure that those with more HH experience will pitch in, but I'd taper the whole thing, maybe 8"-12" over the entire height. Starting my first HH this week, would like to see the replies you get. How do you like the "Chopper 1" maul (if I remember the name correctly)? I used to have one, wish I still did. Those little wings only look dumb, they actually work! I looked them up last year, you can still get them, but they're like 70 bucks! I think we ordered ours from Mother Earth News in the early 80's for less than 30 dollars. Might just be the picture, but the second photo looks like there's a bulge on the right side? Personally, I'd occaisionally toss up the 4-foot level to see how I was doing along the way.
 
Yes, it's a Chopper, and I love it. Use it all the time.

Yes, that bulge on the right collapsed a few hours after the picture was taken, and the bulge on the left has gotten worse.
 
I made the same mistake as you. Tapering as you go up is the way to go. Also a good idea to have the splits leaning slightly in toward the middle. Good luck.
 
Todd said:
I made the same mistake as you. Tapering as you go up is the way to go. Also a good idea to have the splits leaning slightly in toward the middle. Good luck.

wouldn't that bring the rain water in towards the middle?
 
As long as the top is properly constructed, it will shed MOST of the water off the sides. I would imagine that some blowing in the sides will tend to run toward the core, but how much, and how much better/worse the effect is compared to a straight pile, I'm not sure of. A HH should have a "pointed" roof with bark-side-up splits to shed water.
 
but if the splits are down towards the middle that wouldn't require any wind for the water to run into the middle of the hh and that could slow down the drying process am i correct?
 
Todd said:
Also a good idea to have the splits leaning slightly in toward the middle. Good luck.

I've built four now and the only cave-in I had was when I backed into one with my lawn tractor. It really helps to taper, don't make it a cone but also not a cylinder. But as Todd notes above, by angling the pieces down from the perimeter of the HH as the wood dries the pile sort of quietly falls in on itself and becomes pretty stable. I took one HH down after it bulged because its top pieces were angled in the opposite direction and were sliding out from the center toward the edge of the heap.
 
Todd and Burn one have covered the basics. I'm no expert but will be working on my 6th HH soon. After I learned to taper the inner verticals on the 1st hh I haven't had any problems with bulge.
 
thinking about trying my first HH so i'm trying to get as much info as i can. when you guys say tapper the inside verticals do you mean the pieces in the center that are standing?
how much space do you have in the middle of the circle for the vertical splits?
and finally. what do you guys use under the splits for the circle? i can't see from the photos that have been put up.
 
I got 3 HH's so far, none have fallen. I stack 'em right on the ground. Don't make 'em too big to start. I'd say my center hole is about 18 inches across or so. I just start laying splits around, paying attention to how they are nesting together, putting wider end of log to the outside. When the splits start tilting to the outside I put a parallel split on the outer edge as shown in the pics of HH"s, but I try to keep this piece level with the ground. Toward the top I let em start to tilt out so rain and stuff can run off 'em. Anyway, my one HH I built, I just went around it a second time with another row of firewood and I estimate that one to hold about 2 cord.

You can take a mallet and pound the splits in to the center, you see, they start to move a bit as the wood dries out, and I just go around and pound 'em back in tight once, then it stays put after that.

Nice thing about the HHausen is one 8x10 tarp or 10x10 tarp covers 'em up real sweet, just tie the corners down tight to a log sticking out and that tarp'll stay put.
 
Status
Not open for further replies.