It all started two years ago when my wife and I bought our first house and wanted wood heat.
The house we bought had a nice setup but was in rough shape from the top down.

The previous owner had let a bunch of vines grow that covered the chimney all the way to the top. The bottom root was 2 inches thick. The vines kept the sun out and the moisture in. Unfortunately there was a lot of repointing work that needed to be done. The chimney was also pulling away from the house.

Next thing I wanted to check on was the Terracotta flue tiles. I propped a ladder up on the roof and took off the concrete rain cap. The 2" thick cap took little effort to chip off but a lot of effort to throw off the top. During the process of rocking the cap off I felt the whole chimney sway back and forth, pivoting at the roof line. This is where it was decided a rebuild was going to be necessary.
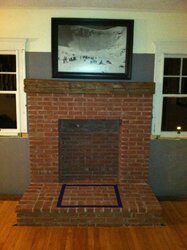
The inside wasn't much better. There were gaping holes in the firebox that were stuffed with backer rod. The bricks had seen extensive water damage and were covered with many layers of paint. The Lintel was also sagging and needed some help.


Sadly things got even worse the farther down we went. The marble tile was cracked and the concrete hearth was crumbling and falling through the forms that supported it underneath. Below that the framing had a header that wasn't supported properly, cracked floor joists and a support beam that was held up by temporary jacks.

My old man came by to help with the grunt work and together we got to work building from the ground up.
We cut open the basement slab, dug some holes, placed new footings and installed new lally columns.


Then we tackled the framing. First we reinforced the hearth forms with 3/4" plywood that was supported by a 2x6 pressure treated anchored into the foundation wall. The plywood also ran into a new double 2x10 header ripped to match the old lumber. We also sistered the floor joists on either side of the header with more ripped 2x10's. One more sistering job to the floor joist in the middle that was cracked and I'm now confident that the underside can support the new 700lb rock.

With the basement ready to roll the real fun begins upstairs. Look for part two coming soon.
The house we bought had a nice setup but was in rough shape from the top down.
The previous owner had let a bunch of vines grow that covered the chimney all the way to the top. The bottom root was 2 inches thick. The vines kept the sun out and the moisture in. Unfortunately there was a lot of repointing work that needed to be done. The chimney was also pulling away from the house.
Next thing I wanted to check on was the Terracotta flue tiles. I propped a ladder up on the roof and took off the concrete rain cap. The 2" thick cap took little effort to chip off but a lot of effort to throw off the top. During the process of rocking the cap off I felt the whole chimney sway back and forth, pivoting at the roof line. This is where it was decided a rebuild was going to be necessary.
The inside wasn't much better. There were gaping holes in the firebox that were stuffed with backer rod. The bricks had seen extensive water damage and were covered with many layers of paint. The Lintel was also sagging and needed some help.
Sadly things got even worse the farther down we went. The marble tile was cracked and the concrete hearth was crumbling and falling through the forms that supported it underneath. Below that the framing had a header that wasn't supported properly, cracked floor joists and a support beam that was held up by temporary jacks.
My old man came by to help with the grunt work and together we got to work building from the ground up.
We cut open the basement slab, dug some holes, placed new footings and installed new lally columns.
Then we tackled the framing. First we reinforced the hearth forms with 3/4" plywood that was supported by a 2x6 pressure treated anchored into the foundation wall. The plywood also ran into a new double 2x10 header ripped to match the old lumber. We also sistered the floor joists on either side of the header with more ripped 2x10's. One more sistering job to the floor joist in the middle that was cracked and I'm now confident that the underside can support the new 700lb rock.
With the basement ready to roll the real fun begins upstairs. Look for part two coming soon.
Last edited by a moderator:


")