Quadra Fire Castile 2004 project/input

  • Active since 1995, Hearth.com is THE place on the internet for free information and advice about wood stoves, pellet stoves and other energy saving equipment.

    We strive to provide opinions, articles, discussions and history related to Hearth Products and in a more general sense, energy issues.

    We promote the EFFICIENT, RESPONSIBLE, CLEAN and SAFE use of all fuels, whether renewable or fossil.
Status
Not open for further replies.
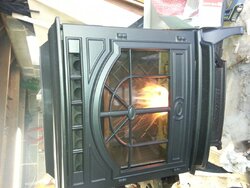
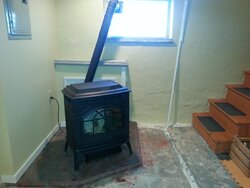
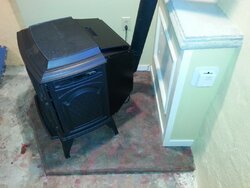
Could someone tell me a good web site I can finding the updated control box. I like cheap chit that works. This stove is nothing more then a supplement heater In the basement..
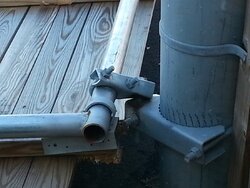
Should the exshaust fan be updated?
 
There out of stock. I was looking earlier today

Hi Burd,
I don't want this to come off sounding mean, but....

Welcome to the Wacky World of Pellet Stoves.

I still think you got a good buy at 500, considering new ones are selling at 3K. But repair parts can be shocking, and I always budget 300-500 for parts when I buy used. I walked from a lot of c-list stuff for that reason.

If you are willing to run this like an old-style Pellet Stove (on manual) then the continuous Combustion fan issue may not matter. Just make sure to "Verify by test" all the safety shutdown features (ie the ones that stop feeding the fuel).

Good luck. These things ain't simple like a wood stove.
 
Well today I pulled the trigger on the the new control box from Stove World should be here with in a couple of days.
?s Do I have to worry about the junction box not matching the control box?
Once I install the box should I fire it up wright away. Should I just plug it in and make sure the convection blower turn off before I fire it up?
I don 't want to screw up the control box so any Info before I install it would be appreciated
 
It should be 'plug and play' compatible, Burd. Make sure your stove is unplugged before you install the new box. I assume you still have your thermostat jumpered? I would un-jumper the t-stat to check if the combustion fan comes on when you plug the stove back in, then see if the fan cycles off after a few minutes, which should tell you that your previous fan problem was indeed control box related. Assuming your combustion fan cycles off, unplug the stove again. Put the stove heat adjustment switch on high and make sure your thermo-couple sensor is fully seated in the ceramic cover and protruding out straight over the fire pot by about an inch or so.

If the hopper / auger chute is empty put a handful of pellets in the fire pot before you fire it up, which should give you a long enough fuel burn to get the auger to refill and start dropping pellets without having to keep hitting the reset button. If your hopper and auger chute are full you should just have to jumper the t-stat, then plug the stove back in again and see if it goes through the full cycle from call-for-heat light coming on and combustion fan start-up to pellet ignition. The control box should have a green light come on once your thermo-couple senses pellet ignition, then the green light will turn to red when the fire pot gets to 200 degrees and the auger should start the normal pellet feed. The convection fan should kick in after 10 - 15 mins when the fire pot gets to 600 degrees. Check for normal flame height and color (4 - 6" above the burn pot and brisk / yellow-white colored flame), and you should be good to go !!!

Let us know what happens.
 
I'll keep you up-to-date....I'm keeping my fingers crossed.
 
Well the new box came in today. Combustion fan didn't shut down once I powered it up.
I waited 15min? Fan seems to be running slow. I fired the stove up box is on setting 4 on the high. Things looked great until I switched it to low. It basically went out. I then pulled the thermostat jumper to shut it down. Everything worked even the combustion fan shut down. I then pulled the box and put t it on setting 5. I had a better burn in the pot and on low it stayed light.
So why won't the fan shut down on power up.
 
Anyone have any a clue why it won't shut down on power up
 
Anyone have any a clue why it won't shut down on power up

Maybe you didn't wait long enough. It is by time and controlled by the controller. The trigger is appearance of power to the controller so anything that causes power to be removed and then applied would act as a reset for the timer.

The issue you had when going from high to low burn is because you likely didn't set your flame height properly when in high burn which is the only place where it can be properly set.
 
Anyone have any a clue why it won't shut down on power up
Burd,

I just timed my combustion fan cycle and it was 18 mins before it turned off, so as Smokey said you may need to wait longer,
 
Maybe you didn't wait long enough. It is by time and controlled by the controller. The trigger is appearance of power to the controller so anything that causes power to be removed and then applied would act as a reset for the timer.

The issue you had when going from high to low burn is because you likely didn't set your flame height properly when in high burn which is the only place where it can be properly set.

Smokey
Thanks for getting back to me. Your stating that you can ajust the flame? Do I set the flame through the control box.
If so can you move the controler settings with the power on? as of now I'm on setting 5.(10%)
(I hope that Im not missing something). Is there any other way to ajust the flame? I really wont know if this is the proper setting intill I really start burning once I install it in the basement.
 
Burd,

I just timed my combustion fan cycle and it was 18 mins before it turned off, so as Smokey said you may need to wait longer,


Burd,

I just timed my combustion fan cycle and it was 18 mins before it turned off, so as Smokey said you may need to wait longer,
 
Last edited:
what can I say most likely I was a little impatient. I really wanted to fire the stove up to make sure things are working. As of now everything is working including the vacuum.
I'll go ahead and test the cycle when I get home from work..II honestly feel that the stove project is complete it really is a nice looking stove..I only invested $700 and a little bit of time.
Now it's time to remodel the basement and find a nice home for the stove..I'll make sure I post pictures..
thank you for all the wonderful knowledge
 

Attachments

  • 20140508_170533.jpg
    20140508_170533.jpg
    204.6 KB · Views: 164
Smokey
Thanks for getting back to me. Your stating that you can ajust the flame? Do I set the flame through the control box.
If so can you move the controler settings with the power on? as of now I'm on setting 5.(10%)
(I hope that Im not missing something). Is there any other way to ajust the flame? I really wont know if this is the proper setting intill I really start burning once I install it in the basement.

The flame adjustment is set by increasing or decreasing the pellet feed rate. There is a flat plate inside the hopper that has a screw and an adjustable slider plate you can open or close to adjust the pellet feed. The longer the avg length of pellet you're burning the more open that plate needs to be to prevent pellet 'bridging' at the bottom of the auger. I tinker with mine regularly to get the fuel / air mixture right.

For cold spells I often open it 'WAO' (wide azz open) to increase the pellet feed rate, and thus more heat output. To compensate for the increase in pellet feed I partially restrict the door air wash, which is on the top edge of my door, with a section of fiberglass stove gasket rope. This pulls more air through the fire pot and gives me a lower flame but hotter and more intense pellet burn. I get more loose fly ash blowing out of the firepot, which keeps ash clinkers from building up in the bottom of the pot, but it does increase the amt of fly ash that builds up in the back corners of the fire box and on the glass, but for me the increased heat output is worth the bit of extra cleaning. As always, "your results may vary", but you can try it on your Castile and see how it works. Good effort sticking with it - you got a great deal on that stove !!!
 
Last edited by a moderator:
  • Like
Reactions: SmokeyTheBear
The flame adjustment is set by increasing or decreasing the pellet feed rate. There is a flat plate inside the hopper that has a screw and an adjustable slider plate you can open or close to adjust the pellet feed. The longer the avg length of pellet you're burning the more open that plate needs to be to prevent pellet 'bridging' at the bottom of the auger. I tinker with mine regularly to get the fuel / air mixture right.

For cold spells I often open it 'WAO' (wide azz open) to increase the pellet feed rate, and thus more heat output. To compensate for the increase in pellet feed I partially restrict the door air wash, which is on the top edge of my door, with a section of fiberglass stove gasket rope. This pulls more air through the fire pot and gives me a lower flame but hotter and more intense pellet burn. I get more loose fly ash blowing out of the firepot, which keeps ash clinkers from building up in the bottom of the pot, but it does increase the amt of fly ash that builds up in the back corners of the fire box and on the glass, but for me the increased heat output is worth the bit of extra cleaning. As always, "your results may vary", but you can try it on your Castile and see how it works. Good effort sticking with it - you got a great deal on that stove !!![/quote]
 
Last edited by a moderator:
Sorry about the post.
Well the controller is working I didn't exactly time It after power up. I had to cut the grass..

My feed rate is wide opens and it's a little stiff from sitting I'll have to take it apart and clean it up.
What kind of temperature change do you get when you play with the air wash can you get it up to 100 degrees difference. Will this slow down the exhaust fan?
Once I get the stove installed in the basement I'll have a chance to play with the feed rate/pellets.
 
I don't have an IR thermometer to definitively measure it, but several Quad modifications designed and championed by tj and B-mod on this message board have significantly increased my Castile's heat output. https://www.hearth.com/talk/threads/quadrafire-castile-experiment.58216/

Even in my drafty circa 1870's New England farmhouse with no wall insulation, I can keep the downstairs and upstairs bedrooms in the low to mid 70's for room temps on the medium heat setting. I typically only need to run it on high when it is below zero and / or windy out.

Between covering the air wash, wiring the convection blower to run on high at all the temp settings, replacing the #2 snap disc with one that has a lower set temp, and putting springs in the heat exchanger tubes to modify the convection blowers laminar air flow to increase the heat transfer, I have gotten more heat for the same or less amount of pellets in each of the last 3 burn seasons.

As anecdotal proof, I burned the same # of bags of 100% softwood pellets this past winter as I did the season prior, despite a 20% increase in heating days in our region, where most folks burned 1-2 tons more than the prior burn season. I was certainly more attentive to regular stove cleaning, that no doubt improved my heat output as well.

I get a change in the airflow sound when my air wash is closed off - it makes more of a blow torch type sound, but it doesn't seem to slow the exhaust fan down. I'm at the upper end of my EVL w/ my venting system so this seems to help my stove 'breath' better besides burning hotter. In the first season I burned pellets the convection fan would regularly cycle on and off as the firebox temperature would rise and fall, but now it runs continuously, so it is definitely burning more efficiently.
 
Burd the flame height adjustment is talked about in the manual.

I forget the page number but you should have that manual and at the risk of being scolded by Brother Bart again I always recommend reading the fine manuals.

Sorry I didn't get back to you sooner but I don't spend much time online these days. Been playing with a number of new toys and getting my audio, photographic, and video media collection servable from my computer system (one of the new toys). Lots of files, very little time, and now outside lawn and garden work to do.
 
Sorry for the delay. In the last couple of weeks I install the Castile in the basement.
I only had one spot in the basement where the stove would be the most efficient...I know you guy love pictures...
20141004_165518.jpg 20141004_165534.jpg
 

Attachments

  • 20141004_165600.jpg
    20141004_165600.jpg
    149.7 KB · Views: 122
As you can see this isn't going to be easy.
I ended up removing the window and replacing it with glass block..
The concrete pad was stained and sealed. The water line was moved lower with a home made
access panel
 

Attachments

  • 20141022_195328.jpg
    20141022_195328.jpg
    163.9 KB · Views: 146
  • 20141027_094203.jpg
    20141027_094203.jpg
    168.6 KB · Views: 148
  • 20141022_195418.jpg
    20141022_195418.jpg
    124 KB · Views: 123
  • 20141022_195425.jpg
    20141022_195425.jpg
    193 KB · Views: 140
  • 20141022_200604.jpg
    20141022_200604.jpg
    172.4 KB · Views: 147
  • 20141022_195328.jpg
    20141022_195328.jpg
    163.9 KB · Views: 129
  • 20141022_195425.jpg
    20141022_195425.jpg
    193 KB · Views: 132
  • 20141022_195418.jpg
    20141022_195418.jpg
    124 KB · Views: 138
  • 20141022_200604.jpg
    20141022_200604.jpg
    172.4 KB · Views: 131
This project was a lot of work but we'll worth the effort.. I know that the exhaust pipe is on an angle I couldn't jeopardize the structure of the foundation with the window being so close..
please take note where I have the thermostat
 

Attachments

  • 20141026_142753.jpg
    20141026_142753.jpg
    118.3 KB · Views: 184
  • 20141026_142742.jpg
    20141026_142742.jpg
    158.3 KB · Views: 143
  • 20141026_142721.jpg
    20141026_142721.jpg
    175.2 KB · Views: 132
  • 20141026_142709.jpg
    20141026_142709.jpg
    124.6 KB · Views: 142
The thermostat is way too close IMHO.
Great idea on the glass block window! I would never have thought of that! I also like the way you tidied up the water line. Well done!
 
This project was a lot of work but we'll worth the effort.. I know that the exhaust pipe is on an angle I couldn't jeopardize the structure of the foundation with the window being so close..
please take note where I have the thermostat

See the Private Message I sent you, Burd.
 
Status
Not open for further replies.