
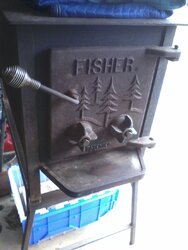
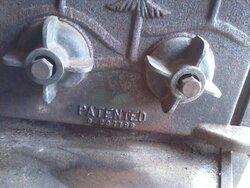
I am new to the forum and have learned a lot already. I just bought a fisher Mama Bear and have a question about the draft caps. The stove is in pretty good shape but the draft caps are froze up tight. They are the 4 fin ez spin caps. From what I have read the bolt is double nutted on each side of the door and the cap just turns on the bolt. Is the door also threaded and are there any tricks to get the cap to turn freely on the bolt? Thanks
Question about Fisher daft caps
- Thread starter weed
- Start date
-
Active since 1995, Hearth.com is THE place on the internet for free information and advice about wood stoves, pellet stoves and other energy saving equipment.
We strive to provide opinions, articles, discussions and history related to Hearth Products and in a more general sense, energy issues.
We promote the EFFICIENT, RESPONSIBLE, CLEAN and SAFE use of all fuels, whether renewable or fossil.
You are using an out of date browser. It may not display this or other websites correctly.
You should upgrade or use an alternative browser.
You should upgrade or use an alternative browser.
- Status
- Not open for further replies.
The door is threaded as well. I like PB Blaster - but many penetrating fluids will work. Open the door and spray through the intake hole in door to soak the threads behind the draft cap. Spray in the recess on the front of the cap to try to get under bolt head. Soaking over time from both sides should help loosen it. Some draft caps are threaded aluminum and some will have a steel insert like a nut cast into the cap. The aluminum against steel is the worst to loosen and can corrode to the bolt. Avoid pliers or pipe wrences since the caps are quite soft.
Are the draft caps closed tightly against the door or open slightly? If against the door soak the perimeter of the cap where it contacts the door as well. Tapping on a block of wood between cap and hammer makes movement to get the penetrant in as well. Take your time and don't rush the penetrant. It took a long time to seize and will take time to soak. A hair dryer or heat gun on the cap will expand it and keeping it wet with penetrant should work it's way in. If the bolt is rusty, I'd remove it from door to buff the threads once apart. When installing it's nice to close cap against door and adjust bolt head sticking out enough to get a wrench on it. If recessed you may need to grind down an old socket to get it into the recess of the cap.
In the case you damage the cap or the threads are corroded and loose when done, the original molds are at Barr Casting in Portland OR. and the foundry now has a web store for new 4 fin cast caps in aluminum, brass or bronze with or without steel inserts. $31.96 is the price for a set of 2 aluminum 4 fin with inserts. 5 fin are available in Yellow brass or Bronze. They used to cast what you needed, so they may have some 5 fin aluminum.
http://barr.enstore.com/browse/knob/1?sort=name
The original nut behind the cap against door should be a half nut. Not sure if that's what they send, so it's good to save and use those. That assures the draft cap will close fully and not hit a full size thick nut.
When done keep silver anti seize or high temp grease on bolt threads by reaching through air intake hole to brush on threads.
Another trick expanding parts on doors is steam. It's easy if you're around a boiler and have it handy, otherwise remove door and bring a tea kettle to a boil. Hold door with gloves over steam and heat the part you want to expand. Amazing how much expansion from the temperature rise from live steam. This protects aluminum or other soft metals unlike a torch but applies even heat. To remove the inside nut you can take door outside to cool and put a deep well 6 point socket in hot water on an extension. Doesn't have to be boiling. Pull the hot socket from the water and put on the nut to be expanded. The hot socket transmits the heat evenly to the nut only where you need it. You may have to reheat the socket, but keeping steady pressure while it heats the nut usually breaks things loose. Once it starts moving KEEP IT MOVING. This creates the heat with friction to keep expanded and if left cool becomes even tighter.
Thanks that is what have been doing just letting it soak. Can I use a butane torch to heat the cap? The stove has been near the ocean since it was new. Thanks
A couple of days with penetrating oil and they both came free. Now how do I remove the penetrating oil so it doesn't mess up the paint? Thanks
The stove still needs to be cleaned up and painted. Do I just clean it up with mineral spirits and paint after is has dried? The penetrating oil has worked it's way about half way up the door.
Mineral spirits is used for cleaning good paint. It doesn't harm cured paint.
If there is any rust on the door, wet with kerosene or PB Blaster and buff with wire wheel. Buffing it with the wheel wet reduces dust and floats debris out of crevasses and ornate work. Wipe with spirits until clean.
Clean with lacquer thinner before paint.
If there is any rust on the door, wet with kerosene or PB Blaster and buff with wire wheel. Buffing it with the wheel wet reduces dust and floats debris out of crevasses and ornate work. Wipe with spirits until clean.
Clean with lacquer thinner before paint.
Mineral spirits is used for cleaning good paint. It doesn't harm cured paint.
If there is any rust on the door, wet with kerosene or PB Blaster and buff with wire wheel. Buffing it with the wheel wet reduces dust and floats debris out of crevasses and ornate work. Wipe with spirits until clean.
Clean with lacquer thinner before paint.
Once cleaned with lacquer thinner, does the steel stove and cast iron door need to be primed before painting, or can it be directly painted with high temperature paint?
No primer necessary for indoor applications.
See question 12 here;
http://forrestpaint.com/stove-bright/faqs-stove-bright-consumer-products/
See question 12 here;
http://forrestpaint.com/stove-bright/faqs-stove-bright-consumer-products/
No primer necessary for indoor applications.
See question 12 here;
http://forrestpaint.com/stove-bright/faqs-stove-bright-consumer-products/
Thanks Coaly for the info.
I was wondering if you could help me ID the year of my Papa Bear I'll be painting.
I think I'll be going with kerosene and a wire wheel brush to knock off the rust, clean with lacquer thinner, and perhaps hit it with acetone right before painting. I'll add a damper shelf inside using firebricks and a steel plate once installed (stove vents out the back). Thanks for all the info. you've provided on the forum.
Here's the details of my Papa Bear.
-Purchased in GA
-Guy I bought it from saved it from a salvage yard a few years ago...it had the bear claw feet too! He sold the feet on Ebay and that paid for the stove twice over!
-He's been using it to heat his workshop
-I think it's 1977 or older due to the following:
-4 fin draft knobs (appear to be cast aluminum, "EZ SPIN" is cast on the inside of the knobs)
-Straight handle on door with tight chromed spring
-No heat shield welded to bottom or back of stove
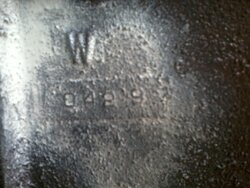
The top left of the inside of the door has the letter and numbers cast; W0429
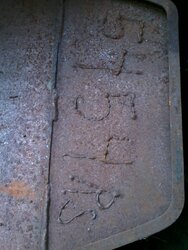
Bottom of ash shelf has the following numbers and letters welded to the bottom; 5454RS
Pictures below.
Thanks for your help!
Attachments
Last edited:
Your right, 77 or before. The RS is the initials of the worker who cut the vent, hung the door and added stove number.
There may be a second set of initials under the box. Boxes were made all summer and vented / numbered later as needed.
Is the weld around the vent on the inside or outside?
There may be a second set of initials under the box. Boxes were made all summer and vented / numbered later as needed.
Is the weld around the vent on the inside or outside?
Your right, 77 or before. The RS is the initials of the worker who cut the vent, hung the door and added stove number.
There may be a second set of initials under the box. Boxes were made all summer and vented / numbered later as needed.
Is the weld around the vent on the inside or outside?
Did not see a second set of initials under the box...I'm assuming the "5454" is the stove box number of that particular manufacturer...
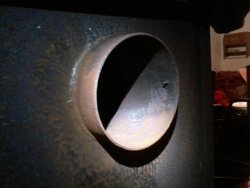
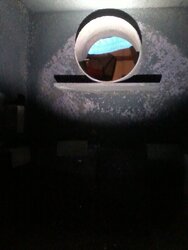
I've enclosed pictures of the vent, inside and out.
The outside has a full weld all around.
It appears there's a bit of a weld around the inside of the vent just above the plate welded below the opening.
This plate is right up against the bottom of the pipe opening, so when I add the baffle shelf, I guess I'll need to put the steel plate for the baffle shelf UNDER the plate that's there, and then stack firebricks if necessary in the back AND sides to get the right angle and opening at the top. Is that correct?
Finally, I wonder if there any resource that could determine when the door was cast since it has the "W 0429" number cast into it? This may help date it. Any ideas of where it could have been manufactured? I think they had a fabricator in GA at one point.
Thanks again for all your help and expertise!
Attachments
Last edited:
Yes, the boxes were made all summer and as they needed them vented certain ways or different doors, the welder that hung the doors and vented it initialed and numbered the stove under the ash fender. Normally the builder of the box initialed the bottom of box.
Fisher Stoves S.E. Watkinsville GA.; Carl Baughman, the license holder hired this "kid" that ended up marrying his step daughter. They are the owners today and operate a Hearth Home and Patio business in the same building. Search posts by CamFan and you will find the picture of the first stove seriel #1 made there and the special built "Great Grandma" he made to trade for it to get it back.
Here's a good idea of what making stoves as fast as possible was all about;
https://www.hearth.com/talk/threads/i-need-some-measurements-prints-for-papa-bear-stove.105118/
He's not on here much with the cold weather down there. Rumor has it he needs a bigger truck !")


Fisher Stoves S.E. Watkinsville GA.; Carl Baughman, the license holder hired this "kid" that ended up marrying his step daughter. They are the owners today and operate a Hearth Home and Patio business in the same building. Search posts by CamFan and you will find the picture of the first stove seriel #1 made there and the special built "Great Grandma" he made to trade for it to get it back.
Here's a good idea of what making stoves as fast as possible was all about;
https://www.hearth.com/talk/threads/i-need-some-measurements-prints-for-papa-bear-stove.105118/
He's not on here much with the cold weather down there. Rumor has it he needs a bigger truck !
Yes, the boxes were made all summer and as they needed them vented certain ways or different doors, the welder that hung the doors and vented it initialed and numbered the stove under the ash fender. Normally the builder of the box initialed the bottom of box.
Fisher Stoves S.E. Watkinsville GA.; Carl Baughman, the license holder hired this "kid" that ended up marrying his step daughter. They are the owners today and operate a Hearth Home and Patio business in the same building. Search posts by CamFan and you will find the picture of the first stove seriel #1 made there and the special built "Great Grandma" he made to trade for it to get it back.
Here's a good idea of what making stoves as fast as possible was all about;
https://www.hearth.com/talk/threads/i-need-some-measurements-prints-for-papa-bear-stove.105118/
OK thanks Coaly, great info...maybe my Papa Bear never traveled too far from home...
")
I'm a history buff, and the Fisher story is fascinating.
Thanks for the links you have provided.
Thanks also for any resources you could point me to further research the date of manufacture of my Papa Bear, it is much appreciated!
As far as the doors, I haven't been able to put much together from foundry markings since there were so many foundries with so many molds. In the early days they were all from Oregon. Then they were shipped from many states with no way to tell which foundries supplied which fabricators. The doors were guarded more than other parts so they didn't end up on any non-authentic "Fisher Stoves".
There was a pile of paperwork in Bob's basement that could tell quite a story. We've lost Carol by the way as well. She was diagnosed with cancer not long after Bob's diagnosis. I'll add it to Bob's obituary thread when there are details or links. I got it directly from the family.
There was a pile of paperwork in Bob's basement that could tell quite a story. We've lost Carol by the way as well. She was diagnosed with cancer not long after Bob's diagnosis. I'll add it to Bob's obituary thread when there are details or links. I got it directly from the family.
- Status
- Not open for further replies.
Similar threads
- Replies
- 1
- Views
- 812
- Replies
- 5
- Views
- 782
- Replies
- 13
- Views
- 3K