Question on DIY Hearth Pad and Carpet

  • Active since 1995, Hearth.com is THE place on the internet for free information and advice about wood stoves, pellet stoves and other energy saving equipment.

    We strive to provide opinions, articles, discussions and history related to Hearth Products and in a more general sense, energy issues.

    We promote the EFFICIENT, RESPONSIBLE, CLEAN and SAFE use of all fuels, whether renewable or fossil.
Status
Not open for further replies.

TheGeneralLee

Member
Oct 21, 2013
33
North East
Hello, I'm a long-time reader and first-time poster here, thanks for the solid advice over the years.

I'm currently installing a Harman P43 in my home and will be building a hearth. The ideal location for the stove in my home happens to be in a carpeted room and I would like to place the hearth on top of the carpet rather than cut the carpet to avoid any headaches with wrinkles.

I plan to take a 1" sheet of plywood, cut it in half and stack it, then glue/screw the two pieces together. On top of this, I'm going to screw 2 layers of 1/2" HardieBacker, then cement 12" x 12" tiles on top. I realize doubling the plywood may be overkill but because this is going on top of a fairly soft carpet, I want to hearth to be extra strong to prevent cracking when the stove is installed.

My question is: do I also need to screw the plywood down to the floor, or will it be ok "floating" on the carpet with stove on top? Again, my main concern is cracking the tiles or having an unsteady stove. I'd like to build the hearth in the garage first and then float it on the carpet, the whole project would be easier that way, but I'm wondering if I need to first screw the plywood down in place, then finish the build where it sits.

Any advice is much appreciated. Thank you!
 
Both of mine are right on top of the carpet, not screwed down, and I have no problems at all. It sounds like you are making it properly, so there should not be any problems with heat getting to the floor. I figure if I ever replace the carpet, I will just cut it out around the hearth.
 
Hello, I'm a long-time reader and first-time poster here, thanks for the solid advice over the years.

I'm currently installing a Harman P43 in my home and will be building a hearth. The ideal location for the stove in my home happens to be in a carpeted room and I would like to place the hearth on top of the carpet rather than cut the carpet to avoid any headaches with wrinkles.

I plan to take a 1" sheet of plywood, cut it in half and stack it, then glue/screw the two pieces together. On top of this, I'm going to screw 2 layers of 1/2" HardieBacker, then cement 12" x 12" tiles on top. I realize doubling the plywood may be overkill but because this is going on top of a fairly soft carpet, I want to hearth to be extra strong to prevent cracking when the stove is installed.

My question is: do I also need to screw the plywood down to the floor, or will it be ok "floating" on the carpet with stove on top? Again, my main concern is cracking the tiles or having an unsteady stove. I'd like to build the hearth in the garage first and then float it on the carpet, the whole project would be easier that way, but I'm wondering if I need to first screw the plywood down in place, then finish the build where it sits.

Any advice is much appreciated. Thank you!

You should be fine with your "floating" design... Most store-bought hearthpads so not require fastening to the flooring. As heavy as you're building it, I sincerely doubt you will get ANY flex or cracking. Assemble it & set it in place. It'll be heavy & the p43 will add to the weight. It's not going ANYWHERE.
 
I've seen several posts by people who intentionally mounted carpet to the bottom of their hearth pads in order to make it easier to move the stove around on a hard floor for maintenance. So I also think you'll be fine.
You might want to consider having a nice smooth surface on the bottom of your plywood base to make it easier to slide on your carpet. Maybe some formica, paneling, or just a good coat of paint.
 
You're design is gonna be STOUT. If you lay the tile correctly, I highly doubt it's gonna crack. I used 1" felt pads along the front and rear "legs" of my stoves. Depending on what tile you choose, it should slide like butta.
 
Thank you all for the helpful replies! Good point about making the bottom slippery and I like the felt pad idea for the stove legs.

I have one other question: After I get my plywood cut and ready, how should I adhere the HardieBoard to that? Are screws alone enough? Also, since I'm doing 2 layers of HardieBoard, can I lay each cement board on top of each other and only use screws, or is a glue or cement required between them?
 
Screws are all that is required to attach Hardi Board, just use the ones meant for that. Why the 2 layers of Hardi-Board? One would be plenty.
 
Screws are all that is required to attach Hardi Board, just use the ones meant for that. Why the 2 layers of Hardi-Board? One would be plenty.

Sounds good. I want to do 2 layers mainly for the added strength, and having a little extra R value is a bonus too.

Thanks again for all the feedback so far. I'm stretched on time but hope to get to this project in the next couple weeks and will post pictures after it's done.
 
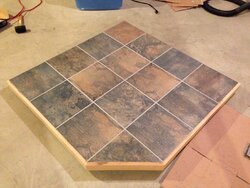
Ok, other than cleaning some of the mud off the oak trim and staining it, the hearth pad is done! I did end up using one layer of Hardie Board instead of two because the hearth was was getting heavy really fast.

What I'd like to do know is run tile (or maybe stone veneer) up the wall about 5 feet behind the stove. I plan to attach Hardie Board to the drywall but I'm a little confused because Hardie Board says to place screws every 8 inches, but my wall studs are 16 on center. Am I ok screwing the Hardie every 16 inches instead?
 

Attachments

  • photo.JPG
    photo.JPG
    245.7 KB · Views: 10,270
  • Like
Reactions: hinkle
Yes. That is all you can do on a wall.
 
Nice lookin work General!!! Happy burning.

Burn Baby Burn:cool::cool:
 
Liquid nail the hardi to the wall and screw it in or you can use galvanized roofing nails. What thickness hardi are you putting on the wall?
 
Status
Not open for further replies.