Hello, I've been a lurker on here for a while doing some research and finally bit the bullet and got me a Hampton HI200. I apologize in advance if this post makes little sense as this install has completely wiped me out. ") I attempted to install today and ran into a few issues. First of all, my chimney has a 8" x 18" (outside dimension) terracotta flue. I had a chimney sweep come by and inspect it, he told me I would need an ovalized liner. The fireplace shop said it will be tight but should be fine. Well, we tried, and tried and tried, but were not able to get it in. It took a bit of a beating, but seemed to still be ok...somewhat banged up and dented, but no holes or cuts. We wound up ovalizing it ourselves. We layed it on the sidewalk and gently pushed down on it with a piece of wood, moving along about 3 inches at a time. It wound up looking more like a D than an oval. We were able to drop it down with no problems. I was able to bend the end at the stove into a good enough circle to fit into the connection between the flex and the flue adapter. The instructions that came with the liner are pretty much useless so I'm hoping I'm hooking this up right. One end of this connector has a groove that sandwiches the pipe you put in it...this is where I inserted the flex. The other end fits snugly into the flue adapter that came with the stove. Does this sound right? The instructions say to screw in screws at the flex and flue adapter. I attempted to screw in the small screws that came with it in at the flue adapter, but that wasn't working. Then I tried to drill a hole for them, the metal is pretty tough stainless and drilling isn't going to be easy unless I take it completely out. Are these screws necessary? It seems like everything is pretty well connected. Will the "ovalizing" we did cause any issues? Thank you for any advice you may have. This forum has been a great resource!
I attempted to install today and ran into a few issues. First of all, my chimney has a 8" x 18" (outside dimension) terracotta flue. I had a chimney sweep come by and inspect it, he told me I would need an ovalized liner. The fireplace shop said it will be tight but should be fine. Well, we tried, and tried and tried, but were not able to get it in. It took a bit of a beating, but seemed to still be ok...somewhat banged up and dented, but no holes or cuts. We wound up ovalizing it ourselves. We layed it on the sidewalk and gently pushed down on it with a piece of wood, moving along about 3 inches at a time. It wound up looking more like a D than an oval. We were able to drop it down with no problems. I was able to bend the end at the stove into a good enough circle to fit into the connection between the flex and the flue adapter. The instructions that came with the liner are pretty much useless so I'm hoping I'm hooking this up right. One end of this connector has a groove that sandwiches the pipe you put in it...this is where I inserted the flex. The other end fits snugly into the flue adapter that came with the stove. Does this sound right? The instructions say to screw in screws at the flex and flue adapter. I attempted to screw in the small screws that came with it in at the flue adapter, but that wasn't working. Then I tried to drill a hole for them, the metal is pretty tough stainless and drilling isn't going to be easy unless I take it completely out. Are these screws necessary? It seems like everything is pretty well connected. Will the "ovalizing" we did cause any issues? Thank you for any advice you may have. This forum has been a great resource!
I attempted to install today and ran into a few issues. First of all, my chimney has a 8" x 18" (outside dimension) terracotta flue. I had a chimney sweep come by and inspect it, he told me I would need an ovalized liner. The fireplace shop said it will be tight but should be fine. Well, we tried, and tried and tried, but were not able to get it in. It took a bit of a beating, but seemed to still be ok...somewhat banged up and dented, but no holes or cuts. We wound up ovalizing it ourselves. We layed it on the sidewalk and gently pushed down on it with a piece of wood, moving along about 3 inches at a time. It wound up looking more like a D than an oval. We were able to drop it down with no problems. I was able to bend the end at the stove into a good enough circle to fit into the connection between the flex and the flue adapter. The instructions that came with the liner are pretty much useless so I'm hoping I'm hooking this up right. One end of this connector has a groove that sandwiches the pipe you put in it...this is where I inserted the flex. The other end fits snugly into the flue adapter that came with the stove. Does this sound right? The instructions say to screw in screws at the flex and flue adapter. I attempted to screw in the small screws that came with it in at the flue adapter, but that wasn't working. Then I tried to drill a hole for them, the metal is pretty tough stainless and drilling isn't going to be easy unless I take it completely out. Are these screws necessary? It seems like everything is pretty well connected. Will the "ovalizing" we did cause any issues? Thank you for any advice you may have. This forum has been a great resource! First of all, my chimney has a 8" x 18" (outside dimension) terracotta flue. I had a chimney sweep come by and inspect it, he told me I would need an ovalized liner.
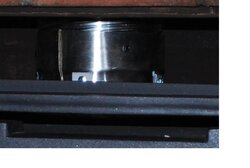