
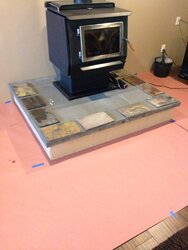
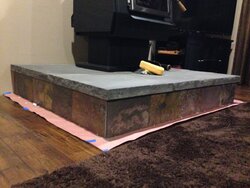
So I rebuilt my raised hearth over the summer. I went up several more inches and placed thick hearthstones on top but since I hadn't installed a floor finish yet I put off finishing the "skirt" of the raised hearth. In my case it is a 7.5" rise from top of the floating floor to the bottom of the overhanging hearthstones.
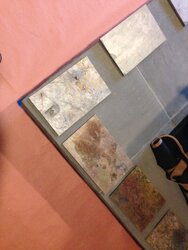
I attached the 1/4" hardibacker which I had never used before and by the way that stuff is a pain to cut. Then I decided on real slate for the tile with no grout so a dry stacked look. Home depot sells slate for 1.48$ per SF but it is really irregular and not gauged on any side. Some pieces were only 1/8" thick. Lowes had some really nice slate, gauged on one side (machined flatish) for the same 1.48$ per foot so I got that.
Only 10% of the tiles were broken on arrival. The colors were "wild" IMO compared to regular plain black slate but the opalescent reds/yellows/green/blue/gray were also pretty consistent and the product was relatively nice so I used it.
Back buttered each tile and pressed on. It overhangs the floating floor so no baseboards. I borrowed a huge wet saw for the cutting which was very nice and fast.
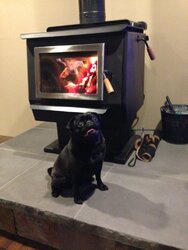
Now the wife wants the wall behind the stove tiled with this stuff. ugh.
I attached the 1/4" hardibacker which I had never used before and by the way that stuff is a pain to cut. Then I decided on real slate for the tile with no grout so a dry stacked look. Home depot sells slate for 1.48$ per SF but it is really irregular and not gauged on any side. Some pieces were only 1/8" thick. Lowes had some really nice slate, gauged on one side (machined flatish) for the same 1.48$ per foot so I got that.
Only 10% of the tiles were broken on arrival. The colors were "wild" IMO compared to regular plain black slate but the opalescent reds/yellows/green/blue/gray were also pretty consistent and the product was relatively nice so I used it.
Back buttered each tile and pressed on. It overhangs the floating floor so no baseboards. I borrowed a huge wet saw for the cutting which was very nice and fast.
Now the wife wants the wall behind the stove tiled with this stuff. ugh.


")