Rebuilding a cast iron stove

  • Active since 1995, Hearth.com is THE place on the internet for free information and advice about wood stoves, pellet stoves and other energy saving equipment.

    We strive to provide opinions, articles, discussions and history related to Hearth Products and in a more general sense, energy issues.

    We promote the EFFICIENT, RESPONSIBLE, CLEAN and SAFE use of all fuels, whether renewable or fossil.
Status
Not open for further replies.
E

elkimmeg

Guest
Well I'm in the process of changing the top of my Resolute Acclaim. IS there any interest of how to dissessemble a stove to be rebuilt
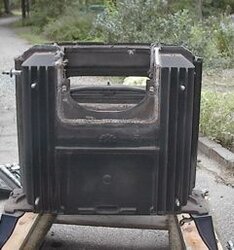
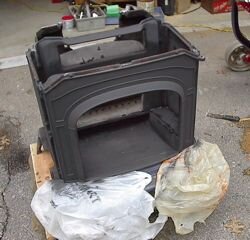
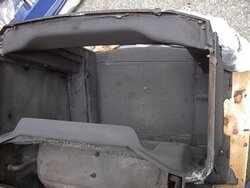
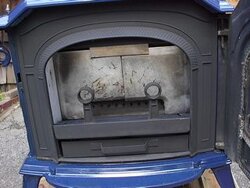
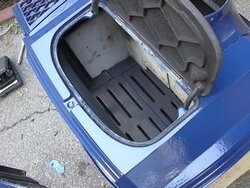
I will take pictures as I go. Already to pop the top off. By the time I done, everything is acessiable. I am going to refactory all seams again. I got to run out to the hardware store to get some stove cement, but will be back to check if any interest? I will grab the digital camera. Ever wonder what it looks like behind the cermanic plates?

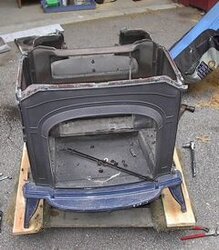
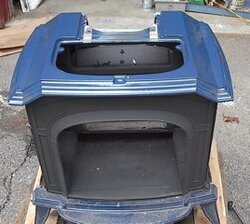
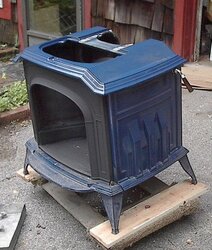
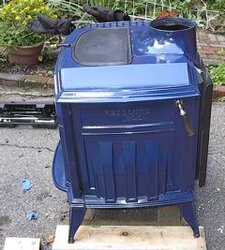
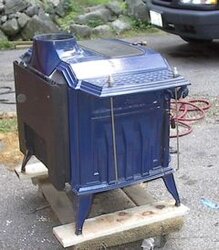
Another issue is how easy it is to bolt off many heavy items, that reduces the weight of the stove. IT can be re-essembled once in place. On the Resolute Acclaim,it is easy to lighten it up enough to take 150 to 200 lbs off and only have to deal with 200 remaining lbs. Start to finish only one more hour of extra work to remove and re-install the parts. We are talking about not breaking any original factory seals to reduce the weight
 
I am interested tho i dont have that style stove. I'm sure there are a lot of "visitors" that come and go that dont post or sign up that can use the information and also any extra input / short cuts and or good points of interest to do a job like this . Fire away Elk . Be the teacher. This would be great input to the forum .
 
Definately interested in seeing it here Elk. Sounds like just what the WIKI was designed for.
 
pictures in progress

First photo rear of the resolute acclain with all cermanic blue pannels off thr top removed and the flue collar

Second photo is the front view with top off door removed as well as the sides

Third photo is the crappy top the reason for all the work. I'm replacing it with a new non chipped top.
I am getting this stove ready to sell. This Resolute Acclaim is the Stove the Encore replaced.
Now that I have a clear shot at all joints, I am going to refactory all of them again. Already vac and blew it out with compressed air. You know it starts off just doing the top, then the job always includes more that expected. I hope to bring this stove joint and gasketing up to original factory settings and tighten it even more. I am not really trying to make money at this but to sell it to recoup what I will have into the Encore, after the new cat. I posted it in our sale section first before it goes to Ebay.
 

Attachments

  • rear1.jpg
    rear1.jpg
    14.9 KB · Views: 600
  • front 1.jpg
    front 1.jpg
    18.3 KB · Views: 607
  • top1.jpg
    top1.jpg
    24.3 KB · Views: 569
Well back from the hardware store with the furnace cement I have to get off the computer to make progress
Later on I will detail the steps I made to rebuild the stove. I had to move the opperation into the garage its raining now. Well at least it held off long enough, that my compressor and blow gun, cleanned out all the ash and dust first outside.
 
I am very interestd as I have an older VC resolute that is in need of some repairs. Please document it and give advice along the way.
 
Well I re-doing all the cast iron seams so easy now that the top is off and everything is exposed

I ended up replacing the flue collar gasket and the damper gasket I was there and it did not look all that good
Next will be the griddle gasket I have a little more seams joint I want to get at then finally the new top goes back on
 
elkimmeg said:
Well I re-doing all the cast iron seams so easy now that the top is off and everything is exposed

I ended up replacing the flue collar gasket and the damper gasket I was there and it did not look all that good
Next will be the griddle gasket I have a little more seams joint I want to get at then finally the new top goes back on

What furnace cement are you using on the seams Elk? I have to put the F3 CB back together in the next few weeks.
 
I am using a combination of 3 different aplicators all Rutland furnace cement in a plactic container bulk applied witha putty knife
Caulking tube and gun same Rutland cement and a gasket stove cement squeeze tub again Rutland brand Each as advantages of getting into spots the other one Can't

BB it may be possible to re caulk all joints without any dissesembly, by applying a healthy bead over the existing seams. You might be able to do it in place. To really get it done means disconnecting it and rolling it outside. Once outside using a breathing filter and goggles, I use one of my air compressors and take the door off and blow it out. I shop vack it After that, there will be an unbeliable cloud of ash dust. With the compresed air and blow gun, you will have no problems finding leaks or compromised seams joints Even poor gaskets. If not taking it apart I suggest two more additional steps. One I bought a couple of smaller wire brushes from Home cheapo I work them into the seams. If I notice cracking of almost falling out cement I use a putty knife or screw drivers to get it out
all the loose older refactory cement is removed. I then use a tooth brush and rag dipped in water to get any loose residue before applying new cement A little moisture left behind is ok because the stove cement is water souliable (I know SP)
 
After work I just finished up the recaulking the cast joints and installed the top and sides

First picture on the left is front view before the top is installed and all is seamed

Middle picture is from looking down into the fire box after it is seamed and I wire brushed every thing I then to clean everything High Temp painted it boy did that dress it up

Right picture is after the top is installed

I did install the sides I will post soon
 

Attachments

  • stove4.jpg
    stove4.jpg
    14.6 KB · Views: 508
  • stove5.jpg
    stove5.jpg
    13.7 KB · Views: 487
  • stove6.jpg
    stove6.jpg
    15.1 KB · Views: 509
Couple questions here MSG what was it you said cleaned the cermanics best veggie oil?

Damn I just about rebuilt this entire stove I guess I should do the door gaskets and glass? what do you think?
That would just about be a complete rebuild.

Got to thinking, maybe keep it and replace the older Intrepid ? This stove will run equal of better than new there will be no seam leaks or gasket leaks. and it should be good for years to come

I learned there is an re essembly sequence that one should do. IT Would save removing things out of sequence. I plan to detail the steps involved later
 
What ceramics Elk? The glass? If thats the case i think the good ole rutland glass cleaner is the best. I never mentioned vegie oil i dont believe.....
You might as well do the door and glass gaskets. There cheap, and might was well get it all up to speed.
I did mention once that acetone got the enamel spick and span, i had some hard to remove residue from dripping fat wood that i could not remove.
 
the front door covers up the front. One can order everything matt black or chose cermanic coatings

You are looking at the stove with the door removed

About a week back someone recomended the best way to clean the ceramoiic surfaces. I thought it was MSG. Not talking about the glass

The picture below shows the stove with the sides installed
 

Attachments

  • wood7.jpg
    wood7.jpg
    63.9 KB · Views: 452
"About a week back someone recomended the best way to clean the ceramoiic surfaces. I thought it was MSG. Not talking about the glass"

Yeah. That was MSG talking about acetone taking the fatwood stains off the enamel surfaces on his Hearthstone stove.
 
Well the stove is fully essembled and light tested. I placed a 150 watt bulb inside turned out all garage lights and not one
sliver of light escaped. I am confident, It is sealed equally or better, than when I received it new 2.5 years ago. There are new gaskets under the rear plate and the flue collar The griddle gasket is new. I was going to replace the door gaskets but they do not emit any light and appear to be in decent shape. They were not a problem before and I did not change any settings.
Everything inside is ash and dust free. When first fired up again, it will act like a new stove, meaning there will be smells from the stove cement and some paint curing.

Tomorrow I will roll it out of the garage for final pictures. All cleanned up it looks damn good
 

Attachments

  • rightws.jpg
    rightws.jpg
    18.5 KB · Views: 310
The finished stove pictures
 

Attachments

  • frontwsd.jpg
    frontwsd.jpg
    16.3 KB · Views: 347
  • leftws.jpg
    leftws.jpg
    17 KB · Views: 347
  • topwdd.jpg
    topwdd.jpg
    20.9 KB · Views: 327
Looks great Elk! Looks like you just started a new business.
 
Chances are I know your installer friend. Ask him who is either the worst or best inspector in the area? good luck with the installation
 
Status
Not open for further replies.