Reducing clearance distances and fire-safe assembly for slate tile hearth

  • Active since 1995, Hearth.com is THE place on the internet for free information and advice about wood stoves, pellet stoves and other energy saving equipment.

    We strive to provide opinions, articles, discussions and history related to Hearth Products and in a more general sense, energy issues.

    We promote the EFFICIENT, RESPONSIBLE, CLEAN and SAFE use of all fuels, whether renewable or fossil.
Status
Not open for further replies.

alex_u

New Member
Oct 19, 2015
5
Vermont
Hi all,
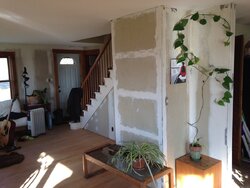
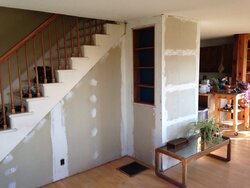
I just purchased a used Jotul Combifire 4, the "Easter Island" wood stove. I am in the process of planning the installation on the first floor/living room, in a new-to-me house. The chimney is single flue, concrete chimney block with a steel liner. Previously, there was only a thimble in the cellar for a big wood furnace, and the chimney is framed out and sheetrocked upstairs. The chimney is centrally located, and adjacent to the far/upper end of the staircase. In other words, there is a framed and sheetrocked corner where the wall below the staircase meets the wall that is framed around the chimney, and wraps around 3 sides of the chimney. Sorry for the lengthy details, but I figure it might be helpful.
What I would like to do is face the above mentioned walls with slate tile, creating a wrap-around hearth for the wood stove, which will go in the corner between stairs and chimney. I spoke with a chimney mason who can install a thimble into my chimney for the woodstove. The current plan is to frame out an opening in the wraparound wall that he can lay brick in to protect the framing from the stovepipe.
Now, my challenge is to figure out a fire-safe wall assembly on which to install my slate tile hearth on walls and floor, while reducing the clearances dictated by NFPA 211. I would like to place the wood stove in the corner, and I don't have a very large living room so 36" from both walls seems like a lot of space to give up.
Looking online at an insurance company's rules based on the NFPA specs, it seems like the best option for me would be to install the " 1/2" thick noncombustible insulation board with a 1" airspace behind the cement fiber board/thin-set/tile assembly.
Soooo, can anyone tell me what 1/2" noncombustible insulation board is??? I asked my local builders supply, and the didn't know what I was talking about. They recommended Roxul comfortboard, but the minimum thickness is 1.25". I asked if there is another thinner, fireproof sheet good that I could use, but they are unaware of any. I assume that if NFPA specs 1/2", there must be a product out there that is commonly used.
Sorry for the long post. Any thoughts or ideas? Thanks!
-Alex
 
Greetings Alex. Use 1/2" cement board. It's totally fireproof and a good backer for slate. Durock NexGen is good for this application. You will need non-combustible spacers or furring strips to attach it to the studs in the wall. They sell ceramic spacers for this purpose, or you can cut up some 1" lengths of 1/2" copper pipe. Or you can make long furring strips by snapping off 3" wide x 36" long pieces of the cement board, then double them up to make 1" thick strips attached to each stud. Remember when making the NFPA 211 wall shield to account for the hearth floor height so that when it is finished there is a 1" to 3" gap at the bottom and leave the top open so that air can freely convect behind the wall shield.

What are the hearth floor construction details?
 
  • Like
Reactions: Alex C
Greetings Alex. Use 1/2" cement board. It's totally fireproof and a good backer for slate. Durock NexGen is good for this application. You will need non-combustible spacers or furring strips to attach it to the studs in the wall. They sell ceramic spacers for this purpose, or you can cut up some 1" lengths of 1/2" copper pipe. Or you can make long furring strips by snapping off 3" wide x 36" long pieces of the cement board, then double them up to make 1" thick strips attached to each stud. Remember when making the NFPA 211 wall shield to account for the hearth floor height so that when it is finished there is a 1" to 3" gap at the bottom and leave the top open so that air can freely convect behind the wall shield.

What are the hearth floor construction details?

Thanks for the recommendation for Durock, looks like a perfect material for the job. As far as the hearth floor construction, I haven't thought it through completely, I noticed that the NFPA 211 rules require either 2" of closely spaced masonry, or a UL approved floor protector. I would like to just lay down the durock on my subfloor, and tile over that, for easy construction and minimal change in height from the finish wood floor. I realize that doesn't meet the 211 code though. My floor system was underbuilt, and the less extra weight I put on it the better. Any thoughts on that one?

Also, I just want to make sure I understand your reply about the wall shield... My understanding from the code is that with 1/2" noncombustible insulation (in this case the Durock), with a 1" air space behind it (between Durock and framing), that I don't need the 24-gauge steel heat shield. That is another recommended safety option to reduce clearance, but I would prefer the final look to be tile (over the Durock), without a metal heat shield.
In other words, the total assembly from the chimney out towards the wood stove would be:
-Chimney
-air space >2" (probably more like 6-8")
-wall framing (with brick in-fill around stovepipe)
-1" spacers
-1/2" Durock Nextgen
-thin-set mortar (any particular "high-heat" types necessary?)
-slate tile
-clearance space of >12"
-wood stove

Does this work/make sense? Maybe you are saying that the 1"air space behind the Durock should be able to ventilate? I hadn't thought of that, but as it would be part of the finish wall assembly, I'm not sure how it would work to leave a gap along the bottom of the finish wall...

Thanks!
 
The hearth will need more protection unless you have the manual and it says otherwise. NFPA suggests brick on edge with metal underneath for ember protection. Insulation value needs to be R=.84. It needs to extend at least 8" to each side of the stove and 16" in front of the stove door. Plan on putting down at least two sheets of durock nexgen. That will get you to R=.78 before the slate. The durock should be on 3/4" plywood if the floor needs stiffening. The hearth pad will help distribute the weight over several joists so this should not be an issue unless joists are missing underneath.

Why are you building out the wall with the 6" gap and brick? That is unnecessary. Can you post a picture of the current corner so that it's easier to see what is currently there?

PS: no special high heat thinset needed for the wall shield or hearth pad

Thanks for your reply! Regarding the hearth floor protection, is that for a stove with short or no legs, or is it the spec regardless of leg height. The Jotul Combifire 4 has legs taller than 10". However, I this hearth may one day have a much more squat stove, so I guess it's better to build for that...
Right now, the floor has 5/8" plywood subfloor, and 3/4" t&g hardwood flooring. Sounds like 2 layers of Durock Nexgen with the thinset and slate should meet the insulation requirement, and the actual thickness is less important than R-value? Sheet metal underneath the Durock for ember protection or is that unnecessary?
I will try to attach some photos to show the existing framed out walls. I'm not sure why they are so big (32" deep x 36" wide) compared to the chimney inside (16"x20"), and I may not know until I tear into it if there was a good reason or just aesthetic. The wall away on the far side away from the corner serves to chase a light switch dimmer, but that is actually the wall spaced closer to the chimney; the wall closer to the corner has the bigger air space between it and the chimney. IMG_2109.JPG IMG_2108.JPG
 
First thing to check is whether the chimney has the required air space between it and the new walls boxing it in. Probably not. To make it safe I suspect an insulated stainless steel liner will need to be dropped down the chimney to a tee fitting. The only masonry then would be to open up a hole for the thimble and plugging the lower hole in the basement. You can use a Safe-T or Insul-Flue thimble to achieve safe clearances passing through the wall.
http://www.efireplacestore.com/cpf-21480.html
http://www.woodmanspartsplus.com/4940/559943/Black-Stove-Pipe/Insul--Flue-Wall-Unit-and-Thimble.html

Is the return grille in the floor connected to the furnace? If yes it will need to be relocated at least 10ft away from the stove.

The chimney has a stainless steel liner, but I believe it is uninsulated. The mason who will be performing the work said that the typical construction around here would have been to pour concrete with vermiculite around the single-wall liner,inside the chimney blocks. But he won't really know until he breaks into the chimney to attach the thimble. I believe his recommendation was to build any framing around the chimney 2" away from the chimney, but it sounds like you think that is inadequate? What is an adequate spacing? Where can I find safety specs for this?

The grill in the photo is for the hot air system that is no longer in use, completely disconnected. It's just a hole in the floor now.

Thanks!
 
Wood framing is supposed to be 2" away from an interior chimney for its full length. It often is not. With an insulated liner this is not an issue. What was the existing ss liner connected to? furnace?
 
Wood framing is supposed to be 2" away from an interior chimney for its full length. It often is not. With an insulated liner this is not an issue. What was the existing ss liner connected to? furnace?

Existing liner was piped to both a wood furnace and oil furnace (same single flue), using a combo system, I guess with oil as backup to wood. I can't tell what the make of the wood furnace is, it might be homemade. Everyone that sees it says it looks modeled after a "Sam Daniels". Both appliances are now non operational, and a direct vent gas boiler was installed to replace them, using hydronic heat below the 1st floor. So I will be insulating between cellar and 1st floor below the hydronic, so I think it makes sense to burn wood upstairs using the single flue. I guess that's a long answer to your question :)

But if I understand you correctly, if the single wall ss pipe is insulated with a material between itself and the chimney block interior, such as a cement/vermiculite material, the 2" spacing is acceptable, and I should verify that it is 2" along the entire length. And if there is just air space between the ss liner and the chimney block interior, then that is unsafe with wood framing at 2" away from chimney?
 
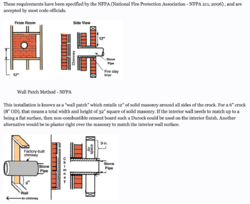
If the liner is insulated then the 2" distance between framing and the chimney becomes a moot point. It doesn't hurt though. What does not change is the distance between the thimble and the surrounding woodwork or framing for that. If bricked in it needs to be 12" all the way around the thimble. This may be what your mason is proposing. If you use one of the products I listed earlier then the framing is directly to the insulated thimble. No mason is needed in that case except to close up the bottom hole and open a new one. The liner connection will require a tee with a removable snout at the thimble and capped on the bottom.

Screen Shot 2015-10-19 at 4.10.48 PM.png
 
Status
Not open for further replies.