remodel and new stove pics

  • Active since 1995, Hearth.com is THE place on the internet for free information and advice about wood stoves, pellet stoves and other energy saving equipment.

    We strive to provide opinions, articles, discussions and history related to Hearth Products and in a more general sense, energy issues.

    We promote the EFFICIENT, RESPONSIBLE, CLEAN and SAFE use of all fuels, whether renewable or fossil.
Status
Not open for further replies.

mtcates

Member
Mar 1, 2010
138
Central NC
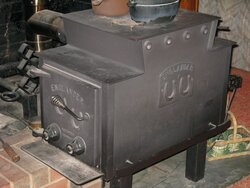
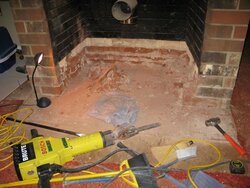
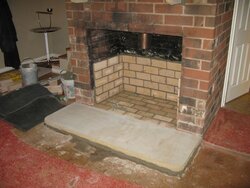
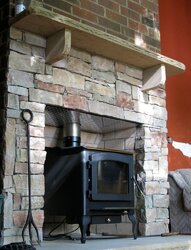
Here are the before, during and after pictures of my fireplace remodel. Pictured is my old englander that my father heated this house with for 33 years. It was by far not the safest setup. I have used this stove for 3 years now since purchasing this house from my dad. I wanted a more attractive, safer, and more efficient setup. I lowered the hearth and firebox floor about 9 inches so I could install the new stove comfortably in the firebox. I rock faced the brick around the fireplace and put a new layer of firebrick over the old cracked and black firebrick. The mantel is rock also. I feel better knowing the mantel is not wood anymore. New englander 30 installed inside the fireplace. I installed an electrical outlet in the fireplace floor to run the stove blower. The outlet is wired to a wall dimmer switch to control the speed of the fan. Now its time to install hardwood floors on the entire bottom floor of the house.
 

Attachments

  • 1.jpg
    1.jpg
    46.5 KB · Views: 4,410
  • 2.jpg
    2.jpg
    58.7 KB · Views: 4,676
  • 3.jpg
    3.jpg
    49.7 KB · Views: 4,694
  • 4.jpg
    4.jpg
    47.2 KB · Views: 4,717
  • 1.jpg
    1.jpg
    130.7 KB · Views: 3,697
Nice looking install. A job well done.
 
Now you just need a piece of black pipe around the end of the liner to complete the look. Nice job!
 
j-takeman said:
Very well done. looks very sharp!

How do you like the new Englander?

So far I love the new stove. It is a heat monster. Got to be careful with the fuel load. Im starting small and working up. It will hold 400 degrees for about 3 hours on two medium size splits. A full load will have to be large splits and stacked east to west or I could easily over fire it. I need to fabricate a shut off valve for the secondary air just in case of an over fire. I don't want to put in a pipe damper. A wad of aluminum foil stuffed in the secondary air intake would make a good shutoff valve in case of emergency.
 
Holy Cow I didn't expect to see that, That looks awesome

I'm really impressed and jealous.
 
Wow, what a difference. Nice job! You certainly get the most out of your stoves and treat them well. That old Englander looks like it could go another 30 years, but it's probably better for it to go in the Englander Hall of Fame museum.
 
BeGreen said:
Wow, what a difference. Nice job! You certainly get the most out of your stoves and treat them well. That old Englander looks like it could go another 30 years, but it's probably better for it to go in the Englander Hall of Fame museum.

My dad bought that old Englander when I was 8 years old. It heated this house for 33 winters. I have owned this house for 3 years now and I used that old stove also. There is no heat at all in this house except the wood stove. Last year was a colder than usual winter as most people in the US experienced. I went through 5 cords of Oak last year. The top of that old stove turned red over a dozen times last year alone. What's that, about 900 degrees stovetop temperature? I'm not going to retire it though. I've got a 1800 square foot insulated shop that it's going in in the near future.
 
Wicked nice job on that hearth and stove install!

Ray
 
That looks FANTASTIC!

My wife just walked by and said "WOW that looks great".
 
Beautiful install . . . quite the difference betweeen the before and after pics.
 
i'm impressed with the work so far, would like to see picts. after the new floor is installed! ;-)
 
this is almost exactly what I intend to do. Nicely done.
 
That is the only one I have ever seen with diamond plate above it. It has a very nice clean finished look to it with that.
 
struggle said:
That is the only one I have ever seen with diamond plate above it. It has a very nice clean finished look to it with that.
I thought the diamond plate looked good myself. It matches my stainless steel liner. I put R30 fiberglass insulation over the top of the plate so it would keep all of the heat in the house. I also stuffed insulation between the flue tiles and the stainless liner at the top of the chimney. With the stove blower running the aluminum plate only gets warm to the touch with a stove top temperature of 500.
 
Nice looking install! :cheese:
 
Simply lovely. Lots of nice details like the tilted diamond-plate baffle. Sweet! Where did you get that? And what is the stone for the front hearth, and where's it from?
 
Status
Not open for further replies.