No problem. Glad to put this out there for any one who is not sure about it. Here are some extra points I forgot to make:
You may not need to replace the refractory assembly. I did, because I had damaged the top of the assembly. The manual tells you how to access and inspect the catalyst without replacing the refractory. Here is a link to the manual for model 1945:
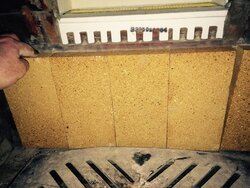
http://www.fergusonfireplace.com/1945.pdf (see especially pages 30-32, and the exploded image on page 36). The problem is the refractory assembly is very fragile and brittle and easily damaged. Do not damage or break open the refractory if you don't have to (the image above shows it opened just to show the location of the secondary temp probe and to describe that). Be very careful with the refractory assembly and follow the directions in your manual. Do not force it into its spot. If you are just trying to access the catalyst you should be able to do that without ruining your expensive refractory assembly.
I knew that I had a damaged refractory and needed to replace that too. My problem was that the user manual does not explain how to replace the refractory assembly, so when I decided to do this, I had to rely on the exploded diagram in the manual, the information on pages 30-32, my local VT castings dealer, and posts on this forum.
I thought that adding description of my experience would help the next guy who decides to do this.
So here are some points I missed above:
- The catalytic converter that I used was a new Condar catalyst purchased from my local Vermont Castings dealer, I also got the refractory assembly there as well. They both cost about $200+, but worth the investment, I think
- The bricks I got were Rutland firebricks (about $5-6 each) and looked like a different color but were the same size as the original firebrick.
- I forgot to reiterate that after putting the refractory assembly in place, I pushed the secondary air probe into it from the back of the stove, and secured the secondary air probe assembly by screwing it back to the rear of the stove, and put the access panel back on.
- I removed the griddle, andirons, grate, flue collar, and stove pipe for this job. I also removed a side panel inside the stove, but I'm not sure I had to. The panel had the same size bolts as the ones that held the damper assembly.
- I had a shop vac handy and vacuumed dust, debris and ash as I progressed through each step.
- Having some gasket cement handy and some gaskets is a good idea as I found a loose gasket or two while working on this.
- I made multiple trips to my local Vermont Castings dealer. They helped me think through pushing back the secondary air probe and moving the damper assembly forward to get the refractory into place. And they helped me get the right parts. They did not know to remove the bolts on the back to move the damper assembly, so I had to figure that out on my own.
Now that I am finished and burning again, I can barely remember the last time I had such a good catalytic burn. The whole firebox glows orange, I can see the catalytic element glowing behind the baffle, and a green/blue flame in front of the firebricks. Now when I close the damper, I hear the 'clicking' noises of the flue adjusting as the temperature changes for catalytic burn. I hear the 'whir' sound of the catalytic burn. Feels great, looks great. The way it ought to be.
I hope this helps somebody. Wish you all warmth this winter.

 Hello. Just removed and replaced the refractory assembly and catalyst and fire brick on my model 1945 defiant (manufactured 2008). I took pictures and learned a lot, posting my experience to help someone in need.


 I also had the chimney sweep tell me it was ok to have a loose gasket in glass door which I disagreed with because then it cant work properly and when I spoke with someone at Vermont Castings, they confirmed that it needs to be airtight. The guy just didn't want to fix it. I am lucky my 1780 historic house didn't burn but I am pretty mad at this guy. He is not taking any responsibility for his mistakes. I could have replaced this cat back when he cleaned stove and I would have a fire right now during the 6 degree weather, but instead we are cranking oil. Thanks again, its really generous of you to post this for others. It will be a hassle to fix, but much less so now thanks to you!!