Seal those secondary manifolds!

  • Active since 1995, Hearth.com is THE place on the internet for free information and advice about wood stoves, pellet stoves and other energy saving equipment.

    We strive to provide opinions, articles, discussions and history related to Hearth Products and in a more general sense, energy issues.

    We promote the EFFICIENT, RESPONSIBLE, CLEAN and SAFE use of all fuels, whether renewable or fossil.
Status
Not open for further replies.

precaud

Minister of Fire
Jan 20, 2006
2,307
Sunny New Mexico
www.linearz.com
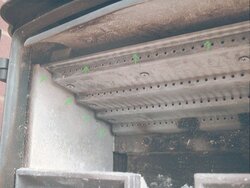
A couple days ago, someone here asked a good question; what can happen to make an EPA-compliant stove burn less clean with time? It so happens I stumbled into one cause last weekend. While staring mindlessly into the Morso 2110's fire one evening, I noticed something I'd never seen before; occasional licks of flame shooting downward torward the left-rear corner of the firebox. Given that there is no air inlet down there and this must be caused by a leak of some sort, I watched it hoping to spot the source. Well, it wasn't so simple... I could isolate it to a region but not to one spot. So I let the stove cool for a few hours, and then prepared to stuff some kaowool into the various gaps and crevices down there. (In the attached photo, the area behind and below the lowest green arrow is what I'm referring to.)

While reaching into the firebox, my hand bumped the front of the secondary manifold. (It's that stainless steel thingy with step-folds and four rows of holes at the top of the firebox.) It made a 'clink', the sound of metal to metal contact. Odd, I thought... that shouldn't be. So I pushed again. Sure enough, the front edge of the manifold (see the three green arrows along the edge) was NOT tightly against the cast iron piece above it that it was secured to. With a lamp, I looked all along the front edge and could then clearly see a gap along the entire width. That's one big leak.

Some of the ramifications of this immeditely flashed through my mind. In terms of upsetting the balance of air sources in the stove, this is the absolute worst place in the firebox to have a leak. Why? Because draft in a stove is like water flowing - it will always pull from the closest source possible. So... leaks closest to the flue connector will upset things inside the stove the most. In this case, it will (theoretically) happily pull from this gap and pull alot less air from the secondary holes at the back of the firebox.

My curiosity piqued, I checked for other possible leak sources around this secondary plate, probing along the stair-step edges on both sides (see the four green arrows in the photo.) Oddly, there was no cement there - yes, there are plenty of screws holding it in place and it fits pretty well. But I could easily press a fingernail into several of the joints on both sides. Air is leaking out there too.

So I let the stove cool down all the way, cleaned and moistened those surfaces, and sealed them good with stove cement. (Great stuff, by the way... every stove owner should have a tub of it around for maintenance.) I gave it an hour to set (should have given it longer but it was getting cold!) and then fired the stove up.

What a difference. With the same air control settings, there was more flame burning inside the firebox, especially the blue secondary flame toward the back of the stove. And MUCH LESS long, yellow flames curling around the front edge of the manifold and exiting up the chimney. There's more turbulence in the secondary flames, always a good thing. The net effect is as if someone rolled the flame 6 to 8 inches back into the stove. Stack temps are lower too. Before sealing, the thermometer on the stack was normally in the 440-500F range. After sealing, it's down to 380-430. And an unexpected added bonus; the stove is less prone to the runaway burn that I had complained about previously. It's a more controlled fire.

Oh, and I haven't again seen the licks of flame that started all this. The air feeding them was probably leaking out of the side of the manifold at the very back.

I think it's pretty obvious that the stove is now operating more like it's supposed to.

I'm not sure that stoves with the "tube"-style secondaries will benefit as much from this. If you decide to try it on yours, please post the results. Sealing those tubes where they enter the air channel may make them too difficult to remove. However, if your stove has a secondary manifold of similar design to the Morso, it will very likely benefit from this treatment.
 

Attachments

  • 2ndary.jpg
    2ndary.jpg
    50.5 KB · Views: 1,129
Good writeup. As an added bonus to being the one who asked about degrading performance, my stove has a very similar baffle+secondary setup. I haven't seen anything indicating I may have a similar problem, but I'll keep my eyes open. Sealing the seams may be a good off-season preventative maintenance step none the less.

-Hal
 
Roo, I don't know, it has less than one season of use, hard to call it wear. So... given the otherwise superb construction of the Morso, I'll be generous and call it an oversight. But I will say, I think the tube-type secondaries with insulation above perform better. This sort of construction impresses me as "1st generation".

HalJason, I agree, adding it to one's off-season maintenance is a great idea.
 
Great information Precaud. I know I'll be checking my secondaries when it cools down. On the Jotul they are gasketed at the points you mention. Is this not so with the Morso?
 
Yeah I found the same thing with the Englander. When I took the firebrick out to bring it into the house I saw a flubbed weld low in the back on the side of the secondary manifold near where air comes into it. Didn't think much about it.

Went through weeks of weird burns thinking I had forgotten everything I ever learned about burning wood. And really disappointed that front to back loading caused all hell to break loose. And a ton of action was taking place in the back of the firebox with side to side too once I could get a load burning which wasn't easy. Finally I loaded a small front to back load and bingo, a butane cig lighter like flame came up in the back from the area of that damned weld. I brought the stove down the next day and sure enough there was a pencil lead sized hole where the guy screwed up the weld. I in effect had primary air coming in the front and the back at the same time. I dressed the metal and applied furnace cement and it is like a whole different stove and I can burn front to back like I have always liked to.

I hate cast stoves because of the air leaks. Never thought it would happen with a steel stove.

Whoops.
 
BG, that is the only seam in the 2110 that isn't gasketed. That doesn't surprise me; I'd think gasket material there would get burned out in no time - that edge has got to be one hot spot!

BB, glad to hear you found that hole. I'll have to look for the same thing in the Quad when I clean it out. I remember a while back when you said you were having better luck burning east-west in the Englander, and I was puzzled. Ain't it nice when things make sense finally? :)
 
precaud said:
BG, that is the only seam in the 2110 that isn't gasketed. That doesn't surprise me; I'd think gasket material there would get burned out in no time - that edge has got to be one hot spot!

BB, glad to hear you found that hole. I'll have to look for the same thing in the Quad when I clean it out. I remember a while back when you said you were having better luck burning east-west in the Englander, and I was puzzled. Ain't it nice when things make sense finally? :)

Yeah, the reason I wanted a big firebox was to be able to burn front to back. To hell with this 30 minutes to an hour to get a side side burn going and pray that it keeps going and watching for neat secondary burn. Head'em in front to back and ten minutes later cut'er back to 25% at 450 like God intended and go to bed. Just like Old Brownie. Blue flames like it was on natural gas.
 
Kevin, yes, I thought the same when I first got the stove. But they're all tight and snug.
 
Hummmm. My next thought would be maybe the screws are too long, or the female threads are too short and the screws are bottoming out before properly seating. I wonder if a slightly shorter screw would allow the head of the screw to seat properly and in turn tighten the secondary assembly down. You'd think that Morso would have figured this out already, but...

Of course being shorter it would also be easier to overtighten the assembly which may lead to distorting the thin metal. I'd personally take one screw (or a row of screws) out and try shortening them. Though I'm glad your fix with the cement worked, I feel the issue is a design issue, and should not have required the modification you made. In any case, and no offense to you or Morso, but it still looks wrong to me.

-Kevin
 
My next thought would be maybe the screws are too long, or the female threads are too short and the screws are bottoming out before properly seating.
I grok where you're going with this, but if that were true then the whole manifold would be loose and it's not. It appears they used countersunk screws with no countersink below and so the heads stick up a bit even when they're tight. Maybe one of the other Morso users will post a pic of their manifold (babalu?) and we can see if it's any different.
 
Okay, I guess that makes more sense. But then I'd have to ask... why not a pan head screw? In any case, sounds like you've got the stove working correctly, and safely, which is the main goal in the end. Maybe a letter to the manufacturer would be the next step to try and gather an explanation for the design details of the secondary assembly. The lack of gaskets or means to create a proper seal seems like a gross oversight in my opinion, which frankly is surprising taking into account the excellent reputation of Morso.

-Kevin
 
BrotherBart said:
Head'em in front to back and ten minutes later cut'er back to 25% at 450 like God intended and go to bed.
Yeah! BB's got the religion! It's the east-westerners vs. the north-southerners!! ;-)
 
wrenchmonster said:
The lack of gaskets or means to create a proper seal seems like a gross oversight in my opinion, which frankly is surprising taking into account the excellent reputation of Morso.
I don't know about that. That part of the stove is constantly in direct contact with the flame, and may well be the hottest piece in the stove. I just can't imagine gasket lasting very long there. I think cement would be the better choice.
 
precaud said:
wrenchmonster said:
The lack of gaskets or means to create a proper seal seems like a gross oversight in my opinion, which frankly is surprising taking into account the excellent reputation of Morso.
I don't know about that. That part of the stove is constantly in direct contact with the flame, and may well be the hottest piece in the stove. I just can't imagine gasket lasting very long there. I think cement would be the better choice.

MSG have you seen any issues with the gasket here?
 
Update... it's been less than three weeks since I posted this. I happened to notice this morning that the lively secondary burn in the rear of the firebox that I'd noticed was greatly diminished. OUtdoor temps have been up recently, so I thought it might just be the reduced draw due to the high temps. But just now I reexamined the area in front of the secondary manifiold as was saddened to see 75% of the stove cement was gone. So it's clear that the high temps there and daily expansion/contraction take their toll. It's hard to imagine that gasketing would fare any better.
 
precaud said:
I'm not sure that stoves with the "tube"-style secondaries will benefit as much from this. If you decide to try it on yours, please post the results. Sealing those tubes where they enter the air channel may make them too difficult to remove. However, if your stove has a secondary manifold of similar design to the Morso, it will very likely benefit from this treatment.

sealing the manifold is important with tube types as well, im unsure of other brands using tubes, but we weld ours out solid (apparantly we missed a spot on BB's unit , he caught it and sealed it. precaud has it right , path of least resistance is where the air will flow, if anyone has a brand out there that does not have the manifold(not necessarily where the pipes go into it as that would be very minor im sure, but along the air channels leading to the pipes, that are not welded out , press some rutland stove cement or similar into the cracks unless they are tight to the walls of the stove , force the air to exit the tubes, you will pick up brighter secondaries if you were spilling air before.

nice catch precaud!!!

EDIT: you know, looking at the picture again closer just now, im seeing good paths from flame impingement on the step top reburn grate, except in the back where there are 3 visible black sooted areas, there does not appear to be as much secondary burn patterns in front of these sections, combining that with the soot buildup there , im wondering if you are leaking air there as well, not getting force through the holes in those spots. granted im not as familiar with this setup as i am with the tube type, but it looks suspicious to me. are you seeing a lesser action with your secondaries in these locations or is the picture fooling me?
 
BeGreen said:
precaud said:
wrenchmonster said:
The lack of gaskets or means to create a proper seal seems like a gross oversight in my opinion, which frankly is surprising taking into account the excellent reputation of Morso.
I don't know about that. That part of the stove is constantly in direct contact with the flame, and may well be the hottest piece in the stove. I just can't imagine gasket lasting very long there. I think cement would be the better choice.

MSG have you seen any issues with the gasket here?

No, not at all.
 
MSG, does the Castine actually have a gasket along the front edge of the manifold?
 
stoveguy2esw said:
EDIT: you know, looking at the picture again closer just now, im seeing good paths from flame impingement on the step top reburn grate, except in the back where there are 3 visible black sooted areas, there does not appear to be as much secondary burn patterns in front of these sections, combining that with the soot buildup there , im wondering if you are leaking air there as well, not getting force through the holes in those spots. granted im not as familiar with this setup as i am with the tube type, but it looks suspicious to me. are you seeing a lesser action with your secondaries in these locations or is the picture fooling me?
Mike, what you're seeing on the rear is the casting for the pri. and sec. air channels, which nearly covers the entire back plate. As you can imagine, it's not a great insulator and tends to run cooler than any other part of the stove, especially when the secondary air is pulled out the front gap and up the chimney... when my gap patch was intact it did burn hotter in the back, no question of it.
 
precaud said:
stoveguy2esw said:
EDIT: you know, looking at the picture again closer just now, im seeing good paths from flame impingement on the step top reburn grate, except in the back where there are 3 visible black sooted areas, there does not appear to be as much secondary burn patterns in front of these sections, combining that with the soot buildup there , im wondering if you are leaking air there as well, not getting force through the holes in those spots. granted im not as familiar with this setup as i am with the tube type, but it looks suspicious to me. are you seeing a lesser action with your secondaries in these locations or is the picture fooling me?
Mike, what you're seeing on the rear is the casting for the pri. and sec. air channels, which nearly covers the entire back plate. As you can imagine, it's not a great insulator and tends to run cooler than any other part of the stove, especially when the secondary air is pulled out the front gap and up the chimney... when my gap patch was intact it did burn hotter in the back, no question of it.

actually im looking at the stainless steel plate in the top, but near the back, on this perforated plate im seeing a couple spots where you have soot (not large spots about 4 to 6 holes wide in the bigest one i can see, on the last row of holes in the back. i know the air channels will stay cool, but im looking above that on the actual stainless plate with secondary holes in it
 
stoveguy2esw said:
actually im looking at the stainless steel plate in the top, but near the back, on this perforated plate im seeing a couple spots where you have soot (not large spots about 4 to 6 holes wide in the bigest one i can see, on the last row of holes in the back. i know the air channels will stay cool, but im looking above that on the actual stainless plate with secondary holes in it
Ah, ok, I see now. No, that's not consistent... just a sooty spot from the fire before the pic was took... happens that way sometimes burning this pitchy pine...
 
Status
Not open for further replies.