Selkirk DT Venting Conversion Kit to Masonary Or Metal chimney?

  • Active since 1995, Hearth.com is THE place on the internet for free information and advice about wood stoves, pellet stoves and other energy saving equipment.

    We strive to provide opinions, articles, discussions and history related to Hearth Products and in a more general sense, energy issues.

    We promote the EFFICIENT, RESPONSIBLE, CLEAN and SAFE use of all fuels, whether renewable or fossil.
Status
Not open for further replies.

Don2222

Minister of Fire
Feb 1, 2010
9,117
Salem NH
Hello

Just found this sheet on the DT conversion kit. Looks like a great way of drawing in pre-heated burn air thru a 6 or 8 inch metal chimney Or a masonary chimney!

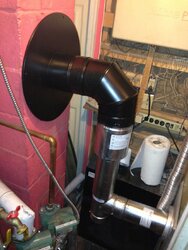
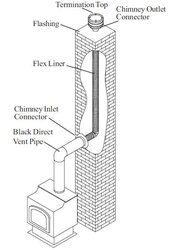
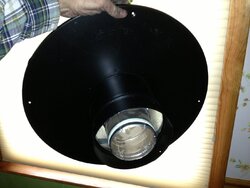
Does adding the flashing at the top of the masonary chimney keep the heat in for the Intake Air? See red arrows in pic2

Looks like a minimum 6x6 inch chimney is needed.
IMPORTANT: The existing masonry flue opening needs
to have an area of at least 35-square inches to insure
proper intake/exhaust flow.

I have an 8x8 block chimney

http://www.dynamitebuys.com/store/pdf/Selkirk-Direct-Temp-Installation-Supplement-Conversion.pdf

Two different types of direct vent conversion systems
are described here. One is through an existing factory
built metal chimney going through the ceiling. The other
is through the wall of an existing masonry chimney. Follow
the appropriate directions for your situation.

4DT-CCK (Factory-Built Chimney Conversion Kit) -- for metal chimneys
4DT-MCK (Masonry Chimney Conversion Kit) -- for block or masonary chimneys

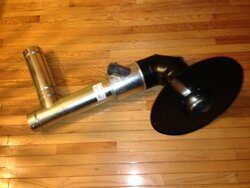
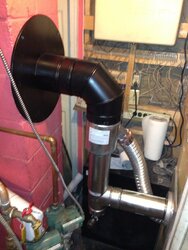
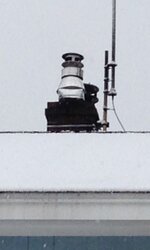
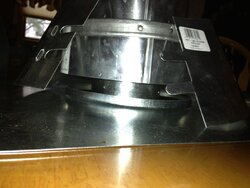
Pic1 & 2 - Conversion Kit used for Adapter for Masonary Chimney
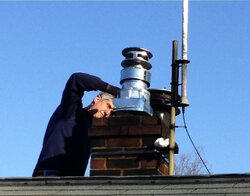
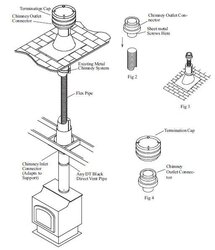
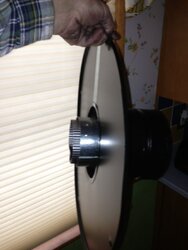
Pic3 - Conversion Kit used for Metal Chimney

click on pics to enlarge.
 

Attachments

  • DTmasonaryAdapter1.jpg
    DTmasonaryAdapter1.jpg
    57.9 KB · Views: 1,577
  • DTmasonaryAdapter2.jpg
    DTmasonaryAdapter2.jpg
    54.2 KB · Views: 1,019
  • DTmetalChimneyAdapter.jpg
    DTmetalChimneyAdapter.jpg
    38.7 KB · Views: 2,799
  • Like
Reactions: mepellet
Hello

Thanks mepellet. I have a friend with a new Harman P61a and a frosty OAK pipe due to this deep freeze that would not spend the money for a Selkirk DT system. Not much can be done now!
 
Hello

Thanks mepellet. I have a friend with a new Harman P61a and a frosty OAK pipe due to this deep freeze that would not spend the money for a Selkirk DT system. Not much can be done now!
Mine never frosts up! B-)
 
Question do all the selkirk pipes have the capability of venting and also being used as an oak. Or is it a certain model #
 
Thanks glenc0322

Well, it looks like this DT masonary install will be the hardest to do but I am going for it!

The conversion kit and flex liner are not the only parts needed here! 4" Selkirk T and piping plus Selkirk 4-5/8" DT piping is also needed.
Also the tight space I have will also be tough!

So here are the parts I ordered. Luckily I already have the 4" flex liner and 3" flex OAK piping!
This install is NOT inexpensive and if I went with the Multi-Fuel liner it would really cost!
If I do not get a cold air intake line and no more caked ash in the burn pot, it will be well worth it!

Selkirk Piping.
4DT-MCK (Masonry Chimney Conversion Kit) -- for block or masonary chimneys
4DT-EL90 - DT 90 Deg Elbow
4VP12 - 4" Diam - 12" long
4DT-AJ12 - 12" Adjustable
4DT-VPSA - burn air output adapter 3" for flex to air inlet on stove
4VP-TS 4" Diam T with cleanout cap
4VP-PC - stove adapter
4VP-EZAJ12 - 4" Diam 12" long adjustable
 
Hello

Still waiting for one 90 Deg DT elbow, then I can see if I have all the pieces for the bottom section!

I now have all the pieces for the top! When I am done I will show the complete list!

See pics below!

All you do is connect the 4" Stainless Steel liner between them!
 

Attachments

  • SelkirkDTtop1.JPG
    SelkirkDTtop1.JPG
    156.2 KB · Views: 498
  • SelkirkDTtop2.JPG
    SelkirkDTtop2.JPG
    136.4 KB · Views: 442
  • SelkirkChineyadapter1.JPG
    SelkirkChineyadapter1.JPG
    137.9 KB · Views: 459
  • SelkirkChineyadapter2.JPG
    SelkirkChineyadapter2.JPG
    103.1 KB · Views: 449
So does the flex vent hook directly to the smaller diameter pipe in your 4th photo and the DT pipe hook directly to the 3rd photo, sealing both the inner and outer pipe? That would seem the easiest but I wouldn't have thought the 4 inch flex vent would make a 90 degree bend within the clay flue pipe. Or do you still need one of those 2 part flex connectors made for connecting inside the flue where there is no access?

Hope you can take more pics as you install it! ;)
 
Don222
Thanks for the pictures and info. I was working on my final list for a similar install when you posted. I seem to have missed a couple parts at the topp.

Starting with the flashing for the chimney top, what are the pieces shown in the picture?

What is the part behind the storm collar? The selkirk catalog only shows 1 "termination" piece where the fresh air intake occurs, but it almost looks like your picture shows two, one behind the storm collar and one above it.

Does the storm collar protect the Fresh air intake?

DonD - What are the two part flex connectors you mentioned?
 
So does the flex vent hook directly to the smaller diameter pipe in your 4th photo and the DT pipe hook directly to the 3rd photo, sealing both the inner and outer pipe? That would seem the easiest but I wouldn't have thought the 4 inch flex vent would make a 90 degree bend within the clay flue pipe. Or do you still need one of those 2 part flex connectors made for connecting inside the flue where there is no access?

Hope you can take more pics as you install it! ;)

Yes, the back of the black chimney connector in the 4th photo does connect to the flex flue liner. No additional flex connector is needed.
I guess it the flex pipe should bend 90 degs. I will let you know when we install it!
 
Don222
Thanks for the pictures and info. I was working on my final list for a similar install when you posted. I seem to have missed a couple parts at the topp.

Starting with the flashing for the chimney top, what are the pieces shown in the picture?

What is the part behind the storm collar? The selkirk catalog only shows 1 "termination" piece where the fresh air intake occurs, but it almost looks like your picture shows two, one behind the storm collar and one above it.

Does the storm collar protect the Fresh air intake?

DonD - What are the two part flex connectors you mentioned?

The top consists of these pieces.
1 - 4DT-VPTA Direct Temp Pellet Termination Adapter $ 59.26
2. - Square metal sheet with round hole.

The above 2 pieces are in the DT masonary kit

The following pieces must be purchased.
The storm collar goes below the air intake.
1 - 4DT-VPTA Direct Temp Pellet Termination Adapter $ 59.26
1 - 4VP-VC Vertical Termination Cap $ 52.57
1 - 4DT-SC Diredt Temp Storm Collar $ 9.22
 
Hello

I just dry fitted the bottom end to see if it would work in my tight space.

What should I used for a tight seal for that big black flange against the chimney?
 

Attachments

  • IMG_0199.JPG
    IMG_0199.JPG
    166.2 KB · Views: 461
  • IMG_0202.JPG
    IMG_0202.JPG
    210.7 KB · Views: 611
Hello

Well it was a nice warm sunny afternoon for a big DT Masonary Kit & 4" diameter SS flue liner install ! ! ! !

So we removed the old chimney cap and put the brush down to for a good cleaning. Then dropped in the liner and connected the big black flange to the liner and bolted it to the block chimney using masonary bolts and masonary drill bit.

Then we cut the liner at the top to the proper length. The next step was to cut the square sheet metal to fold over the clay flue liner where the top sits on. The top was a slight bit too big so we bent it as close to the big hole as possible as we cit the corners to fold it over on the chimney's clay flue. Then it was hitting the cement crown so we had to trim each of the 4 sides. I had an idea to connect 2 large radiator type clamps together and strap the whole thing to the clay flue. It was snug so it would not move around. Then the top pieces were assembled and bolted with self tappers and RTV'd for a good water seal! Also put on the storm collar not seen in the pic below.

Assembling the bottom pieces were a tight fit and I will change a straight 1 footer for an adjustable so I can move the stove back a bit more. The flexible fresh air pipe was a piece of an old 3" diameter chimney liner and the 4" liner was a slightly used SS liner I got on a job. I just had to get the Selkirk DT and 4" regular pellet piping and put in the vacuum cleanout.

Now all I have to do is test it during the snow storm tomorrow and see how it works to dry out and warm the fresh air it pulls in down the chimney and around the flue pipe. May a beer or 2 will make testing easier. LOL
 

Attachments

  • TopAlmostDone.jpg
    TopAlmostDone.jpg
    63.1 KB · Views: 572
  • IMG_0239.JPG
    IMG_0239.JPG
    204.7 KB · Views: 746
So the intake air just comes down the masonry chimney? Then sucked in at the.thimble?

Seems as if the Standard DT would raise intake temps of the air more (smaller area around the 4") than the large area provided down the chimney? It will warm it some. Absolutely. But I wonder what the temp difference would be for the same Height install, but using the Standard 4/6 Selkirk DT?

Either way, looking forward to your results. Do you have a video of before and after burning to post? What was total cost of retrofit?
 
Hi Dexter

The 20 foot chimney is a longer run than a 3 or 4 foot up and out DT install. Therefore I would say they have the same warming effect. Also when the intake air comes out of the chimney into the 90 Deg Elbow it is right up against the hotter exhaust at this point.

I think the biggest difference will be in the early morning when the heavy moist outside air is warmed up hot so the burn air will remain constant all night long. So a video would not see much difference, it is what I do not see while sleeping early in the morning.

The cost is hard to measure. I installed a chimney liner and put in the DT kit and DT pipes all at once so it is very expensive but the easiest way to do it. Cost of all those parts is almost $1k but most people pay that just to line their chimneys around here including the labor.
 
Hello

The results are in. It was a damp snowy early morning and No Caked Ash in the burnpot.
I have tried using the stove with an OAK and without an OAK and the DT system is by far the best!

So just like in that jingle - Rolling and Riding Dirty

The Stove is Roaring! No more - Burning Dirty - Burning Dirty ! ! !

See pic and click to enlarge:
 

Attachments

  • TopDone.jpg
    TopDone.jpg
    36.1 KB · Views: 429
Glad you finally had all the pieces and time to install it. I am installing mine I hope this summer. Does it help with the drafts?
 
Glad you finally had all the pieces and time to install it. I am installing mine I hope this summer. Does it help with the drafts?

Thanks
It was a great day yesterday afternoon so we got it in. The liner being sized correctly at 4" diameter certainly helps make it draft better. This is a center chimney which always drafts better than an outside chimney. The constant warm dry burn air makes it work the best when it gets damp! Also can't wait to try that vacuum cleanout!
 
  • Like
Reactions: glenc0322
Status
Not open for further replies.