Shop Vac conversion to Soot-Sucker - for those who have stoves not vented through the wall

  • Active since 1995, Hearth.com is THE place on the internet for free information and advice about wood stoves, pellet stoves and other energy saving equipment.

    We strive to provide opinions, articles, discussions and history related to Hearth Products and in a more general sense, energy issues.

    We promote the EFFICIENT, RESPONSIBLE, CLEAN and SAFE use of all fuels, whether renewable or fossil.
Status
Not open for further replies.

donbryce

Member
Jan 8, 2009
110
NB Canada
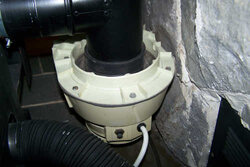
I got this idea from reading about the leaf blower cleaning trick. My Englander 25-PDVC vents almost straight up through 3" vent pipe, about 8', into a 7" Selkirk, previously used with a wood stove, and is located in the livingroom in the center of the house. To use a leaf blower, I'd have climb up to the roof and connect to the top of the Selkirk, which ain't a viable option.

So, I decided to retrofit an old shop vac I had to suck directly from the cleanout 'T' at the back of the stove outlet. In theory, I would make up a foam plug to go into the vent pipe, so the vacuum would draw the soot from inside the stove only, as cleaning operation 1. Then I'd remove the plug and stop up the stove outlet to draw from the vent pipe only, cleaning operation 2.

In practise, I couldn't find a suitable way to close off the stove outlet by going through the 'T', as the 3" diameter is too small to get my hand in there to put a plug in. So, I settled for closing up the OAK inlet when drawing soot from the vent pipe.

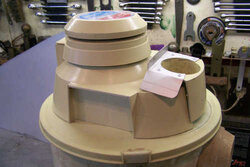
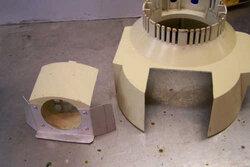
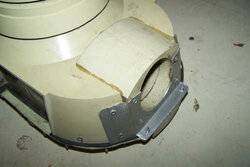
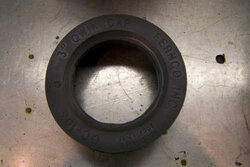
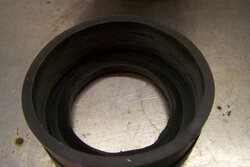
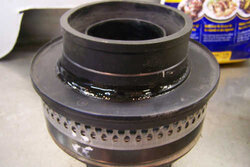
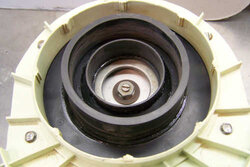
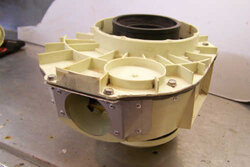
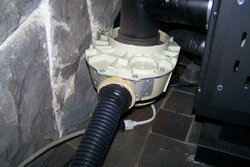
This is post 1 of the how-to on converting the shop vac. As the pictures show, it's an older style that had the outlet pointing straight up. (I didn't take a pic before cutting out the outlet, so staged a shot to illustate) I cut this part out and refitted it to point horizontally. I suppose it would be possible to glue in a plumbing elbow to do this, but I like to do things the fancy way. I fashioned an aluminum plate with pop-rivets to hold the outlet securily in place, and filled the cracks with hot-glue. Silcone would work too, but hot-glue is instant and allows me to continue without waiting for it to set up.

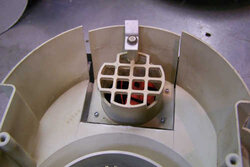
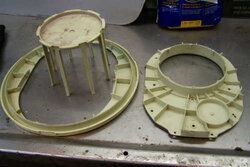
I cut off the handles for clearance to the wall behind the stove. Some work was done to add screws to assure a good seal for the revised casing, with some foam tape around the perimeter. This is necessary because the original shop vac blower fan is designed to move air only, and here I'm pulling soot and air both through the fan cavity.


....continued next post
 

Attachments

  • 100_1350.jpg
    100_1350.jpg
    19.3 KB · Views: 883
  • 100_1352.jpg
    100_1352.jpg
    13.3 KB · Views: 878
  • 100_1351.jpg
    100_1351.jpg
    14.7 KB · Views: 884
  • 100_1353.jpg
    100_1353.jpg
    19.2 KB · Views: 840
  • 100_1370.jpg
    100_1370.jpg
    13 KB · Views: 861
The next series of pictures shows how the shop vac is fastened to the stove vent pipe. I picked up a 3" rubber close cap at the hardware store and cut the hole inside to fit tight around the shop vac inside inlet pipe. This was then glued to the plastic piece that fits against the motor and fan housing with Shoe-Goo.

I also added foam tape around the circumference of the other side of the fan housing to make up for the extra height that the tape around the housing perimeter added. This is easier to see than explain, but the idea is that the motor remains isolated from the fan housing with a gasket. The shop vac motor stays out of the path of debris and water in the original setup, and stays away from the soot here.

The rubber cap has a couple of ribs molded around the inside, which I ground away with a die grinder to allow a very tight fit around the pipe, no hose clamp needed.
 

Attachments

  • 100_1354.jpg
    100_1354.jpg
    13.8 KB · Views: 857
  • 100_1355.jpg
    100_1355.jpg
    12.9 KB · Views: 854
  • 100_1356.jpg
    100_1356.jpg
    18 KB · Views: 859
  • 100_1358.jpg
    100_1358.jpg
    19.2 KB · Views: 867
  • 100_1357.jpg
    100_1357.jpg
    14.5 KB · Views: 861
sounds like a good idea, can't possibly be as fun as this?
 

Attachments

  • 2009_0305Image0007.JPG
    2009_0305Image0007.JPG
    22.9 KB · Views: 896
  • 2009_0305Image0013.JPG
    2009_0305Image0013.JPG
    33.6 KB · Views: 879
This last post shows the unit in place for operation, and how the old canister is setup to collect the soot. I bought a 25' length of 1 1/2" sump pump discharge hose and wrapped each end with foam tape to fit snug into the old shop vac hose ends, wrapping each with electrical tape to secure them.

Now for the disappointing, sort-of, end to this saga. As the pictures show, I removed most of the soot before hooking up my Soot-Sucker by first tapping the pipe with a rubber ended hammer, then running a 3" pellet pipe brush through. The inside of the stove was also vacuumed, with a small dedicated shop vac fitted with a dust bag.

Either because there wasn't much soot left after I did this, or the stove wasn't very sooty anyway, as I cleaned it daily and weekly, and we just finished burning just over a ton, or the Lignetics pellets leave little residue, or some combination of these factors, I don't know. But all I got from the hose after running the unit for 5 minutes was a bare handfull.

The last picture shows the plug used to stop-up the pipe to theoretically vaccuum just the stove. I tried plugging the OAK when doing the pipe, but still couldn't get the plume of soot reported by those who use a leaf blower. *sigh* Maybe I'll try it next season first, then do the pipe tap and brush after.

I've included the self-made tools I use for daily cleaning as well. The scraper is a cut down stainless spatula. The scoop is just wide enough to fit into the bottom recess of the burnpot, in front of the OAK inlet, and works well to scoop 90% of the ash from the storage areas right and left of the pot. I use the dedicated shop vac weekly to remove the ash and soot, and do the heat exchanger behind the baffle plate monthly. The screwdriver has been sharpened to scrape creosote from the auger feed tube, about 1 1/2" in, daily.

Hope this has been entertaining, as it's now cleaning season, right? Cheers
 

Attachments

  • 100_1360.jpg
    100_1360.jpg
    14.2 KB · Views: 833
  • 100_1365.jpg
    100_1365.jpg
    18.5 KB · Views: 847
  • 100_1364.jpg
    100_1364.jpg
    17.7 KB · Views: 1,900
  • 100_1366.jpg
    100_1366.jpg
    16.1 KB · Views: 839
  • 100_1368.jpg
    100_1368.jpg
    19.9 KB · Views: 875
  • 100_1367.jpg
    100_1367.jpg
    18.7 KB · Views: 2,783
burnemifyagotem said:
sounds like a good idea, can't possibly be as fun as this?
I hear ya'. However, my house roof is a 12/12 pitch, and I'm too old to go up there. I do own a leaf blower too, a gas-engine unit that doesn't have a vacuum inlet unfortunately. And even if it did, I'm staying on the ground.
 
If i understand what you have done correctly, i think you and i have a similar contraptions, all i use is a rubber pvc reducer that attaches to the end of my shop vac hose and the other attaches the to the pipe. I believe it is a 3'' reducer to 2 1/2''
I just hook me vac hose up the the exhausting part of the vac and then hook the other end up the the pvc fitting and then put that on the bottom of the cleanout T. Also i use my shop vac to vacuum out my stoves (yea, i know, i have a really good filter and i clean it weekly) so i also use this fitting to vacuum out the pipe as well, though it isnt a cool to watch.
 
no pro said:
sounds like a good idea, can't possibly be as fun as this?

LOL No Pro

"SMOKE Monster" from the show LOST!!!!
 
Status
Not open for further replies.