Signficant Ash and Clinkers on high feed rate

  • Active since 1995, Hearth.com is THE place on the internet for free information and advice about wood stoves, pellet stoves and other energy saving equipment.

    We strive to provide opinions, articles, discussions and history related to Hearth Products and in a more general sense, energy issues.

    We promote the EFFICIENT, RESPONSIBLE, CLEAN and SAFE use of all fuels, whether renewable or fossil.
Status
Not open for further replies.

kofkorn

Feeling the Heat
Dec 3, 2008
371
Central MA
Hi all,

Love the forum, seems like lots of helpful people.

I recently bought an ESW 55-SHP25 and installed it in my house. We have a relatively large house (1st floor Approx 72' x 28'; 2nd floor ~38' x 24') with a very open floor plan in central MA. I usually keep the upstairs closed off. I have installed the stove relatively centrally in house and have a pretty even temperature throughout the house. I've installed a programmable thermostat and I like the performance.

My problem is the amount of ash and clinkers that are created overnight. I have adjusted the low burn feed and air rates (3-6-1) and have absolutely no problem when the stove is in low mode. As a matter of fact, I used about 3/4 of a bag over 24 hours when the stove is burning at low speed. However, when the outside temperature drops and the thermostat kicks on, I get a really large buildup of ash in the burn pot. I wake up in the morning and have to break up a 2"x 3" clinker every time. I have the high speed set at 8 feed and 9 room air. When I adjust it down to 5 feed rate, the clinkers are significantly smaller, but the stove is not able to keep up. I would assume that since the stove allows a 9 feed rate that it should burn reasonably well at this rate.

Is there any way to increase the burn air being fed into the pot at the higher feed rates?? Are there any other ways to reduce the clinkers at the higher feed rates??

I really like the stove, and have been using it continuously for almost a month now. We bought about 4 tons of pellets in advance, not knowing how much we would use, I expect at the rate we're going right now that we'll use 2.5 - 3 tons at most. Gotta love a $750 heating bill for the winter!

Thanks!
 
Sorry,

Forgot to mention that I'm really OCD when it comes to some things. I have completely cleaned out the entire burn box on a weekly basis with my shop vac, including the exchanger on top.

Thanks!

Ray
 
Uhhh, Damper?!??

I didn't know the stove had one. Where can i find it??

Thanks!

Ray
 
only thing i can think of by looking at your manual that there is no damper for air, there must be a way to get more in there...
 
What kind of peletts are you burning? Please tell me they are not OBECKS, because I am having the same problem, since I burned all my LG in the shoulder season. UGH! These are horrible! I don't have any adjustments other than the LFF, LFA, either. There has been talk about an adjustment in the hopper, but I have emptied mine and can't find it- although that is more for fine tuning LFF anyway.
 
Nope,

I'm using Fireside pellets (from Home Depot) made by the Premier Pellet Corp. out of Quebec.

I don't have any particular complaints, when burning in low feed rate, I get very little ash buildup and a very clean burn.

Thanks!
Ray
 
J00fek,

Based on this diagram:

http://www.englandsstoveworks.com/manuals/PelletDiagrams.pdf

I don't see a damper either. I wasn't aware of one in the stove.

I do have a relatively long run for the exhaust vent, about 3' horizontal; 90 elbow; 12' vertical; 90 Elbow; Duravent horizontal exhaust vent.

I have to go outside the house and then through a porch roof.

Would it help to go to a standard cap and eliminate the last 90 and the horizontal vent??

Thanks,
Ray
 
OK one more thing,

Based on this:

http://www.englandsstoveworks.com/manuals/SimpsonInstallation.pdf

a tall chimney would cause an overdraft, which doesn't seem to be the problem here. So this would make the argument that the extra 90 and horizontal vent cap are acceptable, maybe even preferred.

This is the bad thing about the internet!!! Too much information available!

Thank you for your help!

Ray
 
I read that tall overdraft connection a bit differantly. I think it says a tall one can COOL the gas and cause a POOR draft. I am wondering how to measure draft in these units, as I have a manometer, and used to work in fire control years ago. Have you done that formula where each piece of your pipe is assigned a number, and they should not be over fifteen totalled? If it does, you are supposed to go to 4", but I am not sure if the whole way, or adapt to 4". Mine is like 18, so I am thinking of adding a 4" section to see what happens.
 
I believe the whole pipe needs to be 4". The problem being addressed is airflow. If you ran 1/2" garden hose 10' and then increased the diameter to 3/4", you wouldn't be able to get any more water through the hose.

Jim
 
Ouch, that's expensive. I would hate to go through all of that and find out that it's not the problem.

Ok, here's me being the engineer (dangerous, I know) :)

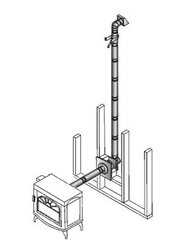
I've attached an image that approximates my installation, the second 90 elbow and the vent cap are above the roof.

Based on the formula I've seen here, my calculation would look like this:

3' horizontal = 3
90 Elbow = 5
12' vertical = 6
90 elbow = 5
vent cap = ?? (Assume 2)

total = 21

If I removed the second elbow (above my roof) and put a circular cap on instead I would lower my calculation to 16. Theoretically, I should see an improvement in the performance. If I see the performance increase and I'm still having issues, then it may make sense to change the whole thing over to a 4" pipe.

Can anyone give me a gut check on this logic?? I would hate to spend another $200 on a 4" kit that may not be needed.

Thanks!

Ray
 

Attachments

  • Installation.jpg
    Installation.jpg
    10.1 KB · Views: 503
Can anyone else weigh in??

Thanks!
 
When running lengths of vent more than 15 feet you need to step up to 4" pipe.

This is the "Important Information" quote #12 from page 3 of the manual

Horizontal runs should not exceed four feet (4’) with a maximum vertical flue
height of thirty five feet (35’). At a height of fifteen feet (15’) the pipe should be
increased to 4” PELLET VENT PIPE.

Have you checked out this page?
http://englanderstoves.com/help/PelletStove/dirty_burn.html
 
I get clinkers almost on a daily basis with my Harman P38 since it`s on a steady low burn .
I scrape every other day. Clinkers are small and form a couple inches away from the auger and below the air holes but they don`t seem to affect the flame much . I guess I could go longer between scrapings but I assume scraping clinkers are always going to be part of pellet stove maintenance.
 
Thanks Codebum and Gio,

With my exhaust vent at 16' total length, and the recommendation to change to a 4" pipe after 15', I have a hard time justifying spending an additional $300 on the 4" kit. I AM going to remove the top elbow and see if it makes a difference. And I agree with your sig. Gio, pellet stoves certainly aren't for people who are looking for a simple replacement for an oil furnace. You can't simply turn up the dial and leave it for a month.

Thanks to everyone for the help!

Ray
 
You didn't mention a cleanout "T",(You have to count this as a 90) or how far above your roof line your pipe terminates. From one who HAS repipied, and completely fixed all pellet burn problems. You need 4". I'd use excell pipe, it's not much more than other brands and well worth every penny. I read yesterday about a guy that was using 21' of 4" plus whatever was above the roof line and behind his stove, and asking why his stove had a lazy flame he needs 6". In the simplest terms, it is like using a large spit ball with a regular straw, BLOW! Large spitball large straw. Think VOLUME! FACT 3/4" water pipe carries a max BTU's of approx. 49,000. 1" pipe carries almost 100,000 BTU's. I have a whole backyard of 3" duravent, any takers?
 
Actually,

If you look at my calculation, I included the "T" as the first 90 in the unit, and the 12' vertical includes the amount above the roofline. So my calculation should be correct based on the system I have.

I'll let you know how it works out when I remove the upper 90 and run it for a bit.

Thanks!

Ray
 
You are using the same brand I used to use (for piping). I found mine leaked like a ******, had to seal EVERYWHERE. I sealed all joints rivets every angel on a 90 where sheet metal met sheet metal. It was sooo bad I just covered every inch of pipe with caulking (500 degree) with a paint brush. Then I replaced ALL gaskets. It helped me get through last season until I could afford to upgrade to 4" excell. With 3" I had more ash than I KNEW WHAT TO DO WITH< AND CLEANED IT CONSTANTLY>
 
Oh, and then when I lost power during full burn or during startup, even after 20 minutes very faint smell of smoke. I think the 3" round cap will improve your situation, but seal all of your pipe well. At the pitch of your roof measure from your roof pipe to the roof (straight across). Your pipe should be approx. 4' high at a point 10' from your roof pitch. Seal it well and BAM no more huge clinkers & normal ash build up.
Good luck.
 
Thanks Mike,

I'll give it a day or two to see how it works. It's supposed to be in the teens tonight so I'm sure the thermostat will kick it into high for a while. If I'm still having issues, I'll let you know.

Nice to see the manufacturer monitoring the forums. My in-laws (next door) and I each bought an Englander this summer. So far, we're both having very good experiences with them.

Thanks again!

Ray
 
Status
Not open for further replies.