
Slammer modifications
- Thread starter grizzle
- Start date
-
Active since 1995, Hearth.com is THE place on the internet for free information and advice about wood stoves, pellet stoves and other energy saving equipment.
We strive to provide opinions, articles, discussions and history related to Hearth Products and in a more general sense, energy issues.
We promote the EFFICIENT, RESPONSIBLE, CLEAN and SAFE use of all fuels, whether renewable or fossil.
You are using an out of date browser. It may not display this or other websites correctly.
You should upgrade or use an alternative browser.
You should upgrade or use an alternative browser.
- Status
- Not open for further replies.
- Sep 8, 2013
- 17
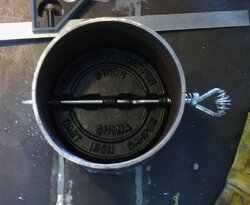
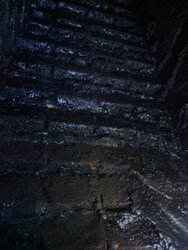
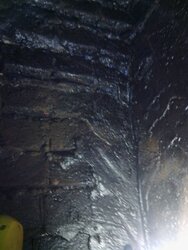
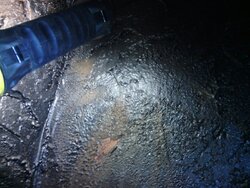
So I finally got my flexible liner + insulation kit delivered today.... wanted to install it tomorrow. Already cut out enough of the old Damper plate to fit the new liner through. The top 18 feet of the clay liner section are nice and clean, but I'm not sure if I've cleaned off the glazed on creosote well enough from the bottom 6 feet or so where the staggered brick transitions up into the clay liner.
Attachments
tfdchief
Minister of Fire
I am not an expert on this. But I will say that you want to clean as much of this as you can. Mechanical means will probably not work. It will take chemicals. Hopefully those more knowledgeable will chime in here. My son and I had similar issues with both our chimneys and used all the mechanical means to clean as best we could and have not had any problems since..
tfd echos my sentiments. You will probably need a jackhammer or a few gallons of easy-off oven cleaner to get it all. I cleaned up everything loose and flaky for my install, but had to leave the rest. I figure if it didn't catch on fire when directly exposed to flame and sparks from the fire, it sure won't catch just being exposed to the warm steel flue.
The only other issue depending on how old/stable the creosote is, would be one of smell. If it's very fresh, you might bake some 'smoke' smell out the first couple of firings. But if it's older and the volatiles have already gassed out, then it shouldn't be much issue. It would also be more notable if there is no block-off plate at the bottom of the flue. (highly recommended, but not explicitly necessary)
The only other issue depending on how old/stable the creosote is, would be one of smell. If it's very fresh, you might bake some 'smoke' smell out the first couple of firings. But if it's older and the volatiles have already gassed out, then it shouldn't be much issue. It would also be more notable if there is no block-off plate at the bottom of the flue. (highly recommended, but not explicitly necessary)
mellow
Resident Stove Connoisseur
tfdchief
Minister of Fire
There you go.You need to put some of this on it: https://www.rutland.com/p/121/tsr-third-stage-creosote-remover
- Sep 8, 2013
- 17
Just wanted to update and wrap up this thread. Along with the glazed on creosote I also had some trouble aligning and connecting the liner. I had to knock out about 6 bricks and cut some pretty large areas out of the old damper plate frame. I then made a chain flail with a truck body mount washer, a piece of all thread and some chain. This worked pretty good for knocking most of the creosote chunks and cracked bricks loose.
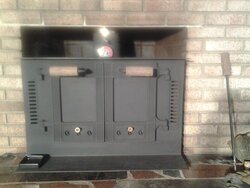
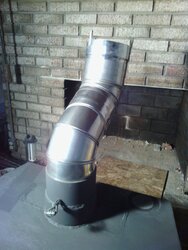
Due to further problems with alignment, I was also forced to put in two elbows. A 90° elbow (straightened to about 50°) is connected right to my damper housing which I had to shorten by an inch. A 45° elbow is then connected between the appliance adapter and the 90°. Everything from the cap up top to the elbows are 316 stainless to include the screw.
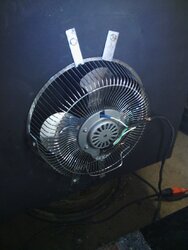
Other points of interest may include the door handles which are pieces of sassafras drilled down the center, the blower which is a re-purposed fan as seen above, and the fire brick/angle iron smoke shelf
I still plan to make a block off plate, and eventually figure out a better fan setup....
Thanx again to everyone for all the tips and advice
Due to further problems with alignment, I was also forced to put in two elbows. A 90° elbow (straightened to about 50°) is connected right to my damper housing which I had to shorten by an inch. A 45° elbow is then connected between the appliance adapter and the 90°. Everything from the cap up top to the elbows are 316 stainless to include the screw.
Other points of interest may include the door handles which are pieces of sassafras drilled down the center, the blower which is a re-purposed fan as seen above, and the fire brick/angle iron smoke shelf
I still plan to make a block off plate, and eventually figure out a better fan setup....
Thanx again to everyone for all the tips and advice
Attachments

wenger7446
Feeling the Heat
- Sep 8, 2013
- 17
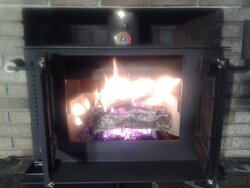
Well, it's been about 20-30° all day and it's keeping the 1800sq ft open basement and 2200sq ft main floor of my rancher at about 68° with only another small fan blowing air up the stairs. The flue thermometer seems to settle in at about 450° when I load it up and nearly close off the air intake. I've got a couch down there about 8' from the stove and with the blower on it gets almost too hot to sit there for too long...90's?
I rewired the fan and moved the capacitor out of the way of any high heat. I also remote mounted the switch.... seems to be fine for now... I'm not expecting it to last forever
I should also mention the draft is incredibly nice. Even when starting from cold, the smoke rolls and swirls around the smoke shelf and gets sucked up the flue with one door closed. Once warmed up I can open both doors without any smoke coming out.
Last edited:
wenger7446
Feeling the Heat
Thanks for the followup. Great to see how things turned out. I started to worry a bit when you mentioned the elbows because those will cut the draft some. But sounds like you're still drafting pretty good. I guess I also didn't explicitly mention, but in looking at my set-up, I had to offset the flue pipe about as far as it would go to the back of the stove and even then I had to totally remove the damper and take several bricks out of the smoke shelf to fit the pipe. Looks like by 'luck of the draw' maybe you chose to move the pipe forward on the opening? It's amazing how similar our two installs are! Big ol stove in a relatively small fireplace!
As for the damper, maximum heat will probably come with the damper closed a bit as it slows down the flue gas and allows max heat transfer to the stove. So you might experiment with best placement there. Too far open and the fire will just roar through the stove and up the flue with no chance to transfer heat to the metal. Too far closed and it will smolder and send all the 'energy' up the flue as smoke.
Good luck - enjoy the heat!
jrems
Feeling the Heat
To get that fan to blow more air make a shroud for it. Take some metal or even a few inches of stove pipe and slip it over the fan so it's shielded around the outside. It will help channel all the air through the stove.
By the way, nice work!
By the way, nice work!
- Sep 8, 2013
- 17
Got up on the roof today for something else and I decided it would be a good time to clean the liner. Last winter the stove went through about 3 cord and I hadn't so much as looked at the chimney since I installed it. Far as I can tell, there wasn't any buildup, just some bits of ash dust on the cap screen. I ran the rods and plastic brush all the way down anyway, and nothing came out but a small handful of ash/dust.
Looking back, I'm happy how it all came out, and I'd certainly do it again. Longer burn times in the Black Bart II would have been nice, but all around it is a decent performer after all the modifications. However, this winter I'll be running the new Lopi Cape Cod insert upstairs for primary heat, and burning in the basement a little bit less.
Looking back, I'm happy how it all came out, and I'd certainly do it again. Longer burn times in the Black Bart II would have been nice, but all around it is a decent performer after all the modifications. However, this winter I'll be running the new Lopi Cape Cod insert upstairs for primary heat, and burning in the basement a little bit less.
- Status
- Not open for further replies.
Similar threads
- Replies
- 11
- Views
- 920
- Replies
- 9
- Views
- 822
- Replies
- 2
- Views
- 436
- Replies
- 33
- Views
- 1K