1. Welcome Hearth.com Guests and Visitors - Please enjoy our forums!
    Hearth.com GOLD Sponsors who help bring the site content to you:
    Jotul Cast Iron Stoves
    Woodstock Soapstone Stoves
    Hearth and Home (QuadraFire and Harman Stoves)
  1. dylskee Burning Hunk

    joined: Sep 28, 2008
    230 posts
    Hello all,

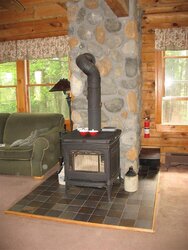
    If you have been following along you might know that I'm in the process of building a hearth for my new Fireview, along with a slew of other projects in the works as well! :eek:

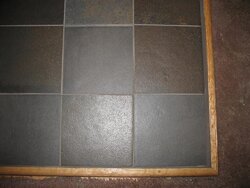
    I am a great CNC Milling Machinist if I say so myself but a carpenter I am NOT! I have constructed my hearth so far without a problem and now I'm ready to lay the slate tile. I pulled the tiles from the package and these tiles are incredibly different to say the least! The thickness of these tiles vary a lot, I have never tiled before so I need some help. I bought a few more boxes of tile to try and get most of the tiles with the same thickness to make it a little easier on myself. How do I compensate for the thickness of each tile? Do I just use more thinset under the thinner tiles or do I shim it somehow? Any help would be appreciated so I can get this knocked out before the Patriots game tomorrow.
    tile.jpg
    #1

    Helpful Sponsor Ads!


  2. mfglickman Minister of Fire

    joined: Jan 17, 2012
    652 posts
    NW CT
    Do you have enough of one thickness to do your project and of other thicknesses to make up a box to return? That's what I'd tend to do if possible. Shimming doesn't sound like a good idea unless you can figure out the R value business. Maybe you can - I've no idea what that CNC milliing machine thing is! :p Every time I've bought boxes of tile at Home Depot or Lowe's for a project I've made my own "boxes" before leaving the store to account for broken tiles, variations in color, etc.

    I'm sure others will have better ideas. Go Pats!
  3. Pallet Pete Minister of Fire

    joined: Nov 27, 2011
    3,178 posts
    Ovid MI

    This Might help ya http://www.doityourself.com/stry/layaslatefloor#b I have tiled a few times but not sleight. Usually I go to the diy website when I don't know and it works out well.

    Pete
  4. jeff_t Minister of Fire

    joined: Sep 14, 2008
    2,693 posts
    SE MI
    Mine were a bit varied, but not that radical. I pretty much just winged it with the mortar. It's not a high traffic area, so I'm not worried about tripping. If I really look I can see it, but it just doesn't stand out.

    My tile came from here, not the other stuff from the box stores http://www.vermontslatedepot.com/
    Scotty Overkill likes this.
  5. dylskee Burning Hunk

    joined: Sep 28, 2008
    230 posts
    That's why I bought 3 more boxes today so I will open them tomorrow and see what I have.

    Yeah I shouldn't be too worried because it's just for the stove to sit on so there won't be any traffic on it at all but I'm the type of person that will stare at the inperfections and swear at myself for not doing it right the first time! Just trying to save mysely some time, i want to get my stove fired next weekend. I got my floors done so the pressure is on me now.......
  6. Pallet Pete Minister of Fire

    joined: Nov 27, 2011
    3,178 posts
    Ovid MI
    There is nothing like building it yourself you know all the imperfections by heart well everyone else pats you on the back and says great job all you can think about is that on little half a millimeter gap difference between those two tiles. ;lol


    Ok in seriousness know if you have not got them yet I picked up a box of tile spacers that look like miny crosses. I think they may help you with the spacing and maybe even the leveling out of the tiles to a small extent. http://www.lowes.com/pd_87748-34587-1004_0__?productId=1198399 they really are a huge help !

    Pete
  7. dylskee Burning Hunk

    joined: Sep 28, 2008
    230 posts
    I bought 12"X12" tiles, where should I start my tiles? The center or one side or the other? My hearth is going to be 60 3/8 X 48, using 1/4 spacers. I was thinking I would start with the second row from the back with the full tiles. that might make it a little easier for me to lay the rest of the tiles. I'll be cutting a 1/4 from all the back tiles.
    hearth .jpg
  8. jeff_t Minister of Fire

    joined: Sep 14, 2008
    2,693 posts
    SE MI
    That ain't nothing but truth there.
    Scott2373 likes this.
  9. dylskee Burning Hunk

    joined: Sep 28, 2008
    230 posts
    Yes you're right pete, I think I have to lighten up a bit and just start slapping tiles down! My main goal is to have a safe place for my stove to sit, I'm not making a piece of art! :) And thanks for the link, I have spacers but they're the cross type without the circle, I like yours better....
  10. dylskee Burning Hunk

    joined: Sep 28, 2008
    230 posts
    I love your quote in your sig Jeff, sheldon........ :)
  11. Pallet Pete Minister of Fire

    joined: Nov 27, 2011
    3,178 posts
    Ovid MI
    I acctually use slightly different method. Put them all down without grout so you can cut them all and dry fit them all. Then in a order you will remember pick them up and stack them neatly. When you put them down again put enouph grout for one row at a time and go slowly. Another tip is to put a screw down in the beginning then attach a string and do it again on the other side and follow the straight line. After that you should be good to go off the first row. I would start with the wall and work out as you go staying in a straight line.

    Pete
    Scotty Overkill, dylskee and Dairyman like this.
  12. raybonz Minister of Fire

    joined: Feb 5, 2008
    5,981 posts
    Carver, MA.
    I agree with Pete, lay them out dry with spacers first. I used a square and pencil then marked the center line to create an X then worked from the center out to the edge. If grout oozes between the tile let it set up a bit and I used a bamboo shish kabob skewer to clean out the excess (my wife's idea). The rest will clean up when you damp sponge the tiles.

    Ray
    Scotty Overkill likes this.
  13. Jack Straw Minister of Fire

    joined: Dec 22, 2008
    2,011 posts
    Schoharie County, N Y
    Slate is very brittle and cracks easily, so you want a good, thick layer of thinset. With a thick layer of thinset you can somewhat compensate for the thickness discrepancy.
    Scotty Overkill likes this.
  14. Stump_Branch Minister of Fire

    joined: Nov 12, 2010
    878 posts
    MD
    Two things, love the fireview and slate combo, have it myself. Second love the basket weave pattern, much better then a grid. Magical more thinset. Id lay them out first a well just to get them a close a you can. even the face of slate isn't flush so don't go crazy. What kind of grout are you thinking? Going up the walls with slate too?
  15. raybonz Minister of Fire

    joined: Feb 5, 2008
    5,981 posts
    Carver, MA.
    I will also add to spread out your mortar in sections marked by the X and to back butter the tile with mortar then place the tile one section at a time.. The true integrity of your tile install is reliant on the mortar fully supporting the tile and this translates to no mortar voids between the tile and the substrate (cement board). All layers must be mortared including the cement board to the floor to realize maximum strength of the hearth. The mortar I am referring to is also known as thinset.

    Ray
    PapaDave and dylskee like this.
  16. flusher17 Member

    joined: Jun 3, 2010
    52 posts
    ADKs, Northern NY
    If it was me, I would use different notch sizes in trowels for the different thicknesses of the slate tiles. Use the largest notch on the thinest tiles and the smaller notches as the tiles get thicker. I like starting with a full tile centered on the front row and then a running bond pattern.
  17. jeff_t Minister of Fire

    joined: Sep 14, 2008
    2,693 posts
    SE MI
    We all understand that you mean mortar ;lol
    Scotty Overkill likes this.
  18. raybonz Minister of Fire

    joined: Feb 5, 2008
    5,981 posts
    Carver, MA.
    Ooops yes mortar I tend to get the 2 mixed up except when doing the actual work lol.. Sorry about that! I will fix the post..

    Ray
    Scotty Overkill likes this.
  19. dylskee Burning Hunk

    joined: Sep 28, 2008
    230 posts
    That's no problem, I knew what you meant. I'm using a pre-mixed thinset. I'm heading down stairs to get started now.....
    Scotty Overkill and raybonz like this.
  20. jeff_t Minister of Fire

    joined: Sep 14, 2008
    2,693 posts
    SE MI
    This is the reason I chose the Vermont slate over the Indian and Chinese slate from the box stores. That stuff already looks broken, like huge pieces are going to flake right off .

    There is that reason, plus the fact that it came from Vermont. It was over 2x the price with shipping, but I only covered 50 sq ft.
  21. raybonz Minister of Fire

    joined: Feb 5, 2008
    5,981 posts
    Carver, MA.
    I look forward to seeing your progress! I am very pleased with my finished hearth here :) There are pics of it posted here somewhere..

    Good Luck!

    Ray
  22. dylskee Burning Hunk

    joined: Sep 28, 2008
    230 posts
    I'm not going up the walls, I might do something like that next year but for now I'm just doing the hearth. As for the grout I'm using the brand Simple Grout, a pre-mixed gray color.
  23. raybonz Minister of Fire

    joined: Feb 5, 2008
    5,981 posts
    Carver, MA.
    Yes there is a big difference to say the least! Vermont slate is a much harder product and looks nicer too! I decided porcelain tile would look good and I bought it on clearance for short money at Best Tile near me.

    Ray
  24. raybonz Minister of Fire

    joined: Feb 5, 2008
    5,981 posts
    Carver, MA.
    I used Permacolor made by Laticrete because you can choose from a huge color assortment.. More $$ but worth it and the whole hearth only set me back under $300.00 ..

    Ray
  25. raybonz Minister of Fire

    joined: Feb 5, 2008
    5,981 posts
    Carver, MA.
    Here is my hearth\stove complete..

    Ray

    Attached Files:

    Scotty Overkill and dylskee like this.

Share This Page