Stacking on pallets

  • Active since 1995, Hearth.com is THE place on the internet for free information and advice about wood stoves, pellet stoves and other energy saving equipment.

    We strive to provide opinions, articles, discussions and history related to Hearth Products and in a more general sense, energy issues.

    We promote the EFFICIENT, RESPONSIBLE, CLEAN and SAFE use of all fuels, whether renewable or fossil.
Status
Not open for further replies.

wendell

Minister of Fire
Jan 29, 2008
2,042
NE Iowa
I am going to stack my 2010 wood on pallets and have a couple questions.

First, the ground is not level throughout the area I will be using. Is it OK if the pallets don't set level as long as you stack level or are you asking for trouble? Is it better to shim up each pallet so you are starting level? My first 4 are pretty good but then I start sloping up towards a pine tree.

Do you wrap the wood with some kind of fencing/wire to keep them from tipping over or are some metal fence posts enough?

Do you stack each row tight against its neighbor to avoid shifting and falling or still try to keep some air space between them to facilitate seasoning?

Thanks!!
 
I'm probably the worst stacker of wood in this forum but I think being level is very important. Once you get about 4'...and many folks do, they can tumbling down on you. That's bad if you have kids...cause wood pile are magnets to children. I use shim the bottom of the pallets level back in the day. Sometimes that can lead to a visually pleasing step- like effect. You'll be happy you took the extra time to level.
 
I went the wood route this year for the first time (in sizable quantities), so I'll share what I've done/learned.

1. I would ABSOLUTELY level the pallets. Wait a bit until the ground softens up and dig (if you have to) to level it. Depending on what you use to shim it, it might not be strong enough.

2. Once I got my pallets together (I have one string 24' long and one pallet wide and one string 16' long and 2 pallets wide), I used 5' pieces of pressure-treated 2x4s to brace them. It turned out to be a very good idea.

3. For the winter, I put tarps up on them and pretty much wrapped them, using hay baling rope to tie them off to the pallets. I'll pull the tarps off the sides for spring, summer and fall to let the air get at the wood.
 
I use old pavers to level and raise pallets. It makes it easier to stack and the pallets last longer up off the ground.
 
Leveling the pallets is the easiest way to do it. I used concrete blocks and PT wood to do this. Mine is actually on a slope and not just uneven - so I had to use all shapes and sizes to get it level enough. My pallet configuration is roughly 12x12. It is ok if the pallets slope in the direction your pile is going to run - but not the other way. I have pallets form the end of the pile and tie them into the base pallets with 2x4s or whatever scrap I have around. Pretty simple really. The wife and a friend call it pallet island and mock me a bit but they don't mock me in the winter while the house is warm.
 
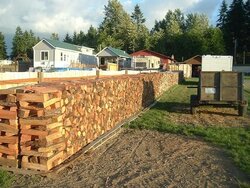
I'll whip out my overused wood picture since it applies again. I love stacking on pallets becuase they are free, support two rows of 18" wood, and effectively elevate the stack.

I smoothed the area out but the pallets are on a slope towards the camera. To deal with really bad uneven ground just dig out the high side. My pallet bottoms always end up getting buried by rodents and the pallets will rot away after a couple of years nomatter what you do. It is way easier to bury the high side than to try and prop up the low side.

I don't stack any higher than 4'. It gets much harder and more likely to fall after that. That row is 96' long and 9 cords.

There is no need for any posts or steel or wire mesh or any other jive. Just stack it straight. If you feel the need, then maybe some end posts? The whole point of outdoor pallet stacks is so that they are temporary and not structures. If you want to drive posts then why not build a pole barn?

I only stack two rows deep and tend to have the rows come together near the top but I'm not obsessed about that.

When winter comes I buy the 4 mil black plastic in a 10'x100' sheet and fold it in half for a 5' wide strip. This strip covers the top and about a foot down each side. DOn't do this is the wind! Then I run nylon mason style string zig-zagged over the plastic and down to the pallets to hold the plastic down. I don't put any heavy stuff on top, just the string holds the plastic.
 

Attachments

  • wood2s.JPG
    wood2s.JPG
    101 KB · Views: 873
  • wood1.JPG
    wood1.JPG
    74 KB · Views: 816
Get them pallets level. i take some t-posts on the side that i shim and i put one at each end and one in the middle, and i take a piece of old clothes line (cable not sting) string it from post to post so it butt up to the wood about a foot down from the top. As my stack got shorter i slide the line down. some stacks i do that to both sides. Ya never know what side is going to start leaning even shimed.
 
Here is what I just finished today. My plan was to stand up a pallet up every 8 ft to stabilize the stack but only got 2 in. The ends are pallets standing up on end and braced with scrap 2x6s
My stack is 4 ft ish high and 32 ft long. I also have another one that is 11 ft long. I wish my stack was as neat and flush and the one above but what can I say. Also my splits are 16 inches long so there is a gap between rows. I did however run several longer pieces of scrap wood between the stacks that are embedded in the rows, kind of like rebar in cement.
http://i29.photobucket.com/albums/c254/Jamess67/Bark/100_2399.jpg
http://i29.photobucket.com/albums/c254/Jamess67/Bark/100_2398.jpg
 
Wow, you must have a time machine...5/3/09 :)
Guess that explains why no snow on the ground.
Nice lookin stacks.
 
Jamess67 said:
Here is what I just finished today. My plan was to stand up a pallet up every 8 ft to stabilize the stack but only got 2 in. The ends are pallets standing up on end and braced with scrap 2x6s
My stack is 4 ft ish high and 32 ft long. I also have another one that is 11 ft long. I wish my stack was as neat and flush and the one above but what can I say. Also my splits are 16 inches long so there is a gap between rows. I did however run several longer pieces of scrap wood between the stacks that are embedded in the rows, kind of like rebar in cement.

Don't worry about that, the general consensus is that Highbeam is just really good with photoshop :p
 
Wow, you must have a time machine...5/3/09

You guys play alotta ball out there too! %-P

Just kiddin', nice setup, I'm looking at doing something similar, good to see what everyone else does too. Is that your version of a sawbuck there as well?
 
pulldownclaw said:
Wow, you must have a time machine...5/3/09

You guys play alotta ball out there too! %-P

Just kiddin', nice setup, I'm looking at doing something similar, good to see what everyone else does too. Is that your version of a sawbuck there as well?

All those hoops are for the trick shots..."bank it off the roof, 2 hops on the woodpile, and then nothing but net"
 
Ha! What's most important is that you have enough wood, then you have to make sure that you don't poke holes in your tarp, and then you have to make sure that it doesn't fall over. I tend to pace my stacking at a slow enough speed that I can just work all day and get it all done at once. The slower pace means I can take some time to get it pretty.

Sorta like eating a bowl of cereal, I always finsish the cereal and milk at the same time where most folks end up with milk left over that they must drink. We all get the food eaten but I like things to work out just right even though it really doesn't matter.

I see you saved those large splits of wood there with the big knots in them. Those will burn for a long time.
 
ilikewood said:
pulldownclaw said:
Wow, you must have a time machine...5/3/09

You guys play alotta ball out there too! %-P

Just kiddin', nice setup, I'm looking at doing something similar, good to see what everyone else does too. Is that your version of a sawbuck there as well?

All those hoops are for the trick shots..."bank it off the roof, 2 hops on the woodpile, and then nothing but net"
I dont shoot hoops, I hoping the house (dump) next door burns down so I wont have so many basketball hoops around to taunt me.
And yes that is my version of a bucking stand. Its not for long lengths just for sizing the occasional long log.
The date on the photo is correct it reads day/month/year. Im too stupid to figure out how to change the order.
 
Highbeam said:
I'll whip out my overused wood picture since it applies again.

Admit it, you love pulling out your pictures. I would like to see you come out here and try stacking split elm as pretty as that! :)
 
sorry a blurry pic. this is my set up before I stack my wood. I shim it level with wood chips so it is level to walk on when I stack. I drive wooden fence post rails into the ground through the side pallets to keep them from tipping. I can get my stack about 7' high like this...
 

Attachments

  • !cid__0207091551a.jpg
    !cid__0207091551a.jpg
    9.4 KB · Views: 485
here is a bigger pic but with some wood on it.
 

Attachments

  • P5060013c.jpg
    P5060013c.jpg
    150 KB · Views: 444
My ground is mostly level, I just lay out the pallets, stack straight, and haven't had a problem. I cross stack on the ends, making sure the ends tilt inward toward the row a bit. These 3 rows here are about 5 cord, the pic is from a year ago, these stacks are still standing and this stuff is all red oak. I'll burn it next winter :)

3337924118_c0c1af3a6f.png
 
That sure is a nice pile ansehnlich1. Are you using a laser or string?


KC
 
Ha, no laser, no string.

I bucked up this log load, and cut 'em pretty close to size for my stove. Then stacked the splits along the pallets, and voila, she turned out lookin good. I do take the time to turn a piece end for end if it fits better to keep stuff level when stackin'. I got a saw mill right close to me and get a 5 cord load every spring. Don't have a pic of this years stuff yet, but it's split and stacked already, and will sit 'til winter '10/'11

3337955306_6520653aec.jpg
 
Status
Not open for further replies.