I made a 304 SS stove out of 3/8" plate that I purchased as scrap. (Old filter press plates) It was cut with a plasma cutter and a LOT of grinding, stick welded mostly with 1/8" 309-16 rods. (about 20 lbs)
Being so thick, the warping was minimal, but small parts pretty much require preheating to prevent serious cool-down movement. It has a full width baffle leaving a 2" transfer area to the upper chamber, firebrick floor and a cast refractory door and door-side wall.
Two intake ports feed the fire directly, two feed pipes that go through the bottom of the fire and dump just in front of and below the window. Stove pipe is 10' of SS, 6" .190 wall tube.
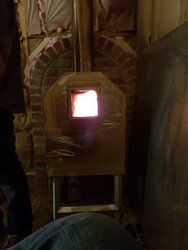
It is about 18" x 20" deep by 24" tall. How does it work? It lights easy and drafts extremely well. The window blackens immediately but clears as it heats up. It heats up quickly. The reflectivity of the interior surfaces combined with the refractory make for great burns, immediate action when refueling.
BUT:
I knew that SS "holds" heat, moves more with heat, and in general behaves differently than mild steel. Watching the stove turn a golden straw color, I realize that it's cresting 700F.. with a dull red circle forming below the window.
You'd think it would feel painfully hot, but it doesn't. Run hand past the window and it's intense, not so much past the steel. Hot, but not overly intense.
The surface is ground with flap discs, just to shape it and knock down welds. Turns out the emissivity of any polished metal is super low... a couple hard mineral deposits on top from the first fire actually feel hotter despite being the same temp.
For fun, putting a 2x8 solid mild steel unfinished block on top, going to see how it feels. Then look at roughing up or oxidizing the surface- have had interesting results adding oxide layers to SS by putting pieces in coals overnight. Also, the secondary air is hard to tune, may have too much volume and a cooling effect.
This will be a sauna stove, btw. So, can it be done? Sure. Would I do it again? Not sure. Fun experiment but easily takes 3-4 times as long for a garage fabricator. Once I figure out how to get a little more radiation from it, maybe I'll be sold.
Also- it convects wonderfully, being 18" off of the floor. Very strong laminar flow follows the profile of the angled top until they meet and rise with considerable force.

")