Stay on target.

  • Active since 1995, Hearth.com is THE place on the internet for free information and advice about wood stoves, pellet stoves and other energy saving equipment.

    We strive to provide opinions, articles, discussions and history related to Hearth Products and in a more general sense, energy issues.

    We promote the EFFICIENT, RESPONSIBLE, CLEAN and SAFE use of all fuels, whether renewable or fossil.
Status
Not open for further replies.

Marty

Feeling the Heat
Jul 11, 2006
284
Pittsburgh
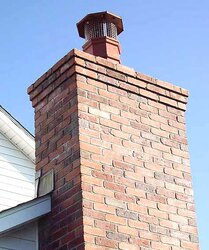
Install progress on the Mansfield(2,450.00 including tax and delivery), Olympic 20' 316 Ti liner kit (475.00 including tax) and 25' ceramic wrap with mesh surround kit (275.00 including tax) = total cost so far 3,200.00


Last weekend I used a bag of morter (type S) to reenforce the interior of the chimney above the firebox and fill the gaps and cracks that had developed over the years.

Yesterday I cut out the damper cross piece and put 4 notches in the brick to get the stove in deep enough for a better shot up for the liner out of the flue collar (now about 2 1/2" back from the upper inner steal 'L' cross support).

Today I made the block off plate, according to the instructions on this site, out of what appears to be 24 gage )might measure out as 25) galvinised sheet metal that I had sitting in the garage for years. And I cut out two 17x20" sheets of same to mount on the side walls of the firebox to reflect out some of the heat.

Unfortunately I am looking at about 20" recessed into the box and 4" out in front on the hearth. This is the only way to get a good clean shot up through the chimney. (Mansfield is top exit only)

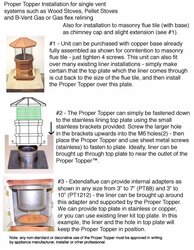
The current plan is to use lots of mineral wool to center the ceramic blanket insulated liner in the 16" clay flue and get the added insulation it provides.

Now I'm off to get a heavier gage steel for the top plate and mix up some more morter for the final touch up work inside the box...

The plan is she goes in next weekend.

Speak now or forever hold your peace.
 
T-Minus seven days and counting. Peace hold activated.

Lookin good guy.
 
Projects do have a way of expaning sounds like you recieved a lot of good advice here. When Hot flame and I installed his stove we attached mineral wool Micore to the back of the blockoff plate prior to installation. Again for two reasons to reflect heat back and prevent cold decending
 
After a little reading today, I am a little concerned about possible downdraft through the water heater only chimney cap that will sit about 12" (closest edge) from the stove chimney cap.

The bottom edge of water heater cap lid is aprox 3" below the top or the flexliner inside the cap.

I wish they had a little more verticle seperation.
 
Marty said:
After a little reading today, I am a little concerned about possible downdraft through the water heater only chimney cap that will sit about 12" (closest edge) from the stove chimney cap.

The bottom edge of water heater cap lid is aprox 3" below the top or the flexliner inside the cap.

I wish they had a little more verticle seperation.

Boy has Craig got a deal for you.
 
BrotherBart said:
Boy has Craig got a deal for you.

Yeah, heck....why use that ugly cap when you can use a Proper Topper or Cast Classic to add to the chimney height and make it look really good.
 

Attachments

  • PT1212.jpg
    PT1212.jpg
    46.1 KB · Views: 421
  • PTlinerinstall3.jpg
    PTlinerinstall3.jpg
    99.2 KB · Views: 410
I read through the link to your boosta and extenda offerings on that other thread craig in the section where it calls for a 4-12" verticle seperation and you recomend at least 7". so I climbed up on the roof again this AM with a cup of joe and a tape measure.

The top of the pipe on the water heater sits at 2".
The top plate termination collar sits at 4" and the instructions say to cut the lliner 4" above that. (8")

So now I'm looking at a 6" difference and thinking about cheating it up another inch to get to 7.

I would like nothing more than to get one of those extendaflues and bring it up another 2-3' and use the whole 20' flex but, to be perfectly frank, the budget is pretty much in the sh!ter at this point and I am trying to get a new clutch in the toyota PU and still have less than a cord of seasoned wood to face the winter with... but that's a topic for another thread...

I guess I'll take a shot with my 6-7" seperation and keep my fingers crossed.
 
In code somewhere I remembering the separation distance of 9" but in your case every additional inch will help
 
Marty, make sure you read the installation instructions for your liner. My liner instructions, in the boldest and largest text states
WARNING! Do not use any loose fill, cementious, or blanket insulation thicker than 1/4" equivalent refractory ceramic fiber. These products void the Saf-T Liner and may create unsafe conditions resulting in damage to the masonry chimney and/or the liner system

So, just a caution about adding the mineral wool insulation. My feeling is, the extra insulation may let your liner heat hot enough to set creosote off and increase your chances of a chimney fire or, if you do have a chimney fire the extra insulation won't let the heat disappate fast enough and you'll pass the safety design of your liner.
 
Project expands again.

called my dealerto see if he had a pipe extension that could buy me 4-6" at the top...

He said the propper way to do it would be to add a 4-6" piece of 16"x16" (matching whats below it) clay tile to the top of the stack and silicone it in place (cost $20). Then silicone the top plate to that and have the 10-12" seperation between pipes.

My clay tile currently ends at brick level on top of the chimney.

This sounds ok to me as I would be able to use almost 19' of my 20' liner, be in code, and only spend another $20...

let the flaming begin.


Rhonemas, I can't find any reference in the liner install manual to over insulating. Besides that I plan on stuffing it ,not the whole way through, but in about 3 sections... near the top, about the middle, and at the bottom. I think it will be stiff enough to cut an oversized hole in the middle, get it up into position and then pack in some loose stuff.
 
Sounds like a plan to me.
 
Status
Not open for further replies.