Steel Block Off Plate w/ Rockbard 60 Insulation pics

  • Active since 1995, Hearth.com is THE place on the internet for free information and advice about wood stoves, pellet stoves and other energy saving equipment.

    We strive to provide opinions, articles, discussions and history related to Hearth Products and in a more general sense, energy issues.

    We promote the EFFICIENT, RESPONSIBLE, CLEAN and SAFE use of all fuels, whether renewable or fossil.
Status
Not open for further replies.

cycloxer

Minister of Fire
Jul 9, 2008
715
Worcester County, MA
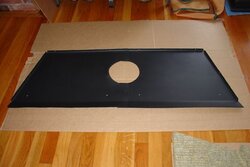
Here is an update of the construction of my lower block off plate. To summarize, this is a 22 gauge piece of sheet steel that I bought at Lowes for $30. I made my plate in two pieces so that it is easier to remove as mine is 46" long. Then I painted it with Rutland 1,200 degree stove paint for $12. It will be screwed into place with 3/16" Tapcon screws drilled into the fireplace masonry joints.

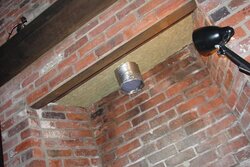
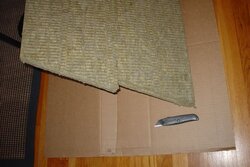
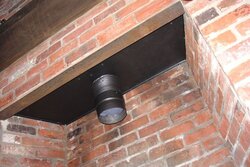
Above the plate I am using a 2" thick Roxul Rockboard 60 insulation board which is fireproof and rated to 1,200 degrees with an ultimate melting temperature of 2,100. This stuff is very easy to work with and can be cut with a utility knife. I bought one board from www.atsacoustics.com for $13. This provides an R value of 8.4 for the 2". I have enough left over to put a plug up at the top of my chimney as well.

I haven't decided if I need to seal around the perimeter with high-temp silicone. Thoughts?
 

Attachments

  • lower block plate 5.jpg
    lower block plate 5.jpg
    31.1 KB · Views: 5,256
  • lower block plate 6.jpg
    lower block plate 6.jpg
    58 KB · Views: 6,857
  • Rockboard 60.jpg
    Rockboard 60.jpg
    42.8 KB · Views: 5,446
  • Like
Reactions: GS7
The lower block off plate Is pretty much done and ready for the stove. With the rockboard behind the the plate I can feel no drafts at all. I'll seal it up even more with high-temp silicone on the perimeter and furnace cement at the stove pipe once the stove is located and everything checks out okay. This took a fair amount of time to complete, but it looks like it is going to work out well.
 

Attachments

  • lower block plate 7.jpg
    lower block plate 7.jpg
    54.5 KB · Views: 3,885
Looks like a text book install. It should work very well. Time to move in the heat machine!
 
Yeah I hope so. I will say that you could feel the cold air getting drawn up the flue before I put this plate in place - and that is with the top of the chimney already blocked off. For those trying to decided if it is necessary, I can only say I would recommend the plate. Also, as I have stated before, this is essentially a steel fire door that separates your chimney from your house. If something were to go horribly wrong within the chimney or liner you have some protection. One final point - I opted to run my stainless liner right into the top of the stove and just painted the end with stove paint. This avoids another joint w/ black pipe. Fewer joints is always better.

I'm throwing all of this info out here so that other people can get some ideas for their installation. I searched the Hearth.com forums before I started this project and saw a lot of great designs and pictures and learned a lot about block off plates.
 
Status
Not open for further replies.