Support box install. Need input on correct install

  • Active since 1995, Hearth.com is THE place on the internet for free information and advice about wood stoves, pellet stoves and other energy saving equipment.

    We strive to provide opinions, articles, discussions and history related to Hearth Products and in a more general sense, energy issues.

    We promote the EFFICIENT, RESPONSIBLE, CLEAN and SAFE use of all fuels, whether renewable or fossil.
Status
Not open for further replies.

Leroy_B

Member
Dec 23, 2010
62
Southern N.H.
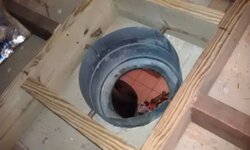
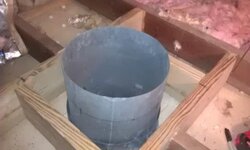
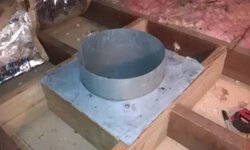
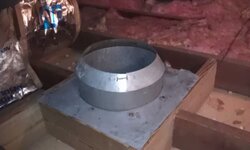
Just installed a support box in a cramped, dusty, mouse turd space in the attic. The support box, double insulated pipe and flashing/storm collar was removed from an elderly couples home. The contractor removed the support box while I removed the insulated pipe so I wasn't 100% sure what the assembly looked like. After reviewing a few web sites showing the different support box installs I'm hoping I've got the assembly correct before I completely secure it to the frame and take the next step to install the rest of the pipe. I'm working with used parts but still in good condition with little use. Yes I had to cut the 2x6 ceiling joist and re-frame since it's the only route the stove and pipe can best be located. So, curious to know if everything looks right. It's my first install.
 

Attachments

  • Support box 1.jpg
    Support box 1.jpg
    31.2 KB · Views: 246
  • Support box 2 .jpg
    Support box 2 .jpg
    28.6 KB · Views: 180
  • Support box 3.jpg
    Support box 3.jpg
    29.4 KB · Views: 182
  • Support box 4.jpg
    Support box 4.jpg
    28.7 KB · Views: 193
  • Support box ceiling support.jpg
    Support box ceiling support.jpg
    18.4 KB · Views: 193
From what I can see, it looks good. the insulation collar is a bit low, but ok with the current batt insulation. You'll need to use the matching pipe to complete the installation.
 
True it is low, and your correct in the observation. I can explain why. There's 2 layers of drywall on the ceiling and the first layer is attached to 1x2 strapping that's been nailed to the ceiling joists. Much to my surprise when I cut the hole in the ceiling and removed a double layer. Here's the bigger surprise I've found with this house I bought 2 years ago. At some time in the 50 years of the homes years when at some time termites were found and the exterminators would drill 1/2 holes in the ceilings and walls and spray the insecticide. I've been finding this common in the house as I renovate. And yes I do have the correct double insulated pipe for the rest of the install. I did have an idea that I'd fabricate sheet metal and build up the insulation collar. A quick fix to make up for what was lost due to work done by previous owner. I'm no stranger to having to go a bit beyond the normal repairs. If I did extend the collar then would I need any ventilation on the storm collar or leave it alone? Just a thought I had but if not necessary then it's one less on the to-do list.
 
Leroy, +1 to what begreen said. Also, I am unable to see where or how the ceiling support box is attached to the 2" x 6" trusses. It seems you have already done much research for the installation. So, as you are well aware, this connection is very important for the amount of chimney weight it must carry. Depending on your stove configuration, either the stove and/or the ceiling support box must also carry the weight of the stove pipe.

Numerous ceiling support box installation instructions I have read indicate the wood framing member supports are secured to the trusses and "kiss" the outside edge of the support box. The support box is then screwed to those framing members. You don't mention the approximate age of the support box so we can assume it is reasonable current production. Most current production ceiling support boxes are sized so the wood framing support members may touch the outside of the support box and still meet requirements for "clearance to combustibles".

The finish trim at the ceiling looks neat and well done. It appears the support box protrudes far enough through the ceiling and into the room to allow for necessary "clearance to combustibles" (the ceiling) for double wall stove pipe. That connection point appears to be a too short for "clearance to combustibles" (the ceiling) for single wall stove pipe.

Just a "heads up" for you to consider before you get too far into the installation.

Best wishes and good luck. :)
 
John, thank you for your input. The ceiling support box or ceiling trim in first picture viewing left to right is nailed in 4 locations to the frame at the top of the wooden ceiling box itself with 4, 8 penny nails. I cut a 12" diameter hole in the ceiling for the trim and it fit perfectly since diameter is also 12". There's proper clearance all around for double insulated pipe and the black pipe from my stove slips up into the insulated pipe and is secured with 4 sheet metal screws on the ceiling ring or as I've viewed it when turned upside down as a top hat. My 2x6 wood box frame is 14 1/2x 14 1/4. The insulation collar sits in the ceiling support box down 7 1/4" then the sheet metal seen in picture 3 covers the box. I'm installing 3, 30" in length double insulated pipe since the roof in the attic is just 28" above the wooden support box. I had an idea to band and secure one of the double insulated pipes to the roof rafters to take some weight off the ceiling support and the force of cleaning the flue periodically. I don't know how old the whole assembly is but if I were to guess, 15 to 20 years old. The home is a ranch with a pitch of12/4 so working in the attic is somewhat confined but doable.
 
Leroy, Bingo!! Your description clarifies all for me. Based on the photos and your description of the installation, I would predict your ceiling support box installation meets the necessary code requirements with which I am familiar. Your inclination to install a support band to one of the 30" sections of chimney is something I would also do but am not certain it is necessary. In my opinion, the peace-of-mind provided by the support band is well worth the slight expense and little labor involved.

Please let us all know how the stove/stove pipe/chimney combination works when the installation is completed.

Best wishes and good luck. :)
 
Status
Not open for further replies.