
tank project pics
- Thread starter free75degrees
- Start date
-
Active since 1995, Hearth.com is THE place on the internet for free information and advice about wood stoves, pellet stoves and other energy saving equipment.
We strive to provide opinions, articles, discussions and history related to Hearth Products and in a more general sense, energy issues.
We promote the EFFICIENT, RESPONSIBLE, CLEAN and SAFE use of all fuels, whether renewable or fossil.
You are using an out of date browser. It may not display this or other websites correctly.
You should upgrade or use an alternative browser.
You should upgrade or use an alternative browser.
- Status
- Not open for further replies.
NHFarmer
Feeling the Heat
How have the coils been going?I am still really torn on the coils vs.plate hx.They look good so far.
NHFarmer said:How have the coils been going?I am still really torn on the coils vs.plate hx.They look good so far.
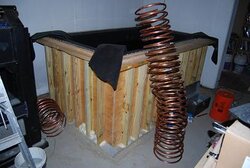
So far so good. I got a little nervous about the quantity so I bumped it up to about 350 feet total. The coil in the last pic is 80 feet long and I'll have four of those. I'll add a 5 ft vertical return on each coil plus the copper to connect them all to get to about 350 feet total. My total is actually about $600 - more than I originally planned on, but still much less than STSS. Another note - somebody mentioned that adding some 90 degree bends would help the heat transfer by adding turbulence. I should get some of that effect becasue I used 45 degree joints to connect each 10 foot coil section.
NHFarmer
Feeling the Heat
Hogwildz
Minister of Fire
Not sure what band board is, but my plan is to put fiberglass bats between the studs then put cover it all with some plywood or hardboard.Hogwildz said:Are yout going to put any band boards around the box?
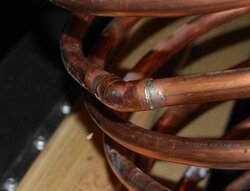
NHFarmer said:Do you have any closeup pix of the coil 45*?
Sure. By the way, the reason for the 45 is that I needed to leave some straight section in order to be able solder the ends. If I had used a straight joint the coil would have gotten out of wack.
Attachments
Hogwildz
Minister of Fire
free75degrees said:Not sure what band board is, but my plan is to put fiberglass bats between the studs then put cover it all with some plywood or hardboard.Hogwildz said:Are yout going to put any band boards around the box?
Meaning boards tied together arounf the outside of the box, especially near the top & center. Thats going to be alot of pressure from alot of water pushing on those sides.
I can see you have it set in the footing at bottom, which is great. But what about the top & center. I am not an engineer, but wall studs & a mitered top plate aren't a heck of alot to withstand the amounts of pressure a tank that size filled with water is going to put against those walls.
Hard to tell from the photos, but looks like no support at the corners either. Just seems to me with the water pressing against the corners & sides in that amount, is going to be quite a few pounds of force.
Would suck if the seams split open, or walls gave way.
chuck172
Minister of Fire
If it were mine I would weld angle iron round the top and middle. Intersecting at the corners. Anchor to the concrete walls. Maybe even then prop the sides up with steel gussets, anchored to the floor. Probably overkill though.
Did you make the coils out of type L 3/4 roll (soft)tubing?
I don't see any stiffeners on the coils to keep them straight and stretched.
Like NHfarmer, I too am undecided between coils and plate HX's.
good job, keep up with the pics. please.
Did you make the coils out of type L 3/4 roll (soft)tubing?
I don't see any stiffeners on the coils to keep them straight and stretched.
Like NHfarmer, I too am undecided between coils and plate HX's.
good job, keep up with the pics. please.
NHFarmer
Feeling the Heat
Thanks for the pic The bends look good.It seems like the least expensive and easiest way to make the coils
Hogwildz said:Meaning boards tied together arounf the outside of the box, especially near the top & center. Thats going to be alot of pressure from alot of water pushing on those sides.
I can see you have it set in the footing at bottom, which is great. But what about the top & center. I am not an engineer, but wall studs & a mitered top plate aren't a heck of alot to withstand the amounts of pressure a tank that size filled with water is going to put against those walls.
Hard to tell from the photos, but looks like no support at the corners either. Just seems to me with the water pressing against the corners & sides in that amount, is going to be quite a few pounds of force.
Would suck if the seams split open, or walls gave way.
The part of the tank above slab is 3 feet tall of water, which means that the pressure at the bottom of the wall is 1.3 psi, in the middle is 0.65 psi, zero right at the top etc. Since the pressure drop is linear we can use the pressure in the middle as the average an use it to get the total outward force. The studs are 8 inches apart so each one supports a total force from the water pressure of (0.65 psi) * (8 in) * (36 in) = 187.2 lbs. That's not too much for a stud. The stud needs to be able to withstand 187 lbs of shear at the base, and varying bending forces from the bottom to top. At most we have 187 lbs acting on any single stud - again not a lot.
The tops of each stud are lag bolted to the 2x6 top plate and the top plates are lag bolted to each other at the corners (can't see it in the photo because the bolts are recessed). I don't think bands around the outside would help much with a non-round tank. They would not help at all in the middle of the long sides unless they were more like beams than bands, and I do have a beam at the top.
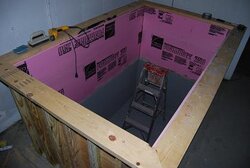
The real problem with water tanks is the large outward pressure at the base of a deep tank. My tank is 5'4" feet deep total, but the really deep stuff is obviously not a problem since it is in the earth. A major concern with a wood tank failing is with the fasteners holding it together at the base. That is a non-issue since I have a concrete block wall and 4 inch slab holding the studs in place. Each stud extends 2 feet down into the blocks.
In the corners there are studs directly behind the points where the water meets the corners. It looks like there is space between each stud and the corner, but there is 4 inches of insulation inside of the plywood, so there is very little water pressure acting in the areas where the plywood sheets come together.
I'm not sure if it is obvious from the pics, but the tank is already about 95% full of water and it is fine so far.
chuck172 said:If it were mine I would weld angle iron round the top and middle. Intersecting at the corners. Anchor to the concrete walls. Maybe even then prop the sides up with steel gussets, anchored to the floor. Probably overkill though.
Did you make the coils out of type L 3/4 roll (soft)tubing?
I don't see any stiffeners on the coils to keep them straight and stretched.
Like NHfarmer, I too am undecided between coils and plate HX's.
good job, keep up with the pics. please.
The coils are made from 1/2" L type hard tubing because hard was about half the price of soft. I used a conduit bender and bent them on a sheet polystyrene insulation. When I started, I wasted 2 tubes due to kinks. I slowed down and used the polystyrene so that I could be a little more gentle and the next 32 coils went without a kink.
Each coil will have a vertical pipe used as a return. The pipe will go up along the outside edge of the coil and I'll probably lash it to the coil with copper wire the also provide support. I'll see how that turns out and if it is still wobbly I'll add more stiffeners.
chuck172
Minister of Fire
Adios Pantalones
Minister of Fire
Very impressive set up. You should get great stratification on that tank. Don't forget to put a pre-heat coil to your DHW (maybe you already mentioned it). I wish I put one in mine. The 50* water sucks the life right out of the tank... What is the cement looking product you are using for the liner?
solo40
New Member
Your tanks is what I would like to do. I want to dig out my 4 foot crawl space a few feet and put concrete blocks at
the bottom and wood at the top. How deep is your tank?
Ethan
the bottom and wood at the top. How deep is your tank?
Ethan
Adios Pantalones said:What is the liner?
This thing is pissa
thx. The liner is 45 mil epdm ordered online (i think it was liners plus).
sparke said:Very impressive set up. You should get great stratification on that tank. Don't forget to put a pre-heat coil to your DHW (maybe you already mentioned it). I wish I put one in mine. The 50* water sucks the life right out of the tank... What is the cement looking product you are using for the liner?
The cement is fast set repair mortar. After installing the plywood at the top, the plywood was not flush with the concrete blocks, so I added the 3/4 in polystyrene. However, this extended a small distance beyond the blocks and also the blocks were not totally even. They weren't even because as I laid them, I realized there were variations in the positions of the holes and I needed the holes to line up so that I could get the studs down into them. So I lined up the blocks by the holes rather than the faces, which caused some slight unevenness. I used the fast set repair mortar with a large trowel to smooth it all out and bring it flush with the pink insulation. Then I painted it all with drylock to keep the earth moisture out.
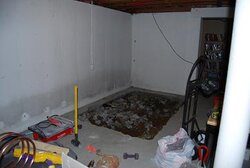
The dirt hole was about 3 feet deep. There is a 4 inch concrete floor and 4 inches of insulation, so the actual water depth below grade is a little over 2 feet.solo40 said:Your tanks is what I would like to do. I want to dig out my 4 foot crawl space a few feet and put concrete blocks at
the bottom and wood at the top. How deep is your tank?
Ethan
- Status
- Not open for further replies.
Similar threads
- Replies
- 5
- Views
- 852
- Replies
- 8
- Views
- 428
- Replies
- 0
- Views
- 447
- Replies
- 8
- Views
- 599