The Time has Come

  • Active since 1995, Hearth.com is THE place on the internet for free information and advice about wood stoves, pellet stoves and other energy saving equipment.

    We strive to provide opinions, articles, discussions and history related to Hearth Products and in a more general sense, energy issues.

    We promote the EFFICIENT, RESPONSIBLE, CLEAN and SAFE use of all fuels, whether renewable or fossil.
Status
Not open for further replies.

willyswagon

Burning Hunk
Mar 18, 2012
221
PEI, Canada
www.straitshine.com
Well the wood is sitting out in the rows. Next years supply is drying. The supply of wood for 2014-2015 is secured.

Now it's time to install the boiler. The sad part is I've had to remove my work bench and shelving storage in order to fit the boiler in and still be able to get rigs in the garage.
You can see behind the wagon the shelving and bench that I tore out;sick

wagonrebuild003.jpg


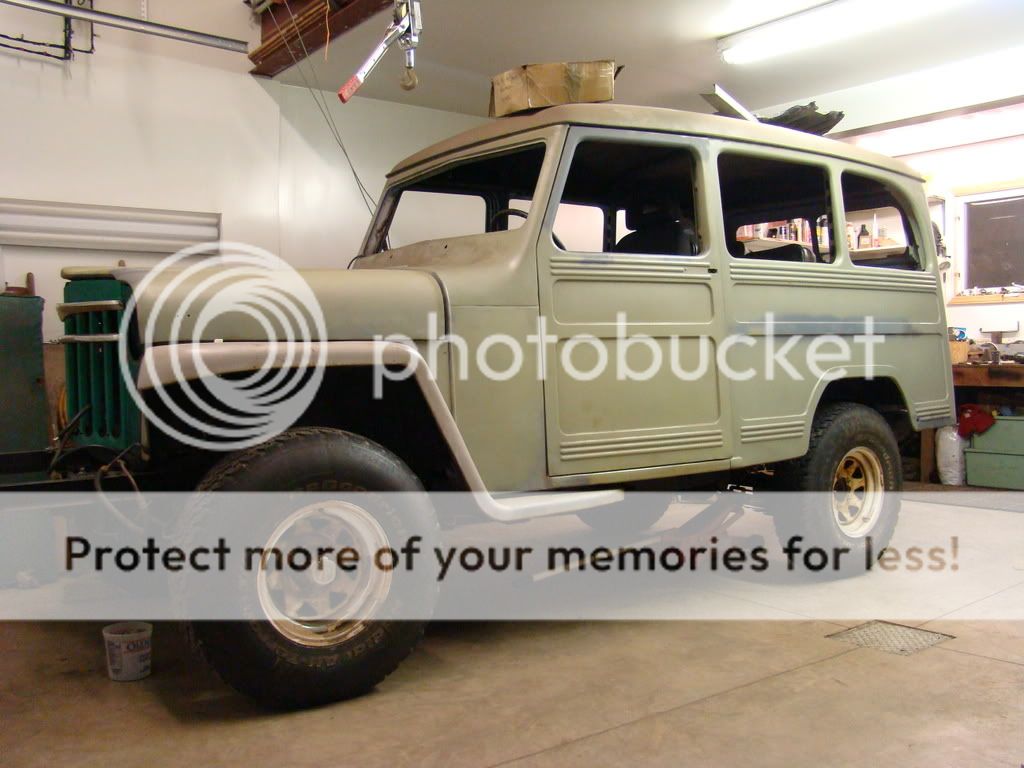
8' of bench and 21' of shelf were removed.
 
Ouch. Always hurts to lose shelves and workspace. You've reminded the rest of us to not take ours for granted. Love my utility room with workbench. Guess I better clean it up when I get home. :)

Go slow on the boiler install. It won't be cold, cold for another month. Don't get cheap, Don't rush.

JP
 
But at the same time, take your estimate of how long you think it will take you to do it - and multiply by something like 2. Or at least that's what I'm finding out - there will be little things pop up that take longer than you think, and other little things pop up that you never saw coming. Even the odd little do-over, plus the repeated trips back to the supplier for all the little things you forgot or got the wrong length or size of.

We're not far apart - what are you putting in for a boiler?
 
Putting in an Empyre Elite.
I have most of the stuff layed out, pilot holes drilled( one directly through a heating pipe):mad:
Contractor will be taking it from here.
 
Boiler placed, flue installed, some piping layed out.

heat%20for%202012-2013%20014_zps026da4a9.jpg


Not sure I'm happy with the location of the Hx.
I have placed insulation between the Hx and the wall to limit the heat loss to the concrete wall.

heat%20for%202012-2013%20013_zpsf9a3256e.jpg


I may have the Hx moved to the rear section of the wall as I'm thinking I could use the space between the boiler and the wall to store my axle stands, and floor jack.

I am trying to maximize on the use of space as the garage is used as a work shop as often as a garage.
 
It looks like the straps holding your Hx are only secured into the foam insulation... If thats the case I would think about securing them into the plywood mounting or concrete.

If you do move the Hx, I would put it on the left side of the boiler as you look at it, not the right. Just thinking future access in case you ever have to service/replace it. On that same note, you may want to put some unions in the piping so you can disconnect the Hx and flush it out if you ever had to.
 
  • Like
Reactions: woodsmaster
Just an FYI, and maybe others have had better luck then me, but on those thread to sweat adapters I find you are better off sweating the closest connections before you thread them on. I had a few of them leak doing it the other way around, I think the copper expanding and shrinking unsettles them plus a lot of pipe dope doesn't like to much heat.

As the HX mounting, I bet your using some long screws...that's what I would have done.

K
 
The two pieces of plywood are secured to the concrete wall. The brackets and styrofoam are then screwed through both pieces of plywood.
I'm going to go to the back of the right side of the boiler as this ensures no one( kids taking shots in the garage) can hit the Hx with a stick or puck.
It will also ensure that I will have enough room for a storage tank to the left side if I go that route in the future.
The distance from the wall to the boiler is 21", so I have lots of room to work on it.

Thanks for the suggestions, and if you see/think of anything else let me know.
 
Ahhh, Ok. I just wasnt sure how long those screws were, just checking.

What kind of storage tank were you thinking of that you could fit in a 21" space? (Unless I have my right and left screwed up based on looking at the pictures....)
 
The Hx is staying on the same side( right hand side of the boiler), possibly putting one of the american solartechniques tanks on the left of the boiler in the future( my mistake in previous post now fixed).==c


We will plumb the wood boiler into the oil boiler tommorow, hook up the electrical and fire the boiler on Friday:)
 
Exciting stuff! More pics when you get them!
 
I'm going to go to the back of the right side of the boiler as this ensures no one( kids taking shots in the garage) can hit the Hx with a stick or puck.

Canadians and their hockey pucks.. LOL, don't stack them up, use long bolts through them, between bodymounts and frame. Haha, sorry I live too close to the Canadian boarder to not throw in at least one Canadian joke.
Make shore you keep up on the boiler water treatment in an open system like the Elite. And a second vote to put that HX out of harms way, and to isolate it with ball valves and unions for future flushing/inspections.

TS
 
Thanks for the Hx advice guys.
It is all ready to be wired and fired later today.
Each side of the Hx has a circ pump located with 12" of it, so it can be broken and serviced if need be.

heatfor2012-2013016_zpscc5d1c09.jpg


Although talking to the plumber that set it up,(the same guy that piped up the boiler room at our distillery) they have been using this Hx for years(over 20) in the central heating system in Charlottetown, and have never had to flush or mantain them yet.

http://www.aboutbioenergy.info/Charlottetown.html

He was invovled in the install and ongoing testing of many of these Hx systems in apartment and commercial buildings.They have followed the efficiency of the system, and have found very little loss over the years.

As far as water treatment for the boiler water goes, it will be no different than what we do with the steam boiler at the distillery, other than I won't have to do it daily;)
 
All wired up, and ran it for 4 hrs to break it in.
Have to pick up the pipe insulation on Monday and start to button things up.
I played with the controls a bit to make sure I had a good feel of how it should run.
Another 30 days till heating season gets into full swing. Then we'll see what type of a rig it really is.
 
I just went out to the garage to check on the old girl and much to my surprise the boiler water temp was still at117* F.

The other surprise is that the draft fan had come bck on through the night.When I last checked at 930 the boiler was at 140 and the fan was off.
I know the system was just trying to bring things back up to temp,but is there any way to stop the fans once the wood is depleted. Other than shutting the whole system off.


I take it your controller does not have an end of burn shutdown, or did it not work properly?
Here is how to add one.

https://www.hearth.com/talk/threads/end-of-burn-draft-fan-shutdown-control.73405/#post-73405
 
Thanks for that link.
I'll ask the dealer if it is OK warranty wise to hook it up like that.
 
I have been busy insulating the pipes with 1" fiberglass insulation, and covering them with the white plastic covering like we used in the distillery boiler room.
It is so much easier to keep clean this way.

heatfor2012-2013019.jpg


heatfor2012-2013020.jpg
 
I have been busy insulating the pipes with 1" fiberglass insulation, and covering them with the white plastic covering like we used in the distillery boiler room.
It is so much easier to keep clean this way.

heatfor2012-2013019.jpg


heatfor2012-2013020.jpg


Nice piping and insulation. Consider the pre-formed PVC elbow covers to really dress it up.
 
I am picking them up tomorrow. The shop I got my supplies from forgot to put them in the bag with the joint tape, and plastic skins.
Not a big deal but it is a 1 hr drive from here:(

On a side not while insulating the piping yesterday I found one of the pex joints to be weaping:confused:
I'm some glad I found it before covering it up!

That being said I think if I were to do it all over again, I would run the system for a couple of weeks before insulating, so I could keep a good eye on everything.
 
That's one thing I have yet to check out or source - piping insulation for when I'm done. I'm going to ask about it next time I'm at my supplier - but what do you call that stuff? It looks good.
 
Willyswagon, your pipe insulation job looks great. Are you using standard fiberglass batt insulation and cutting it to fit on your pipes, and then purchasing the sleeves separately? Or do they come together? I was wondering if you can get the sleeves separately as that's what I'm going to do and hadn't figured out how to cover the insulation and come up with a neat job like you have there. Nice looking work.

Mike
 
Thanks willyswagon. Never heard of this product before. Would you mind sharing how much it runs per three foot section with or without the cover?

Mike
 
Just the pipe insulation is running me 98 cents/foot for the 1" pipe, 90 cents/foot for 3/4" pipe.
Both are 1" thick insulation.
The plastic covering is running about 75cents/foot.

It is well worth it. When we installed it at the distillery, the temp in the boiler run came down 30* F, the still heated up to temp 25 min quicker, and we save 10% oil on each run of product.

That's why I'm putting it in the house form the wood to the oil boiler, and from the oil boiler to the rads(where ever I can get to them.

When you think about it, I took home 150' of 1", 126' of 3/4" and 60' of plastic covering for the garage sections, for $ 350 taxes in.
 
Status
Not open for further replies.