Thermal Storage Tanks Finished - PICS!

  • Active since 1995, Hearth.com is THE place on the internet for free information and advice about wood stoves, pellet stoves and other energy saving equipment.

    We strive to provide opinions, articles, discussions and history related to Hearth Products and in a more general sense, energy issues.

    We promote the EFFICIENT, RESPONSIBLE, CLEAN and SAFE use of all fuels, whether renewable or fossil.
Status
Not open for further replies.

Piker

Minister of Fire
Oct 6, 2008
618
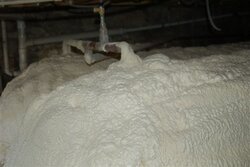
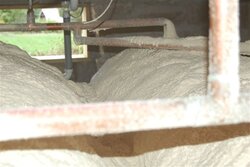
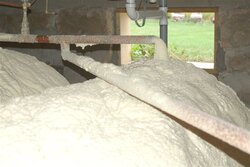
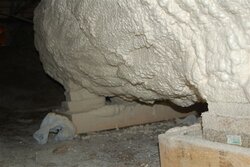
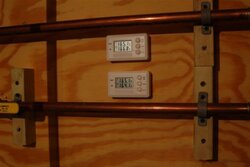
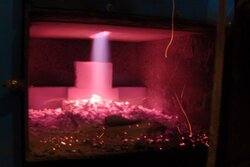
Spray foam guys stopped in today and insulated my storage tanks. These aren't the best pics in the world, but the area where the tanks are is kind of a scary dungeon anyways. I have been doing some testing with the boiler over the summer... letting it idle quite a bit while I make domestic hot water to see how much that effects the stack temps... so the heat exchanger is definitely in need of a good cleaning.

Cheers
 

Attachments

  • Thermal storage 002.jpg
    Thermal storage 002.jpg
    34.2 KB · Views: 1,029
  • Thermal storage 003.jpg
    Thermal storage 003.jpg
    36.3 KB · Views: 1,027
  • Thermal storage 004.jpg
    Thermal storage 004.jpg
    38.1 KB · Views: 1,007
A couple more, and a shot of the torch just because none of us ever get tired of seeing it.

cheers
 

Attachments

  • Thermal storage 006.jpg
    Thermal storage 006.jpg
    45.3 KB · Views: 998
  • Thermal storage 008.jpg
    Thermal storage 008.jpg
    27.4 KB · Views: 1,023
  • Thermal storage 009.jpg
    Thermal storage 009.jpg
    24.3 KB · Views: 996
What do you have on there 3" or so? Going to do my tank later next week i hope, will try some pictures of the whole install.
 
Yep, 3". The spray foam contractor said that 3" is the point of diminishing returns. I don't remember his exact numbers, but he said 1" of foam would give me 75% energy efficiency... 2" would be 94%, 3" - 96%... and 6" 97%... or something like that.

The tanks are up to 190 now, and the crawlspace doesn't feel the least bit warm. I know there has to be a few btu's escaping, but not too many for sure. 190 is about max I guess... I am running out of expansion. sitting at about 27 psi right now.

cheers
 
Piker, useful piece of info on the diminishing return of added inches of spray foam. What made you decide on the spray foam, instead of wrapping with pink fiberglass insulation or some other method? Do you anticipate better results? I am wondering if the spray foam would work better than a wrap of let's say R-30, which I had been thinking about using. Wonder if an R-30 wrap would give anything like the 96% energy efficiency you have achieved. Sounds as if your idea might be preferable. Does the spray foam have any difficulty withstanding the temps in the tank? It looks like the foam usually used in wall cavities. Is it, do you know, or did they need they need to use a special mix for your application?

Mike
 
Congratulations, looks good, and thanks for sharing the photos.
 
Dogwood... the biggest reason why I went with foam is because it was the easiest. These guys were in and out in about an hour and 15 minutes. The whole job cost me $600... well worth it if you consider the time I would have had to invest in either building a box to blow in insulation, or to wrap fiberglass around these things well enough to prevent any convection currents from sneaking through a crack somewhere. The foam was also chosen because it has a high r-value to thickness ratio, and would take up less space in the already cramped area. It's also waterproof, which is a definite plus in a damp old crawlspace. I do anticipate better results than with fiberglass. These tanks are sealed tight now... with 190* water in them, you can place your hand anywhere on the foam, and you would never guess there's any heat in the tanks at all. It's amazing stuff.

The spray foam is good I think up to 250* or so... so 190* or 200* is a walk in the park. I believe it was just standard closed cell polyurethane spray foam... 2lb density I think. There was no special mix required for this application.

cheers
 
Great job! Two things to think about before doing the foam: 1) be sure you don't have to access the tank fittings anytime soon. It took me two heating seasons before I had things the way they probably should be on my tank, and credit diy for that and a big learning curve. An early foam job would not have been pretty. 2) If you have the tank in a space to be heated, there is value in letting some of the tank heat escape, and this is where fiberglass batts work really well. I heat my whole shop with the tank acting as a big radiator and about 80% insulated with 6" of fiberglass, with the remaining 20% + other escaping btu's providing the heat, all without any baseboard, in floor radiant, circ pumps, power consumption, etc.
 
Super pics, Piker. Thanks!
I'm planning on adding storage next summer - first I've got to get my 150 installed this month!
The insulation job is amazing. 190F and no external indication. I'm going to have to consider this when I insulate.
You said you were at the limit of your expansion - what size tank do you have now, and do you regret not going bigger?
And yes, we never get tired of the torch.
Happy burning.
 
Piker makes a good point when figuring out time plus materials to build a box or whatever needs to be done to insulate with F/G or blown in. A much tighter/better insualting with the spray foam. Especially figeure 10 yrs down the road, F/G will loose R-value, any kind of condensation will not be good. If I was to do it all over, I would insulate my house with some kind of foam versus F/G. Be well worth the extra cost. Seems like a no brainer for tanks. The square tank I bought, is done with sheet foam, works great.--- Looks good Piker.
 
Piker
.....190 is about max I guess… I am running out of expansion. sitting at about 27 psi right now.

With a single Amtrol SX160 expansion tank? Am I remembering correctly?

What is your total system volume?

Expansion formulas are wonderful and all but real world numbers are a lot more valuable to me.
 
Thanks for the details Piker. Reread some older tank insulation posts. Wonder how blown in densely packed celluose would compare in thermal efficiency to the 96% you achieved. Nice work and good points about the weatherproofing too. I hadn't thought of that. Very well may copy you as I'd like to conserve space, avoid rust and cut down on convection loss too. Is your tank install is exposed to outside air? Might have to provide some in my soon to be constructed boiler room to meet local code requirements, The ability to withstand both temp and moisture makes the merits of your foam design that much more appealing. It does get humid here in Western Virginia. You've given me a lot to think about. Appreciate the photos and good luck with your heating this winter.

Mike
 
I've had some spray foam done around the house. According to my foam guy, there are various 'weight' foams. What he normally uses for house insulation is the 2 lb. density foam. That is R6.5 per inch.

They spray foam is the way to go in most every application. Like Piker mentioned, it's very quick. The time savings offset the cost difference IMHO. Plus the spray foam leaves you with a totaly sealed product with no heat leakage. When used in house framing, it actually adds to the structural rigidity. I have a house that is 2x4 construction in the walls and it's kinda neat to know that I've now got 3" of foam in between the studs helping to carry the load.

Interesting stuff...I'll be using it alot in the future as I tear out and remodel the rest of the house room by room.
 
As far as expansion goes... I had and extrol 60 on the boiler before I installed the thermal storage tanks. I left that on the system and added a single 160 when the tanks went in. The system was precharged at 12 psi with 55* water. At 190* I was about 27 psi. A little more expansion would probably be desirable, though for now, I just let a little water out of the system to get me down around 25 psi. Since the tanks won't be dropping down below 120 any more, this should suffice, and I'll just set the high limit on the boiler at 195. I should be able to gauge the wood load to make sure the load is completely burned to coals before shutting down.

Total system volume is probably around 1070 gallons perhaps. The boiler holds 45, and I can't believe the piping holds more than 20 gallons or so. I haven't actually sat down and figured the exact volume of the piping.

The bottom line is, the higher temps you put in the tank, the less thermal efficiency you have as your stack temps rise... It's a balance between total Btu's stored and system efficiency. I don't know that it's all that desireable to go above 190 or 195 anyways, though in a pinch it might be nice to get a few more btu's in there by going above 200.

When I went to bed last night, the sensor array was reading, from top to bottom, 195 - 195 - 194 - 188. This morning after showers, a load of laundry, dishes, and about 15 minutes of running the forced air heat exchange, it reads 194 - 194 - 185 - 177. And it's still about 60* in the crawl space. Not too shabby.


All in all, I am ecstatic about the entire system... Running this boiler with storage has a sort of rugged elegance to it, if that makes any sense. It's taken some time and a certain amount of capital investment to get everything to this point, but it's time and money well spent in my opinion. The sense of independence and accomplishment you get from a sweet running system like this that you installed yourself is great... very American if you aske me. Two more (big) radiant zones to add to the house, and I am all done!!

cheers
 
Well that about makes sense. The SX160's acceptance volume is slightly more than half its total volume. That would slightly more than double the starting pressure if you stuffed that acceptance volume in there. That leads me to my next question which I will post seperately so as not to lojack your thread any further.

Thanks for the info, Piker.
These practical, experimental results help clarify things for those of us who are not always certain we undertstand how some of this stuff works
 
Ghettontheball said:
righteous flame looks like CO burning with zilch excess air
tank foam makes me hungry 4 dessert

my brother just saw the tanks and said they reminded him of 2 500 gallon twinkies.

cheers
 
flyingcow said:
"very American if you ask me."-------------Damn nice statement!!!!
--
-
your sensor array readings, was your boiler out and no longer producing heat at the first reading?

first reading was taken almost immediately after the boiler was shut down... all pumps were off. Now after more than a day of domestic hot water... tanks read 183 - 183 - 178 - 146.

cheers
 
Regarding the "spray on foam", do we know for a fact that the foam can withstand constant temperatures around 200F?
Maybe the foam used in this application can, but I would like to see the specifications in writing before committing to this route. I did not think that "spray on foam" was an option do to heat limitations of the foam. If usable, another benefit is that the insulation is less likely to become a mouse house.
James
 
Jimboy said:
Regarding the "spray on foam", do we know for a fact that the foam can withstand constant temperatures around 200F?
Maybe the foam used in this application can, but I would like to see the specifications in writing before committing to this route. I did not think that "spray on foam" was an option do to heat limitations of the foam. If usable, another benefit is that the insulation is less likely to become a mouse house.
James

Tiger Foam states it's resistant to heat and cold from -200 to +200*.
http://www.tigerfoam.com/PDF-FILES/TechData_FR.pdf

Spray Foam Direct states "High Temperature Tolerance of 250*
http://www.sprayfoamdirect.com/products/tech_spec.php

There is nothing special about the foam that I used here... just 2lb density closed cell polyurethane foam. It's the same stuff that the outdoor wood boilers use in their underground lines... and the same stuff that's probably insulating your domestic hot water tank. There are some foams, however, that will not stand up... like the blueboard that you can buy at Home depot... will not hold up to even 180* water. I was checking out some of the overspray that landed on the copper pipe running into the tanks... no sign of any deterioration...

cheers
 
2lb foam will withstand 200 but not much higher(pm me if you need proof) The blue board will melt at 180 as will xps. As far as a mouse house, the foam has no food value, not saying they will chew into it, but its not likely.
 
Great job.
I was just starting to put my tanks together and was curious on how you attach temp sensors ?
Thanks
Rob
 
1" x 1/2" copper mail adapter into the tank with stops filed out of the 1/2" side... I then slid a 1/2" piece of copper down into the fitting (capped on the end) and made a very deep immersion well. The sensors were wired up and spaced evenly between the tops and bottoms of the tank so that you can tell where the thermocline is. (roughly). Because the top and bottom sensors are near the exterior walls of the tanks, they represent the temperature of a relativily small volume of water (since they are close to the tangent point of the thermocline and the extrerior of the tank), and at their current location are more like supply/return measurements. The other two sensors relay far more valuable information about the location of the thermocline and the amount of energy stored in the tanks.

cheers
 
4 full days on the burn cycle for heating DHW and the tanks are 148 - 145 - 144 - 140. Looks thermal storage will last around 5 days for DHW for the whole family... and so far the double 6' sidearm has been taking care of all our demand. Looking good so far.

cheers
 
Piker, do you have a diagram of your system?
What control method do you run for your dhw pumps through the sidearm?
 
Status
Not open for further replies.