Timber Ridge 49-TRCPM Installed w/Pics

  • Active since 1995, Hearth.com is THE place on the internet for free information and advice about wood stoves, pellet stoves and other energy saving equipment.

    We strive to provide opinions, articles, discussions and history related to Hearth Products and in a more general sense, energy issues.

    We promote the EFFICIENT, RESPONSIBLE, CLEAN and SAFE use of all fuels, whether renewable or fossil.
Status
Not open for further replies.

jrsdws

Feeling the Heat
Feb 9, 2011
430
Central Illinois
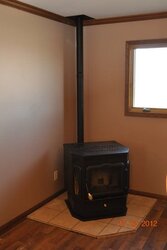
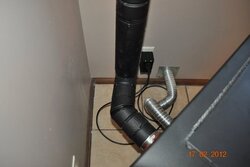
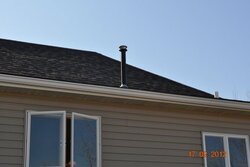
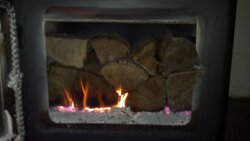
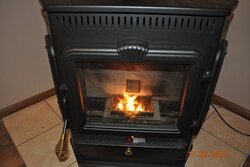
Got the install finished on the CPM just a little bit ago. I think it turned out well and looks good. Hopefully this venting method provides good performance for this unit. I've got a single 45deg. out of the stove adaptor, then the cleanout tee. After that I have a short 12" adjustable section then 9' straight up. It's warm here today so the furnace is off. I'm going to let the RTV cure up for a while before firing her up....if I can wait that long. Fire pics coming soon!!
 

Attachments

  • DSC_0013 (3).jpg
    DSC_0013 (3).jpg
    24.4 KB · Views: 633
  • DSC_0015 (2).jpg
    DSC_0015 (2).jpg
    24.3 KB · Views: 651
  • DSC_0016 (2).jpg
    DSC_0016 (2).jpg
    29.3 KB · Views: 624
Looks great!

Enjoy!
 
I have the same stove, we love it.
Close to the same flue set up, but our went thru the outside wall first then up.
If you can i would try to lose the 45 before the tee?
 
It's 3" pipe. The 45 is there to put the pipe in the corner for looks and for adaptability later if I change stoves. From reading the forum I figured the EVL to be 13' which should be ok?
 
Looks great! I also see that nice surge protector already installed....NICE! Looking forward to burn pics, and your comments on the heating.
 
Nice, clean looking install. Well done!!!

To add to Smokey's comment, the surge protector looks very close to the pipe. You might consider fabricating a small sheet metal piece to screw to the side of the pipe with a small air gap between the pipe and the fabricated shield. Just to be safe. The pipe won't be that hot but better safe than sorry.
 
I think its an optical illusion.

Therr is probably 1ft from the bottom of the vent to the cord on the floor and 6" to the Surge Protector. Angle of the shot was funny...

Jrsdws-Whats the distances?
 
DexterDay said:
I think its an optical illusion.

Therr is probably 1ft from the bottom of the vent to the cord on the floor and 6" to the Surge Protector. Angle of the shot was funny...

Jrsdws-Whats the distances?

Someone has to keep up the policing I thought I'd toss one out there for the team and to agitate a little ;-) .
 
me 2 %-P
 
SmokeyTheBear said:
DexterDay said:
I think its an optical illusion.

Therr is probably 1ft from the bottom of the vent to the cord on the floor and 6" to the Surge Protector. Angle of the shot was funny...

Jrsdws-Whats the distances?

Someone has to keep up the policing I thought I'd toss one out there for the team and to agitate a little ;-) .

Im all about Policing!!

How do you think I was awarded the title, Code Cop or AKA DexterDay??

;-P. All in good fun.. Being on his 3rd stove, I hope he dotted his "i"s and crossed his "t"s. That and I posted a pic in the Hearth Room last night that looked like the wood was sticking out of my Firebox. I had already closed the door and re-opened to take a pic of the Airwash. Bottom righthand piece of wood looks like it is sticking out...

All in good fun...... :lol: Pellet vent Pro is 1" CTC and regular Pellet vent could be 1", but I think its 3" (not sure, I only have Pellet vent Pro). My Dad has Pellet vent and IIRC its 3".
 

Attachments

  • airwash.jpg
    airwash.jpg
    47.5 KB · Views: 374
Seeing as the vent height is 18" from the floor, there is a good 12" from bottom of tee to floor. From the surge protector to the tee is just over 6". The surge protector is cool to the touch with the stove running for a couple of hours now. I pulled the cord out and totally under the OAK and out from behind the stove...no biggie there.

I appreciate the policing!!! Hey you don't know what you don't know. It's all good!!

After just 45 minutes of run time on 5-5 I had to turn her down. House temp had raised 3 degrees and it was hot. She's running low and slow on 1-1 and the far reaches of the house seem to be getting the convection. That was my biggest concern about a freestanding stove in the first place.

It's supposed to get down to 30 degrees overnight so we're going to leave the furnace off and see what the stove will do. It'll be a crap shoot as to where to set it at this point.

I guess I owe an obligatory fire pic:
 

Attachments

  • DSC_0004.jpg
    DSC_0004.jpg
    36.5 KB · Views: 376
All good!!! Man, that thing is pretty!!!
 
Looks great with a burn going. Just wait until you have to crank her to 5 or above during the really cold periods....she puts out some serious heat.
:)
 
Thanks everybody. First night of burning is done and she ran trouble-free all night and kept us warm. I've got to learn how to move the air about the house better now and we'll be all set.
 
jrsdws said:
Thanks everybody. First night of burning is done and she ran trouble-free all night and kept us warm. I've got to learn how to move the air about the house better now and we'll be all set.

On cold nights I have to overheat the living room to keep the bedrooms at a good temp. I also run my central heat blower fan. It helps keep the air moving. This is working well for me. It's nice to wake up to a warm living room and kitchen too!
 
Most likely you'll have to find some spots to put one or two small fans...remember to try and blow the cold air toward the stove room first.
 
No one else will understand. But here are the pics. Per PM.
 

Attachments

  • re1.jpg
    re1.jpg
    94.6 KB · Views: 195
  • re2.jpg
    re2.jpg
    67.2 KB · Views: 196
  • re3.jpg
    re3.jpg
    84.8 KB · Views: 209
Status
Not open for further replies.