Top view HI300 by Hampton

  • Active since 1995, Hearth.com is THE place on the internet for free information and advice about wood stoves, pellet stoves and other energy saving equipment.

    We strive to provide opinions, articles, discussions and history related to Hearth Products and in a more general sense, energy issues.

    We promote the EFFICIENT, RESPONSIBLE, CLEAN and SAFE use of all fuels, whether renewable or fossil.
Status
Not open for further replies.

TTigano

Member
Jan 19, 2012
129
Southeastern, Ma
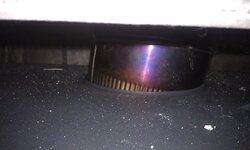
Does anyone have a picture from the top view of the stove in a real picture? I would like to see if the 6" exhaust outlet from the top down. I need to have a visual if possible for a connection I would like to fix. I really appreciate any help you guys can give me on this. I had a nightmare install happen and I had the installer come back out only to throw a bracket on the pipe.... Long story short, I'm not dealing with him anymore regardless if I paid him and I'm going to fix it myself. Just need a little assistance. Thanks. What I'm trying to figure out is.... You can see how this pipe goes INSIDE the outlet of the stove... Is there another "colar" that is on the inside of this?? Just curious. Thanks.
 

Attachments

  • IMAG0379.jpg
    IMAG0379.jpg
    96.9 KB · Views: 312
There is an "inverse" flue collar (for lack of a better adjective)
on all the Regency inserts. Your best bet to correct this is to pull
the liner up enough to clear the top of the insert, remove the
"flex-to-rigid" adapter & install a stainless steel 15° adapter.
Heat Fab makes a variety of different angled SS adapters...
 
Not really a top view, but you can see the lip on the top that the flue connector bracket mates (seals) to. Do you have a manual? I can e-mail my pdf copy and you can see the drawings. Its a hole, nothing else in there.
 

Attachments

  • side view.jpg
    side view.jpg
    58.4 KB · Views: 277
Another way to get a look at this is to take the baffles out. Then take a mirror or stick your head in the stove to see the flue. This will give you an idea of how well you are connected.
 
Thanks for the replies guys. I am pretty sure I figured out the issue... They used a 45 when in fact it is too steep of a turn... This is binding making the end of the 45 that sticks in the stove crooked.... I twisted the 45 a few different ways as it is a swivel and got it to sit much better... only issue now is I have a small hole from the self tapping screw now 3 inches to the left of where a bracket should screw into.... Can I just heat tape over this hole? I may go get a few 22.5 to make my bend a little easier... It just sucks when you pay someone to do something and end up fixing it after the fact.
 
put a short screw in the hole
 
It's sad that in 10 mins I was able to accomplish this without taking the stove out... I'm going to button the rest of it down and use some flu goo to seal up the seam. Has anyone ever used this and if so, am I in the right by using it?. Thx.
 

Attachments

  • IMAG0395.jpg
    IMAG0395.jpg
    97 KB · Views: 236
TTigano said:
It's sad that in 10 mins I was able to accomplish this without taking the stove out... I'm going to button the rest of it down and use some flu goo to seal up the seam. Has anyone ever used this and if so, am I in the right by using it?. Thx.

That looks perfect. I don't understand why the installer didn't do this in the first place. Are you sure the liner is in deep enough so when you drive those screws in you grab the liner behind the flue connector?

As far as goop, use Rutland Stove Cement.

I really feel better for you now that you have done this.
 
Flue Goo will do the job just fine.
 
stejus said:
TTigano said:
It's sad that in 10 mins I was able to accomplish this without taking the stove out... I'm going to button the rest of it down and use some flu goo to seal up the seam. Has anyone ever used this and if so, am I in the right by using it?. Thx.

That looks perfect. I don't understand why the installer didn't do this in the first place. Are you sure the liner is in deep enough so when you drive those screws in you grab the liner behind the flue connector?

As far as goop, use Rutland Stove Cement.

I really feel better for you now that you have done this.

No, the liner is not going to be grabbed by those screws... The liner is connected to the top of the 45 by the liner to stove pipe connector.... This should work right? There is too steep a bend for the liner to go all the way down. I will grab some rutland stove pipe cement... Is that the stuff in the picture you posted of your connection?
 
BrotherBart said:
Flue Goo will do the job just fine.

If your saying to use the flue goo, would you suggest pulling the pipe out and applying it to the 45, then sticking it back in? or just cake it on like i have it now? Thanks.
 
Status
Not open for further replies.