Upgrading 1988 Heatilator to 2016 Pacific Energy FP30

  • Active since 1995, Hearth.com is THE place on the internet for free information and advice about wood stoves, pellet stoves and other energy saving equipment.

    We strive to provide opinions, articles, discussions and history related to Hearth Products and in a more general sense, energy issues.

    We promote the EFFICIENT, RESPONSIBLE, CLEAN and SAFE use of all fuels, whether renewable or fossil.

Weaselfest

Burning Hunk
Sep 1, 2016
103
Iowa City
We've owned our house since 1998, the third owner of a 2300 sq. ft story and a half, built by the original owner who had no business being his own general contractor. If he owned a square or a level, he sure didn't know how to use them. And the concept of a header was lost on him. So with this previous history of surprise revelations, we apprehensively tore into the replacement of the original fireplace.
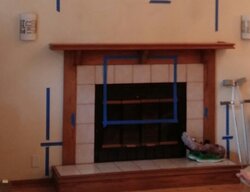
The Heatilator was in dire need of an upgrade. The interior firebrick sheets were cracked and had been patched several times, the fresh air intakes adjustment knobs could barely be moved, and the cheesy 80's tile surround had lost most of its grout. We hadn't used the fireplace in for the last three seasons, as the amount of cold air drafting in coupled with the opening and closing of the front door constantly loading wood made any heat gain a break even proposal at best. Coupled with our ground source heat pump primary heating, our electric bills were killing us on the sub zero days, so we really wanted to get a wood burning source of heat back online. Especially since our house sits on nearly 4 acres of timber. Wood supply is NOT an issue.
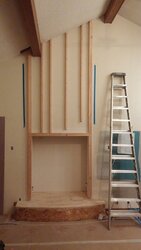
Here is a picture of what we were starting with;
 

Attachments

  • fireplace start.jpg
    fireplace start.jpg
    38.6 KB · Views: 531
here we are with the mantel and surround tore out. Boy am I glad we hadn't been using the fireplace recently. The back piece of firebox liner disintegrated when I lifted it out. The two side pieces were intact, but cracked through in several places. The bottom piece, while looking fine on top, was also cracked through, showing burn marks on the metal underneath. :eek:
 

Attachments

  • oldtearout2.jpg
    oldtearout2.jpg
    60.2 KB · Views: 580
Here is a picture of the inside of the doghouse. How scary is it that there is loose insulation laying against the chimney? No drywall lining or cold air break either, to no surprise. The nice surprise was my previous fear of a lack of header were unfounded as there is a very substantial double 2x12 header with three 2x4's under each end, at what is initially looking like the perfect height for the FP30 installed with a taller hearth.
This is point at which I am looking for advice and confirmation of my game plan.
I want to pull out the old fiberglass insulation and have spray foam installed (2x4 exterior wall construction, so I want to use the max R value available). 1/2" drywall over the foam insulation the entire height of the chase. (taped and mudded?) I need to do more research as to what height my cold air baffle should be located. I am assuming I only need to construct a 2x4 frame, keeping appropriate spacing between wood framing and new chimney, and lay a sheet of drywall over it, with a hole for the chimney. If there is some sort of metal stand-off the holds the actual chimney pipe, that will be integrated into things. I am having the new fireplace and chimney professionally installed,so I do have a local source for a lot of this info, but like to see methodologies confirmed by multiple sources.
 

Attachments

  • doghouse interior.jpg
    doghouse interior.jpg
    124.7 KB · Views: 453
Painfully slow progress finishing the inside of the chase. Now I know why I never got a quote back from anyone that came to look at things. Must be a lot of easier way to make a buck installing insulation and drywall in these parts. But it's done, so on to the hearth.
 

Attachments

  • topdown.jpg
    topdown.jpg
    42.5 KB · Views: 416
  • insidechasecomplete.jpg
    insidechasecomplete.jpg
    58.2 KB · Views: 434
Hearth framing turned out to be no picnic either, as the floor of the doghouse and the floor of the house changed level by over an inch front to back and a half inch down on one side and a quarter inch down on the other. Shimming and shaving all the day long.
Dig the storage cavity on the right hand side of the extension.
Total height of 2x12 + 1/2 OSB + 3/4" ply + 2.25" hearthstone = 14.5" fairly comfortable low bench height to sit on.
 

Attachments

  • hearth framing.jpg
    hearth framing.jpg
    92.7 KB · Views: 405
Your install looks awesome - thanks for all the pictures - it is super helpful! Please keep updating your progress - the FP30 will look outstanding.

Matt
 
Thanks for the encouragement, Matt. We're pretty happy with how things are taking shape and are very excited at the prospect of not having a such a large, cold draft emanating from west wall of the house. Makes us wish we would have done this 10 years ago.
My back wishes we had done this 10 years ago, too.
Benefit is that the new woodburner is going to be far more efficient and proven design than what was available then.
 
That is some good looking progress. I am excited to see how that curved front hearth turns out. Looks really interesting. The FP 30 was on my favorite list until I went free standing stove instead. Keep the pics coming.
 
Speaking of freestanding stoves....why an FP30? Why not a freestanding stove? It appears you have ample room and freestanders are gonna be even more efficient not to mention....good looking. Just curious, I am guessing you and the wife just like the looks of the insert, but would like to hear if there are other reasons. Progress looks amazing!
 
The FP30 is a zero-clearance fireplace, not an insert. For folks that want the look of a fireplace it's a good option.
 
begreen nailed it. We wanted to stick with the look of a conventional fireplace and the FP30 seemed to be most proven, easiest to maintain design available. That, and the local PE dealer showed the most earnest interest in the job and has been super responsive to my many questions.
This isn't going to be the primary source of heat in the house, so aesthetics played a much larger role on selection than heating efficiency.
 
Okay, thanks for the response. Keep up the excellent work. Whatever you do, it will be nice. You are a perfectionist it appears. I like that!
 
Not much progress yesterday, between running at half speed from a cold and keeping one eye on my Hawkeyes struggling to put points on the board yet again. Finished electrical rough in. The old fireplace blower feed was re-routed to the hearth for distribution to the new blower, a Sillite electrical outlet in the mantel, and a switched electrical outlet for a strip of RGB LED lighting, also recessed into the top of the mantel. The right hand adjustable depth box with the back cut out will be for the LED power supply and controls, the left hand side holding my blower speed control and LED light switch.

View attachment 185282View attachment 185281
 

Attachments

  • roughinrotate.jpg
    roughinrotate.jpg
    69.5 KB · Views: 389
  • speedcontrolboxrotate.jpg
    speedcontrolboxrotate.jpg
    62.3 KB · Views: 397
Last edited:
Raised hearth, all sealed up. Now onto the bump out for the stone all the way up the wall.
 

Attachments

  • hearthtoprotate.jpg
    hearthtoprotate.jpg
    45.8 KB · Views: 341
here's a picture of the "Sillite" flush mount electrical outlet. Mounts in 1.75" hole, terminates directly to romex.
 

Attachments

  • sillite.JPG
    sillite.JPG
    32.5 KB · Views: 420
Looking good. Were metal studs and cement board used to frame and clad the face above the fireplace?
 
There will be. The existing opening is larger than necessary, leaving room for the prefab metal stud framing kit PE has available. (edit: metal stud framing kit is included with fireplace, according to my dealer.) The front wall that ends up flush with the fireplace assembly still needs to be built, as we want to create some depth for the stone veneer to have a corner to wrap.
The whole assembly will sit proud of the existing opening by 3", which, with 1/2" cement board + 1/2" wire lathe and scratch coat, should give me a 4" return to the drywall. Inside edges of final RO will be covered in cement board. If I am reading the installation instructions correctly, I am good with combustible material up to the standoffs on all sides and to the edges of the framing kit. Does that sound right?
Thanks for looking out for my safety. I only want to do this once and want to do it right and then some.
 

Attachments

  • fireplace illustration.JPG
    fireplace illustration.JPG
    36.9 KB · Views: 266
Last edited:
Got it, thanks for all the documentation. This is a fun project to follow.
 
Looks great Weasel! We have other heat but want this based on appearance! Thank you so much for the pictures!
 
Looks great Weasel! We have other heat but want this based on appearance! Thank you so much for the pictures!
are you replacing an existing unit, like me, or are you putting in new?
 
Replacing a heatilator 2005 gas fireplace. We were really close to pulling the trigger last summer but all the contractors weren't really sure what to do with the chase. Our Pacific Energy installer would handle the fireplace and pipe and stainless steel chase cap. I could not find any contractors who wanted to install the chase. They seemed intimidated with the height of the chase. I also wanted a cricket on the roof to go around the chase for obvious reasons.

Ours will be similar to yours except not curved. The height will be about 10-12 inches off the ground of a nice ledge to sit on and load the unit.

I posted some pictures of our heat and glo northstar at our previous home. We used a river rock for inside and out. It was a new install - we went on vacation for a week and came back to find it done. It was real clean.
 
not a lot of progress this week. bump out for facing around fireplace starting to take shape.
 

Attachments

  • hearth bumpoutrotate.jpg
    hearth bumpoutrotate.jpg
    51 KB · Views: 309
Dude stone work all the way up with those cathedral ceilings and beam work is going to look so awesome. I cant wait
 
if you look closely, you'll see a hint of part 2 of my living room remodel. In the upper left corner, you see the drywall of the ceiling cut away.
I need to remove all of the ceiling in those two left hand sections of the vaulted ceiling to remedy the issues being caused by the lack of ventilation in that space, due to oversights by the original builder. It has already cost me replacing the sheathing on that section of the roof once and I wasn't smart enough to realize that would have been the time to fix things. But since the existing stuff is water damaged from an ill fitting chimney cap that has already been replaced, this is the opportunity to put up new with closed cell spray foam upping the insulation and resolving the moisture migration issue.
Impact on the fireplace project is that I won't have the stone work done until after the new ceiling is in place, so, sorry to delay payout on that.