
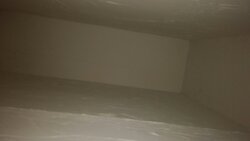
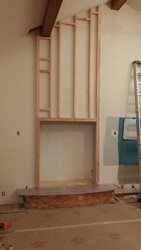
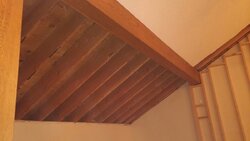
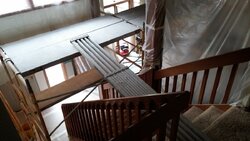
I think we are getting close to calling the fireplace contractor. Hearth template has been cut and delivered this morning, so we'll see how much a 8' x 28" slab of limestone will cost, especially with the radius-ed front edge. Firestop pics, just to prove it's there. Mudded and taped because I have become a bit anal at this point.
Upgrading 1988 Heatilator to 2016 Pacific Energy FP30
- Thread starter Weaselfest
- Start date
-
Active since 1995, Hearth.com is THE place on the internet for free information and advice about wood stoves, pellet stoves and other energy saving equipment.
We strive to provide opinions, articles, discussions and history related to Hearth Products and in a more general sense, energy issues.
We promote the EFFICIENT, RESPONSIBLE, CLEAN and SAFE use of all fuels, whether renewable or fossil.
You are using an out of date browser. It may not display this or other websites correctly.
You should upgrade or use an alternative browser.
You should upgrade or use an alternative browser.
Well, there was good news and major bad news this week.
Good news was that my custom radius-ed limestone hearthstone is going to cost less than $600. Perks of living less than an hour from Anamosa, I guess.
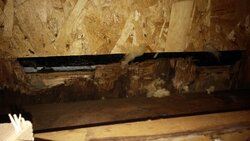
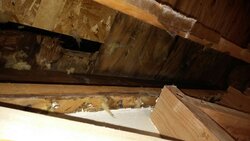
Bad news is that we had a major downpour of rain last Tuesday night and I awoke Wednesday to the sound of water dripping. Our new chimney cap has not totally resolved our water ingress issues. Since we are tearing out the ceiling to fix the lack of ventilation behind it, I tore into things this morning. The resulting discovery was not good. It appears there is no sheathing left under the stone covering the chimney chase. You can see where they cut around it replacing the dry rotted sheathing that revealed the ventilation issue. You can see the blacken wood running up the roof line, which makes me wonder if that is where my point of origin lies.
I'm off to drag a hose up on the roof and see if I can replicate conditions that let water in.
So bummed, I really thought we were past the water issues and were going to be having the fireplace installed this coming week. Now it's going to wait until the ceiling is done.
Good news was that my custom radius-ed limestone hearthstone is going to cost less than $600. Perks of living less than an hour from Anamosa, I guess.
Bad news is that we had a major downpour of rain last Tuesday night and I awoke Wednesday to the sound of water dripping. Our new chimney cap has not totally resolved our water ingress issues. Since we are tearing out the ceiling to fix the lack of ventilation behind it, I tore into things this morning. The resulting discovery was not good. It appears there is no sheathing left under the stone covering the chimney chase. You can see where they cut around it replacing the dry rotted sheathing that revealed the ventilation issue. You can see the blacken wood running up the roof line, which makes me wonder if that is where my point of origin lies.
I'm off to drag a hose up on the roof and see if I can replicate conditions that let water in.
So bummed, I really thought we were past the water issues and were going to be having the fireplace installed this coming week. Now it's going to wait until the ceiling is done.
Attachments
So glad we are going the extreme route with the ventilation issue. It has confirmed my suspicions that the original ceiling was 1/2" rock, since it was so wavy from sagging and from the builder being so miserly with his nail use. Rip it out, and the over stuffed fiberglass insulation, that looks to be have been home to many a mouse over the years. My father in law was savvy with his recommendation of wearing a hard hat during demolition. Already have had larger pieces than expected come loose.
Last edited:

Spent over an hour up on the roof soaking every nook and cranny around the chimney chase. Not one drip inside. !@#$%!
Took out my frustration tearing out ceiling section number 1 today. Really enjoyable having fiberglass and mouse turds raining down on you for 4 hours. Good news is that the rest of the roof looks to be in very good condition from the underside.
Took out my frustration tearing out ceiling section number 1 today. Really enjoyable having fiberglass and mouse turds raining down on you for 4 hours. Good news is that the rest of the roof looks to be in very good condition from the underside.
Attachments
Had our mason come out to appraise the situation. (different gentleman than the person responsible for the current state of things) He soaked the chimney chase everywhere he thought was questionable. We found some new potential leaks, but still could not reproduce the stream of water we had last week.


Opinion is that we should cut the stone back a good 6" around the intersection with the roof, fix the sheathing, beef up the flashing, reframe the roof angle where the lower roof line drops to the back of the house to get rid of the little catch basin created there. We will install a new 3"aluminum wrapped double thick splash board along the intersection with the shingles so they are serviceable, then splice stone back in above that.
Stone never should have been laid all the way down to the shingles and it would have been beneficial both structurally and aesthetically if the whole thing would have been installed about 6" to the right of where it resides
Pretty sure we are going anywhere too fancy for vacation next year........
Last edited:
Yeah, that gets a little more complicated when it isn't a masonry structure coming up through the roof. Especially when the stone is added well after the home is complete. The stone overlay wasn't executed the way it should have been and that is as much my fault as it is the contractor that installed it. I've spent the last few days on researching proper weatherproofing of my particular situation and am not finding a lot of good information. The best so far has been from one of the cultured stone manufacturers.First think I thought of when I saw the pics is 'where's the flashing'?

VirginiaIron
Minister of Fire
Is that real stone or a veneer? The document you show is applicable for the lowest edge of your chimney. The edge along the rake/slope of the roof requires step flashing. Make sure the lower/step flashing is only secured to the wooden deck and then fasten the counter flashing to the stone. This way the roof can move independent of the stone and not work the shingle/flashing loose.


If it is stone, you can get a grinder and cut/smooth the surface where you need the flashing. I also recommend an ice and water shield (or similar material) under the shingles in that area.
If it is stone, you can get a grinder and cut/smooth the surface where you need the flashing. I also recommend an ice and water shield (or similar material) under the shingles in that area.
Handsonautotech
Burning Hunk
I am following along, great work so far, looking forward to the rest.Yeah, that gets a little more complicated when it isn't a masonry structure coming up through the roof. Especially when the stone is added well after the home is complete. The stone overlay wasn't executed the way it should have been and that is as much my fault as it is the contractor that installed it. I've spent the last few days on researching proper weatherproofing of my particular situation and am not finding a lot of good information. The best so far has been from one of the cultured stone manufacturers.
View attachment 187088
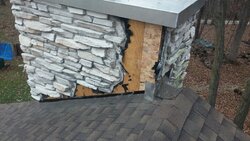
We join this remodel already in progress........in our last episode, we discover we have some further water migration issues.
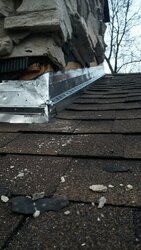
We have removed the bottom 6" of stone along the roof line to repair the flashing. This reveals the additional problems caused by our original chimney cap. Based on the wood damage, water had been getting under the NE corner of the cap, running behind the stone and then was trapped by all the caulk and black jack applied to keep water out of the joint between the stone and shingles. We have now removed the stone along the entire height of the NE corner above the roof, about 3' worth, cut out the rotten sheathing and have splice in new. Same process with a 12" x48" section of the roof sheathing along the chase. 4" step flashing has been reinstalled between the roof and chase sheathing, ice membrane applied over the top and out about 20" from the chase. A new cricket has been constructed with actual sheathing used on the angular pieces,instead of perforated piece of floating tin that was held in place mostly by blackjack and good intentions. New galvanized flashing installed over cricket, more ice membrane and then new shingles nailed down over the whole works. A lot of this got finished up by flashlight in a 30+ MPH gale that made tying tarps down over the still exposed chimney chase a real trick, so no photo documentation, and I'm not undoing the tarps until our mason comes back to restore the stone work.
I'm still on a quest for the proper overflashing that goes down over the step flashing and holds the stone off the shingles. Amazing that many stores know what it is and every stone veneer manufacturer calls for its use, but nobody stocks it or wants to install it. So thank god for the internet.
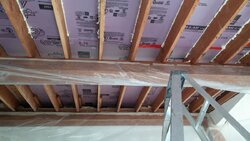
In the mean time, here's what I've been doing: building vent channels in every rafter cavity of my living room by tacking in 1"x1 1/2" strips of wood to hold a piece of 1.5" thick foamboard off the sheathing.
After sealing all joints with more foam blocks and expanding foam sealant, it is then covered with two layers of 3.5" mineral wool. (100 - 47" x 15" x 3.5" pieces, almost every single one had to be trimmed in some way due to the uneven and non parallel spacing of the rafters.
Whole works covered in Owens Corning "Membrane" vapor permeable polymide sheeting.
Total R value of 37.5 in theory. Total cost = under $600 in materials.
Spray foam estimate was $1800 for 4" of closed cell @ R7 per inch for a total of 28. Additional foam $700 an inch. And this would have been applied directly to our roof sheathing, meaning when (not if) the next tree falls on our house, our insulation is going to be a pain in the a** to restore. This coupled with issues with attempting to completely seal the entire system and NEVER get any moisture into it, which seemed unrealistic and the green house gas issues with the foam propellants and likelihood having to clear out of the house for at least a day made it a lot less attractive. That and needing to come up with an extra grand to fix the roof and chimney made it pretty easy choice. Sucked major a** to implement, mineral wool is easy to work with, but breaks into incredibly fine particles that get EVERYWHERE. Had to wear a painting respirator, leather gloves and hooded sweatshirt during installation. Washing clothes twice still left them feeling itchy, so they got pitched. But we can already tell it's working as the lower part of the roof retained frost the other morning while the only thawed portion was the area over the second story, where we know we have more work to do, insulation wise. Usually the whole thing melts off pretty quickly, so feeling pretty good about that.
We have one more section of ceiling to scrape the popcorn texture off, but it is above the open staircase to the second floor, so we have to reassemble some scaffolding to access it. Once that's done, we have the ceiling sheet rock replaced and the remaining wall and ceiling repairs completed, re-textured and painted before we call our fireplace installer. Stone work will also need to be completed so chimney cap can be removed with unhooking the new chimney pipe. Let's cross our fingers for some more unseasonably warm days the upcoming weeks.
We have removed the bottom 6" of stone along the roof line to repair the flashing. This reveals the additional problems caused by our original chimney cap. Based on the wood damage, water had been getting under the NE corner of the cap, running behind the stone and then was trapped by all the caulk and black jack applied to keep water out of the joint between the stone and shingles. We have now removed the stone along the entire height of the NE corner above the roof, about 3' worth, cut out the rotten sheathing and have splice in new. Same process with a 12" x48" section of the roof sheathing along the chase. 4" step flashing has been reinstalled between the roof and chase sheathing, ice membrane applied over the top and out about 20" from the chase. A new cricket has been constructed with actual sheathing used on the angular pieces,instead of perforated piece of floating tin that was held in place mostly by blackjack and good intentions. New galvanized flashing installed over cricket, more ice membrane and then new shingles nailed down over the whole works. A lot of this got finished up by flashlight in a 30+ MPH gale that made tying tarps down over the still exposed chimney chase a real trick, so no photo documentation, and I'm not undoing the tarps until our mason comes back to restore the stone work.
I'm still on a quest for the proper overflashing that goes down over the step flashing and holds the stone off the shingles. Amazing that many stores know what it is and every stone veneer manufacturer calls for its use, but nobody stocks it or wants to install it. So thank god for the internet.
In the mean time, here's what I've been doing: building vent channels in every rafter cavity of my living room by tacking in 1"x1 1/2" strips of wood to hold a piece of 1.5" thick foamboard off the sheathing.
After sealing all joints with more foam blocks and expanding foam sealant, it is then covered with two layers of 3.5" mineral wool. (100 - 47" x 15" x 3.5" pieces, almost every single one had to be trimmed in some way due to the uneven and non parallel spacing of the rafters.
Whole works covered in Owens Corning "Membrane" vapor permeable polymide sheeting.
Total R value of 37.5 in theory. Total cost = under $600 in materials.
Spray foam estimate was $1800 for 4" of closed cell @ R7 per inch for a total of 28. Additional foam $700 an inch. And this would have been applied directly to our roof sheathing, meaning when (not if) the next tree falls on our house, our insulation is going to be a pain in the a** to restore. This coupled with issues with attempting to completely seal the entire system and NEVER get any moisture into it, which seemed unrealistic and the green house gas issues with the foam propellants and likelihood having to clear out of the house for at least a day made it a lot less attractive. That and needing to come up with an extra grand to fix the roof and chimney made it pretty easy choice. Sucked major a** to implement, mineral wool is easy to work with, but breaks into incredibly fine particles that get EVERYWHERE. Had to wear a painting respirator, leather gloves and hooded sweatshirt during installation. Washing clothes twice still left them feeling itchy, so they got pitched. But we can already tell it's working as the lower part of the roof retained frost the other morning while the only thawed portion was the area over the second story, where we know we have more work to do, insulation wise. Usually the whole thing melts off pretty quickly, so feeling pretty good about that.
We have one more section of ceiling to scrape the popcorn texture off, but it is above the open staircase to the second floor, so we have to reassemble some scaffolding to access it. Once that's done, we have the ceiling sheet rock replaced and the remaining wall and ceiling repairs completed, re-textured and painted before we call our fireplace installer. Stone work will also need to be completed so chimney cap can be removed with unhooking the new chimney pipe. Let's cross our fingers for some more unseasonably warm days the upcoming weeks.
Attachments
Last edited:
mol1jb
Feeling the Heat
Boy that seems like an absolute nightmare. But good work on getting it done right. Hopefully you wont have to worry about that roof for a long time now
VirginiaIron
Minister of Fire
That was a lot of work congratulations. I think you did well by putting the spacers and the rigid insulation underneath the sheathing rather than the spray foam. Because, moisture would eventually accumulate where the sheathing and insulation abut each other and eventually cause rot. Your method provides airflow to allow this moisture to escape at the ridge vent. make sure you have enough soffit vents to allow that airflow to move.
The entire width of the soffit is perforated metal, the only part that isn't is where the bay window is, which is open to the adjacent soffit above the drywall. You could feel the air movement up coming up my channels in the attic when the wind was howling.That was a lot of work congratulations. I think you did well by putting the spacers and the rigid insulation underneath the sheathing rather than the spray foam. Because, moisture would eventually accumulate where the sheathing and insulation abut each other and eventually cause rot. Your method provides airflow to allow this moisture to escape at the ridge vent. make sure you have enough soffit vents to allow that airflow to move.
VirginiaIron
Minister of Fire
Good deal. A lot of people do not realize the importance of attic/roof ventilation. Many roofers don't realize that you can actually shorten the lifespan of your asphalt shingle by half and void your warranty if you did not have the proper attic ventilation.
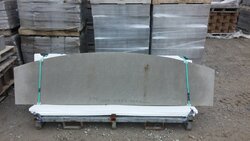
Hearthstone has arrived. They did a nice job of beveling the top edge. Sadly, it will have to sit for a few more weeks.
$563. Substantially less than 28" x 74" 3/4" slab of granite on my basement bar top.
$563. Substantially less than 28" x 74" 3/4" slab of granite on my basement bar top.
Attachments
Last edited:
mminor
Member
kennyp2339
Minister of Fire
I def like the insulation job you are doing, the whole idea is to slow the air intrusion down, the polymide sheeting wrap is a great idea, I bet you will notice in the dead of winter better humidity in your home.
House is usually bone dry in the winter. We run a humidifier from December to March most years to keep static shocks in check, among other benefits.
Hearthstone is limestone, quarried out of Anamosa, Iowa.
Hearthstone is limestone, quarried out of Anamosa, Iowa.
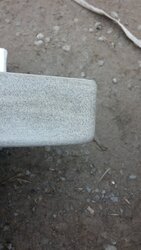
My mason is going to be here on Monday, weather permitting. Better get my weep screed flashing in place, now that I finally found some to buy. (Special order from Menards. Estimated delivery was a week, took 3 days and a whooping $6.)
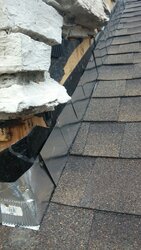
Here are some pictures of the torn apart chase, with new step flashing off the repaired roof, and afterwards, with the weep screed overflashing in place.
Here are some pictures of the torn apart chase, with new step flashing off the repaired roof, and afterwards, with the weep screed overflashing in place.
Attachments
Drywall contractor will be here Tuesday. This project is finally getting its legs back under it.")
redyute
Feeling the Heat
Similar threads
- Replies
- 8
- Views
- 932
- Replies
- 3
- Views
- 1K
- Replies
- 5
- Views
- 510
- Replies
- 11
- Views
- 2K