Used parts for old stoves.

  • Active since 1995, Hearth.com is THE place on the internet for free information and advice about wood stoves, pellet stoves and other energy saving equipment.

    We strive to provide opinions, articles, discussions and history related to Hearth Products and in a more general sense, energy issues.

    We promote the EFFICIENT, RESPONSIBLE, CLEAN and SAFE use of all fuels, whether renewable or fossil.
Status
Not open for further replies.

Snowy Rivers

Minister of Fire
Feb 7, 2010
1,810
NW Oregon
Recently scored a bunch of Good used parts for the Whitfield Prodigy

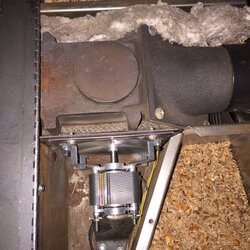
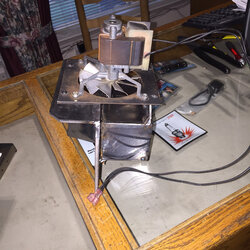
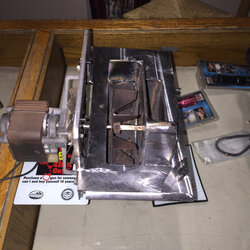
I found a top casting (not even listed in the original spare parts list from mfg)
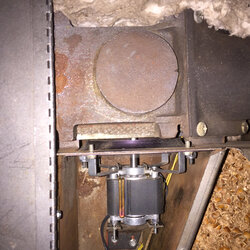
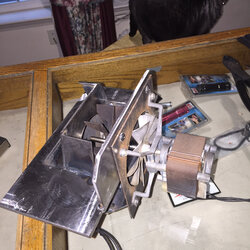
A draft booster fan and the lower sheet metal booster fan housing that bolts to the casting.
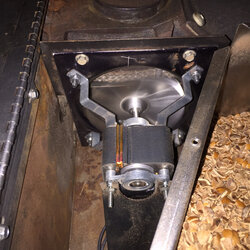
An aftermarket updated draft fan with the larger 5/16 shaft

A nice convection blower (These have a hall effect sensor to allow the heat setting on the board to control the fan speed)
These are no longer available
I will not need the hall effect set up but the price of the fan was too good to pass up

An auger motor and an auger complete
A pressure switch
A door switch

Odds and ends of wiring harness and other tid bits

Guy had 2 factory control boards, one good one dead (passed on those)

The casting is sweet, but the exhaust fan housing is nearly rotted out in a few places.

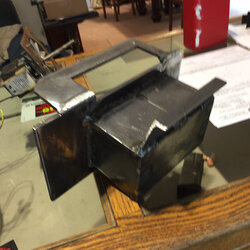
Buttttttttttttttttttt, the fan housing is a perfect pattern to measure up to make a new one.

I stopped by the steel yard yesterday and for $11 got all the stuff I need to fabricate a heavier box box.

The original was very light steel, likely 18 gauge and the area around the bolts that secure it to the casting would bend when the bolts were snugged up.

I got 1/4 inch for the main plate and 1/8 inch for the remainder of the box

The original stuff was all stamped and formed then welded.

I will machine the main plate then fit and piece it together to the original dimensions.

May never need it, but it will be there if we do.

The stove this stuff came from looks to have been left out in the weather.
When water gets into the ashes the caustic mess eats up steel real quick.

I had the option to buy the chassis, but its a mess, and not worth hauling home.

More treasures

Yessssssssssssss
 
Last edited:
I stopped off at the steel yard and bought $11 worth of scrap steel in various sizes/ and thicknesses.

The fan housing I recently acquired for the Prodigy 2 is a fine pattern, nothing more.

Went after that thing this afternoon.

Took the 1/4 inch plate and started whittling on it.
Got it cut to width and length (plus a tad) then tossed it in the Bridgeport mill and got serious with it.

Machined it to length and width then cut the needed notches in it plus the large hole in the center where the exhaust fan box goes

A tedious task to worry this thing out.

Got the two pieces of the main plate done (Originally a formed right angle, but decided to cut, machine and then weld them together.

Once the entire box is done I will likely toss it back in the mill and take a tiny clean up cut so the fan mounting plate sits nice and flat with the shaft square with the box.

It certainly does not require a half thou tolerance by any means, but having all the mating surfaces flat and true will make it work far better.

With the much heavier material in the main plate and the fan mounting area I'm going to locate the fan assembly and then drill and tap the holes rather than using sheet metal screws to mount things.

The sheet metal screws just suck in this area.

Nice button headed Allen screws (10-32) with shake proof lock washers will make things a class act.

I'm going to leave out the port in the rear of the fan box that was used by the low temp switch, as the new controller does not need it.

The low temp switch was used solely to shut the stove off.

The shutdown was done by simply turning the main switch off and the snap switch would run the exhaust fan only until the fire was out and cool.

This is a bad plan, as the convection fan needs to be on as well as the draft fan to allow the entire stove, the heat tubes and exhaust to cool slowly and then simply shut the power off when the stove is cooled down

The new controller has a switch to stop fuel feed, and the convection fan and draft fan keep running.

This will make life good.

I have always shut the stove down this way anyway, never just kill it.

Picture shows the old fan box (Ratty as it is) and the new main plate with the angle piece (must be welded to large plate.

Note the machined angle on the right hand end (This edge nudges into a section of the flat gasket rope that meets the exhaust casting.

The original main plate was so thin that they had a formed lip on the opposite side from the large flange to keep the thin metal from bending when the bolts are snugged down.

The 1/4 plate will be sweet.

Far too heavy and costly to mass produce though, but so is my control box. (not for me, but to mass produce)

Can't really complain, as our Prodigy is in nice shape even after all the years on it.

If and when the stove comes apart again I will replace the white ROCK WOOL insulation blanket that goes under and to the left side of the exhaust casting / fan housing.

I'm looking forward to seeing this little beast finished.

Some welding yet, but weather sucks right now outside at present.

Some other pix of the location of the fan housing.

Took these a few moments ago with the stove running to show the location of things.

The plate that the fan venturi bolts to is the plate I was making today.
With the stove together its tough to see much.

The new fan motor I installed just a short time ago can be seen in the chassis area.

Snowy
 

Attachments

  • fanhousing.JPG
    fanhousing.JPG
    65.9 KB · Views: 122
  • fanhousing2.JPG
    fanhousing2.JPG
    113.9 KB · Views: 114
  • fanhousing3.JPG
    fanhousing3.JPG
    94.7 KB · Views: 115
  • fanhousing4.JPG
    fanhousing4.JPG
    99.8 KB · Views: 123
Last edited:
  • Like
Reactions: Owen1508
OK

Ahhhh, spent today fiddling around with building the new fan housing.

Not quite done, but close.
I need to layout and drill the 4 mounting holes that fasten the housing to the casting and locate and weld on the lower bracket for the exhaust fan..

I have some advice.

DON'T TRY THIS AT HOME

Even with a Mill, Welder, Band saw, torch and many years of fab experience, this little critter was a good task.

The original was all stamped, formed and jig welded to keep everything right where it needed to be.

Building one from scratch was a whole different story
fanhousing5.JPG
fanhousing6.JPG
fanhousing7.JPG
fanhousing8.JPG
 
Nice construction there! Good deal on the parts too!
I love seeing when people are redesigning these stoves ad make them ten times the quality of OEM.
When I worked in a machine shop, I loved improving on OEM designs.

Bill
 
Thank you.

I got out this morning before it rained and got the bottom bracket welded on.
We headed down town to have Brunch and I stopped off at the hardware store and got some 10-24 Allen bolts to fasten the fan plate into the housing.

I just finished marking where the holes go, and now need to head downstairs and drill and tap the holes.

The original part was fine, but sadly these were not ordinary service parts and now with Whitfield long out of business they are nearly nonexistent.

Getting the used one, even though it was pretty sad was a real plus as it served as a nice pattern to copy.

My plan in making the part out of heavier material was just one of extreme longevity is all.

The top casting is iron, and it should last forever unless it gets dropped (While out for service)

Having the spare really only allowed making and fitting the fan housing much easier than without it.

If I could have bought a new one or even a good used one in top shape, I would have gone that route.

But as I have stated before, heat is a very big necessity, and trying to repair a major part like this during a break down is not my idea of fun.

Weather here now is in the low 40's F and rainy, which is common for us.

Today the big Whit is handling the duties and the little guy is off for a few while it cools and I clean it
 
Got after things a bit more this afternoon.

Drilled and tapped the holes to mount the exhaust fan assembly and mounted it.

Still need to get the fan box fitted to the casting and the last four holes drilled that fasten the box to the casting.

May need a slight bit of machining on two edges to allow the box to fit nicely into the flat rope seal the goes between the box and the casting.

Just little tweaks ya know.

I went after the casting with a nasty rotary wire brush on an air grinder and cleaned off the crud.

So here are the last pix for now.

I want to do the final work on it outdoors to get good lighting to see things well.
 

Attachments

  • fanhousing9.JPG
    fanhousing9.JPG
    60 KB · Views: 101
  • fanhousing10.JPG
    fanhousing10.JPG
    93.4 KB · Views: 111
  • fanhousing11.JPG
    fanhousing11.JPG
    81.5 KB · Views: 106
  • fanhousing12.JPG
    fanhousing12.JPG
    89.4 KB · Views: 103
  • fanhousing13.JPG
    fanhousing13.JPG
    79.7 KB · Views: 101
Status
Not open for further replies.