Wiring up a zone valve

  • Active since 1995, Hearth.com is THE place on the internet for free information and advice about wood stoves, pellet stoves and other energy saving equipment.

    We strive to provide opinions, articles, discussions and history related to Hearth Products and in a more general sense, energy issues.

    We promote the EFFICIENT, RESPONSIBLE, CLEAN and SAFE use of all fuels, whether renewable or fossil.
Status
Not open for further replies.
HOLD THE PHONE!!!!

This is exactly what you want/need and I can "walk you right through the installation" Eric:
http://cgi.ebay.com/Air-Products-MR...ryZ42897QQrdZ1QQssPageNameZWD1VQQcmdZViewItem

At $17 and some change...I might be buying one or two myself!!!

I would go with this particular relay (for a variety of technical reasons I will not even begin to describe...so as not to confuse you or anyone else following the thread.) ;)

...Some folks "in heating circles" might say "Just throw in a pony relay and be done with it".

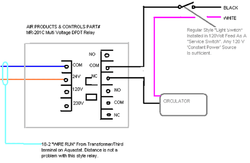
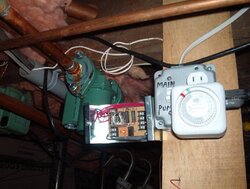
Not quite that easy. A 'pony relay' is a set of "wet contacts"(in terms of how it actuates...it has it's own power supply built in)...The 201 is a "dryset" and of minimal power consumption. How low??? When I first started trying to figure out the best way to wire my system I experimented with powering a 201...off the T-T terminals... on the Oil Primary control of the oil burner, and it worked. The 201 would "power up" but not draw enough power to close T-T on the oil primary... not bad when you stop and think about it! ;)
 
Assuming you use the 201Relay...Here is where the 18-2 wire run will connect to the transformer and aquastat:
 

Attachments

  • LD-EricREV1WR.bmp
    241.5 KB · Views: 1,377
Okay now for the other end that is a hundred feet away:
 

Attachments

  • EBWDORIG_cr_WR.png
    EBWDORIG_cr_WR.png
    27.7 KB · Views: 1,566
Oh...BTW Eric...Just so you know "I'm not just pulling things out of thin air" On the AP&C;Relay...
I use one in my system (It was made twenty years ago and is still working perfectly).
 

Attachments

  • IM001564WR.jpg
    IM001564WR.jpg
    87.4 KB · Views: 1,284
Eric, I don't know how much wiring you need to do between the barn and the house but if you are going to have a few wires run back and forth might I recommned something similiar to this:
 

Attachments

  • IM003958wr.jpg
    IM003958wr.jpg
    53.1 KB · Views: 1,212
  • IM003959.JPG
    IM003959.JPG
    78 KB · Views: 1,203
The wire in the two pictures above???

"Standard (Underground) Phone Cable". Not exactly something the "everday homeowner has laying around" but it is fairly common enough. This particular "Cable" is Made by American Insulated Wire Corp. 22AWG,"shielded" and 5 pairs in the cable. It is suitable for "direct burial" and is pretty 'bullet proof'. Can be found at yard sales/flea markets every so often.

Just something you might want to keep your eyes open for.

I've got about 75 feet of it "leftover" and will at some point utilize it for my system (hopefully)...lol

...It's always nice to have a couple extra wires available "for future use"...and by the sounds of things, I'm sure your set-up might have a few additions "down the road".

That's what's great about a wood fired boiler "the flexibility" to make it do what you want it to. Makes things a whole lot easier with low voltage controls...Well that is once you have a basic working picture of what does what...takes a little time to figure it all out but all in time!
 
Wow, thanks keyman. I'm going to have to dedicate part of this system to you.

After we get her all hooked up and running, I'll tackle this part of the equation.
 
The easiest way is to wire it direct. The aquastat is just a switch. Run two black wires into the aquastat and connect them to the terminals. If it has three terminals, figure out which two you're going to use. If it's a Honewell, it will tell you which ones on the inside of the cover. "Open" means a broken connection and "closed" means a completed connection.

Anyway, I can't explain it; I had to draw it out. I'm not much of an electrician, but this is the way I do it. I left the ground out, but the ground from the power source connects to the ground terminal on the pump. No ground needed to the aquastat.

You also want to set the differential. Again, on a Honeywell stat, it's that white wheel with the black numbers on it. I believe they go from 0 to 25, or something in that range. That's the number of degrees it will swing beyond the setpoint before it makes or breaks the connection again. So, if you want to make the connection at 140 degrees to run the pump and your differential is set to 10, the stat will allow the temp to drop to 130 before it turns the pump off. One more thing to play with.
 

Attachments

  • statwire.jpg
    statwire.jpg
    15 KB · Views: 603
Good thread, but seemed more suited to the Boiler room, now that it exists, than it does as general DIY info.

Gooserider
 
Status
Not open for further replies.