Addition update 4-16-12

  • Active since 1995, Hearth.com is THE place on the internet for free information and advice about wood stoves, pellet stoves and other energy saving equipment.

    We strive to provide opinions, articles, discussions and history related to Hearth Products and in a more general sense, energy issues.

    We promote the EFFICIENT, RESPONSIBLE, CLEAN and SAFE use of all fuels, whether renewable or fossil.
Status
Not open for further replies.

Hogwildz

Minister of Fire
Well, coming up on 6 years in this summer, and I am finally starting to get finishing up on the addition.
Started getting doors, trim and cosmetic things done in the new office and entrance.

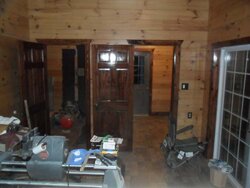
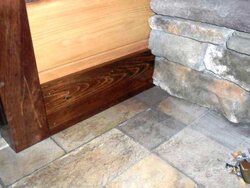
The trim I went with pine due to cost constraints. I was going to stick with natural, but went with Red Oak stain to contrast the natural finish tongue & groove.
Now I am not a builder nor a carpenter, but my years as a roofer gave me some decent constructions skills and common sense. The stuff is not perfect, but I am very pleased with the way it is turning out.
The doors are pine 6 panel solid doors. The trim is also pine 1"X stock. I sanded the doors and trim with an orbital sander with 150 grit in an attempt to get a more uniform stain. There is still some variances, but I like it as is. I stained everything with Minwax Red Oak oil base stain. I then put 2 coats a few hours apart of water based polyurethane floor coating in high gloss. After a day or two to set, I sanded again with a 320 grit sanding sponge block. I tried sanding with 220 sandpaper and it scratched too much. The 320 block worked real nice. Then cleaned the dust off and again 2 more coats of clear high gloss. 4 coats really turns out real nice and smooth. Well I don't have a dust free work area, so there is minute imperfections, but still turned out real nice for me. I am finding I like to do a couple horses worth of trim at a time, as my back hurts alot after doing that amount of work.
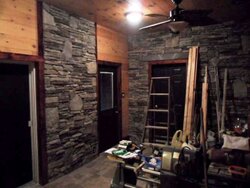
The Tongue and groove as I said is natural finish, and the water base does not seem to make it go amber so much, and it holds the natural color better. My mistake was to put the tongue and groove up and let it sit before putting the clear on, and not getting the trim up at same time frame. To cover the corners and along where the walls meet the ceiling, I am using furring strips(cheap at $9.75 per 10 pc bundle) along the wall top at the ceiling, and was going to use 3/4" 1/4 round until I set a pc up in the corners and didn't like it. I decided to rip down 1"X stock to get 3/4" x 3/4" square stock that I like in the corners. I was going to leave the ceiling & corner trim natural, but it is too light as opposed to the tongue and groove. I supose I could wait a few years for it to darken then clear, but just want to be done. So I will also stain them Red Oak and 4 coats of clear gloss. Oh the tongue and groove walls & ceiling I did clear satin finish. Really turned out to my liking between the satin walls & ceiling and gloss trim.
Anyway, here is some update photos.
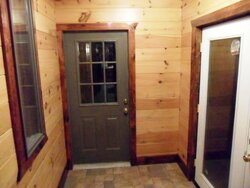
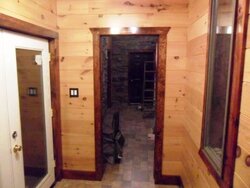
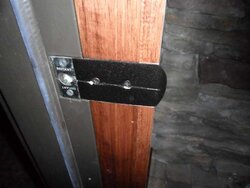
I still need to paint some of the entrance doors. I will be painting them the same color as the Dark Bronze door to the garage and office entrance doors.

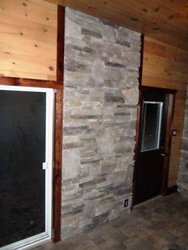
These two are the new entrance.
 

Attachments

  • SAM_2781.jpg
    SAM_2781.jpg
    33.5 KB · Views: 274
  • SAM_2782.jpg
    SAM_2782.jpg
    33.8 KB · Views: 260
Ok pics loaded finally...
2778 is the office & garage entrances.
2780 Is the doorways to the new master bedroom to left and entrance to main house is the door on right.
2784 Is the backdrop for the 30 when I get it installed. Shame I have to cut out the laminate flooring though and put some sort of tile there. Hoping to get something near what the laminate looks like.
2785. Note to self, install trim before putting stone on. Turned out pretty good cutting it into the stone.
2786 Door frame set up for 2' x 4' walls, in a 2" x 6" wall. Had to make a new strike plate to keep the wood from getting beat up from the door latch. .063 aluminum cut and filed smooth and painted oil rubbed bronze. Cost, free, had all the materials. And could not find anything like it anyways.
Hope to be done this summer.
 

Attachments

  • SAM_2778.jpg
    SAM_2778.jpg
    39.8 KB · Views: 361
  • SAM_2780.jpg
    SAM_2780.jpg
    33.6 KB · Views: 362
  • SAM_2784.jpg
    SAM_2784.jpg
    40.2 KB · Views: 433
  • SAM_2785.jpg
    SAM_2785.jpg
    40.4 KB · Views: 347
  • SAM_2786.jpg
    SAM_2786.jpg
    31.2 KB · Views: 330
Getting ready for the ladies I see. :)
 
damn
 
I'd say you have every reason in the world to be very proud of all the work you've done there, and the way it's turning out. Nice job. Bring the girls home! Rick
 
Yes, getting ready for my gals to come home. I'll be flying out to Cali to go to my sons Audio Engineering Degree graduation, then fly from there to Portland to get picked up by the lil mrs., then rent a trailer, over to Brewster to pack her stuff up from the storage shed, visit her father and ask for his approval to marry his daughter(old school in me), visit her middle son and his new baby, and pick the two beautiful girls up along the way, then homeward bound. I am excited! Closer it gets, harder the wait! The bedroom is going to be my masterpiece. 15' x 25 with 3-1/2' x 17' his & hers closet. Set up to hang a flat screen from the ceiling at the foot of the bed. Lots of trim to do there yet. But getting there. I'll post more as I get stuff done.
Thanks for the kind words. I really put alot of time into this addition. When it is done, then I have to redo the outside as it was done poorly. The back to reno the inside of the main house. More stonework to come inside & out.
 
It looks awesome! I won't show any of this to my wife. We have been eight years in our home and I still haven't finished replacing the trim, etc.
 
It looks awesome! I won't show any of this to my wife. We have been eight years in our home and I still haven't finished replacing the trim, etc.
The trim is the worst part. Of course it sets everything off the most too. I am beginning to think I will never get this house completely the way I want it. Having to fix the previous owner's build of this place always turns one project into 5 more. But at least I know it is done right & overkill after fixed.
 
I like your choice of finishes. Nice work!
 
Hog, that's gotta be some of the nicest remodeling I've seen in a long time.You do excellent work.
The strike plate, as simple as it is, is a good indicator of your attention to detail that most would not even come close to.
Just really, really nice.
Has the future Mrs. Hog seen any of that?
I'm glad you got the pic thing worked out so we could see what you've done.
I hear ya' on a job turning into more. Happens every time I start one. I sometimes hate taking things apart, because I just KNOW it probably wasn't done right, but it bugs me so bad I HAVE to anyway.>>
Keep the pics coming.
 
I hear ya' on a job turning into more. .

Welcome to my world..married to a contractor and can't my damn bathroom finished.:mad:
Your gals are gonna love the work you did Hogz.
 
The stone work looks awesome.
I like how you cut the trim around the stone.
The stove is going to look great in that room.
 
Hog, it's looking great !! I remember the pics posted when you were doing the stone work!!

I like the asking her father part :)
 
Lookin' good! The stone ROCKS!
 
Thanks all. I love working with my hands. Always have.
PapD, yep the lil mrs. seen most of it.
I am very anal about doing things, but I asaure you all, it is not perfect, but still nice. Not slapped up like new homes these days.
Not really a remodel, as it was just an big breezeway with perimeter walls, and doorways cut out and roof. I did the rest.
Had to take one wall of the T&G in the smaller room between the office and bedroom to run sewer and vent pipe for the sink that goes in there. What a PITA. Should have done it when I did the walls. Luckily I thought ahead and used screws to attached the T&G in most areas I thought I may need to get access at. Still sucks doing it 2x though.
Gam, YOur hubby is prolly sick of remodeling if he does it day in and day out. Home always comes last when your in the trade.
My beautiful wife will be helping to make this more cozy, and less mancave like. She is a great woman and I love and adore her. Can't wait to bring her home!
I do love the stone, and the T&G and the stone just go perfect together. A choice I would make 100x over again.
I plan on doing ALOT if not all of the outside of the house in the stone also. Just takes LOTS of time & MONEY.
I was averaging about 5sf of stone per 12 hours LOL. Very choosey and like a big puzzle, but the pcs don't exactly fit right, so gotta pc em in 1 at a time strategically. I LOVE the stone!!!!


Dixie, I am old school in many ways, and not so much in others. But that is def the old school in me. I had already asked her mother a few months back, through FB of all places. Sadly, I won't get a chance to meet her this time out, but hope to have her come visit.
 
  • Like
Reactions: Eatonpcat
Good marriage of the stone & wood. Like the others have said, beautiful craftmanship. Two questions: Is that Cultured stone and can you show me a close up of your jamb/header trim join? I think it looks nifty.
 
Very impressive, man. I love the way the wood and stone come together to give the room a "warm" feeling. The finish colors just give it some "pop".

Looks like I will be doing some stone exterior this summer on the cabin. I can't say that I am excited about the time/work that will be invested, but I am very excited about the final outcome. I hope that I can do as nice of a job as you have done on your room.
 
Good marriage of the stone & wood. Like the others have said, beautiful craftmanship. Two questions: Is that Cultured stone and can you show me a close up of your jamb/header trim join? I think it looks nifty.

Yes, it is Owens Corning Cultured Stone. There are many other makers out there. I really like this stuff, looks real. Jamb/header trim joint? Are you talking about the stone header over the door to the garage, or the wood trim over the rest of the door?

Jags: Thank man, it is alot of work, but everytime I look at it, it makes me feel a sense of a nice job, looks great and always makes me feel good and smile.
 
Are you talking about the stone header over the door to the garage, or the wood trim over the rest of the door?
The wood trim over the door. Never seen a join like that.
 
All the trim is basically square cuts, With the exception of the ends of the header trim. I saw them done on an angle somewhere, and liked it. I was going to just do square end cuts and extend them out an inch or so at the top header boards, but decided to do a 30 degree angle and have the angle meet the side trim pcs. Miters just don't seem to fit the rustic look I wanted. I wanted nice, but primitive. The door trim to the garage door is just square cuts. Didn't think ahead when I did the stone. Still works for me. Most old places are add on after add on, with different characteristics with each add on, so I call it something like that LOL.
Here is a few photos of what I did.
SAM_3006.JPG
SAM_3007.JPG
SAM_3008.JPG
SAM_3009.JPG
 
Even nicer up close. Love how the grain shows. You're right, a mitered cut wouldn't fit in as well.
 
Even nicer up close. Love how the grain shows. You're right, a mitered cut wouldn't fit in as well.

plus any drying or swelling in those seams will not be noticed, but in a mitered cut they would look like mistakes. Very good job. I like the character of exposed wood.
 
  • Like
Reactions: Realstone
Status
Not open for further replies.