Only thing I read was to put the smooth side down which I did.
You should be good to go on that front.
Only thing I read was to put the smooth side down which I did.
You really want to go overkill? Go scratch coat as Scotty said and then use a scarifier to create "keys". The buttered bricks will bond like superglue.
View attachment 74985
I assume if I use lath, the scratch coat has to dry for 24 hrs?Hehehe - go figure.")
I assume if I use lathe, the scratch coat has to dry for 24 hrs?
That's great news! I can't wait to see the hearth. Make sure to post pictures of the project!Took a scrap piece of Durock, bought some thin-set. Troweled the thin-set onto the board after letting it sit for 15 minutes like the bag said, after mixing it. Buttered the board, went over it with a 1/4 notched trowel , held at 90 degrees. Then applied some bricks dry onto the board and buttered the back of two others. Did that yesterday, today,,,, I can't get any of them loose. All held great! So the hearth pad will move on today, let it dry for 48 hours and then get the mortar bag out for the joints. I believe the thin-set has an adhesive added.
Scotty and BeGreen, I'll keep ya posted. Thanks for all the feed back!..........CharlieGood news. I thought that might work. Thanks for the update and good luck with the hearth!
.
Thanks a lot Begreen. First time building a hearth pad. Learn by doing. Checked the bricks this morning, glued down solid to the Durock, used Polymer Modified Thin-Set . Just misted the board with water then buttered it to my lay out lines each time and a quarter inch notched trowel. Nothing on the bricks, just grabbed them and rocked them into position. Made for a clean job. Going to trim it out in a stained wood.Lookin' Good!
BG was very helpful when I built my hearth with lots of good info. I would suggest using a Laticrete thinset made for mounting the brick to a wall.. I had good luck with their products but you need to get the good stuff at a tile store as I found Lowes and HD don't carry the good stuff..I used the 254 Platinum which was top of the line and while it was overkill and a bit expensive I only wanted to do this once. I used the best of everything but got an amazing deal on the porcelain tile and the hearth still cost me round $300.00 for everything!Scotty and BeGreen, I'll keep ya posted. Thanks for all the feed back!..........Charlie
") I bought the red oak at Lowes and while much more $$ than pine still set me back only around $35.00. It was a good decision as it has held up well so far.
I bought the red oak at Lowes and while much more $$ than pine still set me back only around $35.00. It was a good decision as it has held up well so far.I suggest you do your joints 1st then add the wood. I did mine this way and I also stained the wood and applied coats of poly before finishing the grout to the wood. After your wood work is sealed and dry apply the blue tape then do your grout, wipe any excess grout and your wood will look fine. At least mine looked good following this process.Yes I did use thin-set with a polymer. A minute after my stone was done I couldn't move them. Great stuff. Stone place gave me S mortar to use the first time,only 50% of the stone held the first time. Should have looked at the brick box closer, said right on there to use Thin-set. Live and learn , it's all good now. Just have to fill the joints. Going to put my trim wood on next , put blue tape on the wood as to not get any joint material on the wood, then I can fill any gaps right up to the wood. Yes I too have about 400 into mine but it's bigger then you could buy and will give me extra roof and over minimums around the stove. Plus I did it myself. Next time I want to build something I'll already have some experience under my belt. A stepping stone of sorts. Again, thanks to all that replied, I appreciate it. The Hearth is such a nice place to come and learn. Can't imagine all the money people must have saved each other on here by getting a heads first before making a bad move.
Ray, are saying do your joints but stay away from the outer edges until the wood is on?I suggest you do your joints 1st then add the wood. I did mine this way and I also stained the wood and applied coats of poly before finishing the grout to the wood. After your wood work is sealed and dry apply the blue tape then do your grout, wipe any excess grout and your wood will look fine. At least mine looked good following this process.
Ray
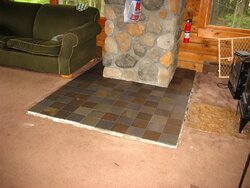
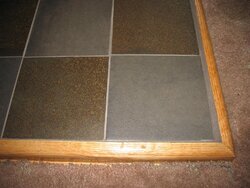
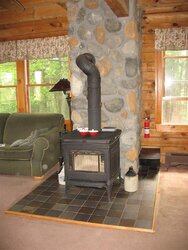
I can only say the wood trim was done after the tiles were done on my hearth. The wood was added later then stained and poly'd. Once this was dry I used blue tape on the sealed wood then grouted from the tile to the wood. The tape kinda worked but I just damp sponged the grout off the wood and it cleaned right off.. I added pics so you can see what worked for me..Ray, are saying do your joints but stay away from the outer edges until the wood is on?
Gotcha!I can only say the wood trim was done after the tiles were done on my hearth. The wood was added later then stained and poly'd. Once this was dry I used blue tape on the sealed wood then grouted from the tile to the wood. The tape kinda worked but I just damp sponged the grout off the wood and it cleaned right off.. I added pics so you can see what worked for me..
Ray