Atlanta Huntsman: Hunting Camp Project

  • Active since 1995, Hearth.com is THE place on the internet for free information and advice about wood stoves, pellet stoves and other energy saving equipment.

    We strive to provide opinions, articles, discussions and history related to Hearth Products and in a more general sense, energy issues.

    We promote the EFFICIENT, RESPONSIBLE, CLEAN and SAFE use of all fuels, whether renewable or fossil.
Status
Not open for further replies.

pen

There are some who call me...mod.
Staff member
Aug 2, 2007
7,968
N.E. Penna
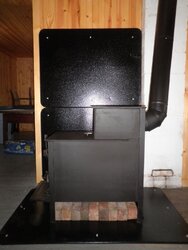
The members of our hunting camp finally decided it time to remove the old Atlanta Homesteader wood stove from the camp for safety reasons (we could watch the fire burn, and shouldn't be able to).

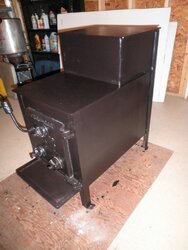
I volunteered up this Atlanta Huntsman wood stove for it's replacement once the boy and I finish putting a shine on it. I bought it for 80 bucks in the spring and figured it'd eventually turn into a firechamber for a meat smoker or else a cardboard burner outdoors. Glad to find it a situation where it will be well served as it appears to be a solid unit.

In all, it's in good shape. I will need to reweld a few joints, but otherwise, think it will serve us well after that, a new door gasket, and a good sanding and coat of paint.

Here's the boy giving me a hand getting things started today.

PA190001.JPG

PA190003.JPG
 
  • Like
Reactions: corey21 and raybonz
Here's the update. Have everything ready for the installation Sat morning.
 

Attachments

  • PB070006.JPG
    PB070006.JPG
    93.6 KB · Views: 8,001
That's purdy...a little sandblasting and a coat of paint makes a big difference!.
 
Thanks, I thought it cleaned up pretty well! I'm really looking forward to put some fire in her belly Saturday.

Do you happen to run a pipe damper on yours or not? I never have on the rear exit stoves like these that I used (fisher mama, timberline) and wasn't planning on using one here but they aren't hard to throw on.

pen
 
Nice work pen.
 
Thanks, I thought it cleaned up pretty well! I'm really looking forward to put some fire in her belly Saturday.

Do you happen to run a pipe damper on yours or not? I never have on the rear exit stoves like these that I used (fisher mama, timberline) and wasn't planning on using one here but they aren't hard to throw on.

pen

Hey Pen,
Sorry for the late reply as you probably already hooked up the stove. I had a damper in the beginning, but when I had the chimney lined and replaced the stove pipe I didn't put it back in. I haven't missed it and find that I can control the stove nicely with the three draft wheels.
 
Decided not to put it in either. After the test burn I was amazed at how low the stove pipe temps were compared to other pre-epa stoves. That baffle design that Atlanta used gave me a very good first impression.

Stove worked flawlessly.

Do you have yours installed on a concrete or a combustible floor? This is going on a wood floor. After going through the manual, and seeing the only recommendation was "metal or masonry 5 inches beyond the footprint of the stove" I bought a stove board with a metal outer surface and rated to 1.5 r value.

I was amazed to see that stove board get to 300 degrees when cranking. Of course, there is no ash built up in the bottom of the stove, and I was running the living piss out of the stove to bet the paint seasoned in. That said, still debating if I want to put more protection under it or not. This stove board w/ an r-value of 1.5 should be equivalent to 3 inches of hardardibacker, so I figured I'd be good, however, I've never used one of those pre-manufactured stove baords before.

pen
 
My stove sits on a brick hearth with the concrete floor below that...no combustibles. I like the baffle design of the Huntsman as well. The "flu tube" extending into the upper chamber makes for a long smoke path. Lots of heat coming off that puppy without extreme stove pipe temps. Glad to hear everything is going well so far!

joel
 
Thanks, I'm heading out tomorrow and am going to place a layer of brick under the stove, on top of the hearth mat for an extra layer of protection. The bricks I found have the 3 holes in them. I plan on placing them on their side so that air can circulate through them.

Hopefully I'll remember the camera so I can get a few pics.

Thanks again for the help Joel.

pen
 
The stove looks great, so does your little helper!

I would be careful with loose bricks on edge. They are not the most stable floor if not mortared in place. Maybe you could place a threaded rod through the holes of the row of bricks that are under the stove legs?
 
  • Like
Reactions: pen
The stove looks great, so does your little helper!

I would be careful with loose bricks on edge. They are not the most stable floor if not mortared in place. Maybe you could place a threaded rod through the holes of the row of bricks that are under the stove legs?

Agreed. So rather than elevate the stove, I added the layer between the legs and gave it a go again as it was only warmer than I liked right in the very center, beneath the stove. Ran the stove up to full temp again with no ash bed and let her stay there for a while. Pulled a brick and measured the temp of the hearth board and it was about 140. I'm a lot more comfortable with that temp. Wish these old stoves were more specific with their hearth requirements as I'd be able to trust that board more if they were.

The highest other temp on that floor board I could find anywhere was about 160, that being in areas that I did not place bricks.

This is the stove board that I used. Micore and steel http://www.tractorsupply.com/imperial-type-2-stove-board-32-in-w-x-42-in-h-slate-1021649 Obviously I used black, the one under the unit is 36x52. The ones on the wall are 32x42


pen
 

Attachments

  • atlanta stove 002.jpg
    atlanta stove 002.jpg
    96.8 KB · Views: 1,574
Looks good. 140F on top of micore is pretty safe. I think a simple sheet metal shield on the bottom with an airgap would do the trick too.
 
Looks good. 140F on top of micore is pretty safe. I think a simple sheet metal shield on the bottom with an airgap would do the trick too.

Thanks for the second opinion BG. I had the materials, and thought about drilling the legs and putting bolts through them, and then setting a metal plate under the stove resting on those bolts to do the same thing. However, I was short on time and the brick was the quickest solution I could come up with before that stove was going to be put into use.

I'll keep checking temps and if I'm not satisfied, I'll cut out the metal plate and add that bottom shield.

I wish I could easily measure the temp under that stove board.

Thanks

pen
 
Status
Not open for further replies.