Mantel Height

  • Active since 1995, Hearth.com is THE place on the internet for free information and advice about wood stoves, pellet stoves and other energy saving equipment.

    We strive to provide opinions, articles, discussions and history related to Hearth Products and in a more general sense, energy issues.

    We promote the EFFICIENT, RESPONSIBLE, CLEAN and SAFE use of all fuels, whether renewable or fossil.
Status
Not open for further replies.

Gabby12

New Member
Mar 8, 2012
65
Wilm. DE
I remember talking to stove shop about this but can't find my notes and don't see info in manual.
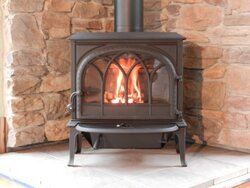
For my new Castine install, what is the minimal height that a mantle can be from the top of the stove?

I know it has to be at least 6" from the dbl. wall pipe but I am looking for distance from stove to top bottom of mantle.
 
Mantel and Trim Stove to 1” thick or less, side trim 13”
Clearances Stove to 1” thick or less, top trim 23”
Stove to mantel- maximum mantel depth of 12” 25”
 
Be green,
I did see these specs in manual but can't quite figure out what it is seying'.
Can you give some explanation so I can figure out.
 
I would guess:
13" to vertical wood side trim on the fireplace, 23" to top trim. Trims cannot be more than 1" thick.
Mantel can't project more than 12" out from fireplace face (which I'd assume would be even with the fireplace opening) and must have 25" clearance to stove top.

They also have ways to reduce these clearances but I didn't look at those...
 
Exactly correct. Show us a shot of the fireplace and provide current dimensions and we can help you figure this one out.
 
I don't have stove installed yet - install date Jan 8th - so not pictures other then build of the hearth.

I guess my confusion is the terminology in manual.
They talk about what you (begreen) stated - trim and mantle.
Not sure what is meant by side and top trim.

The stove height is 29 1/2 ".
What is the minimum height that the mantle can be above the stove?
I am guessing 25"s but don't want to guess wrong.

Just cheking - using dbl. wall pipe - clearance to mantle (will be the farthest thing stick out from corner/wall) is 6".
Correct???
 
One more question, I plan to build a mantle once i fidn out how high it is to be above stove.
Considering the 1" air gap on top edge of wall, I was planning to install the mantle 1" above this air gap.
Is this o.k.
 
I think we need to get the whole picture here. Is the stove going in a fireplace or is it a new installation going against a (shielded?) wall? If shielded wall then yes, this is ok. But give us the full picture here. Also, if this is freestanding, include details about how the stove is connected to the chimney and whether with single or double-wall pipe.
 
I guess my confusion is the terminology in manual.
They talk about what you (begreen) stated - trim and mantle.
Not sure what is meant by side and top trim.

Begreen is right... post a sketch, a photo of the build in it's current state, something to give an idea of what we're dealing with here. However, to clear up your confusion on terminology, "trim" usually means any wood that projects 1" or less from the wall, and "mantel" refers to a horizontal plank mounted above the stove that projects more than 1" but less than 12" (by your manual) from the wall. These are often quoted for installs where the stove is mounted in front of, or partially into, an existing fireplace.
 
I just looked over gabby's old posts. This is a new, corner installation. Not a fireplace install. Therefore I'm not sure why the discussion of side trim.

gabby, I recommend temporarily halting production until there is a clear plan. Reading the past post I still see some confusion in terms and with the wall building. To avoid an expensive tearout, I would not start building until you have a clear idea of what you are doing. The best thing to do is to spell out what you have currently planned including the method of installation. And if at all possible, include some sketchs of what is envisioned, including dimensions. That way we can verify your clearances and process.

https://www.hearth.com/talk/threads/installing-jotul-castine-400.100898/

PS, to avoid issues with the mantel, have you thought about making it out of stone too?
 
Let me first say, kudos to the designer of this web site to allow you to just upload a photo.
See attached photos...
I am on other forums where you have to send photos to a server and then post or something like that - not an easy thing to do fo rme anyway.

Also, I am sure you have noticed I have a couple threads going about my install.
I was trying to get specific answers about a challange and then when something else came along I thought it might be easier for you all to answer each topic seperatly instead of weeding through all the questions in one thread.

Let's move forward.

This is a new install of a new Castine wood stove being installed by Bylers out of Dover DE.
County code requires that a contractor install and with me building the 24'x24' addition on days off and weekends I am glad to let someone else do some of the work - but it comes at a price.. but a plug for Bylers, comparing them to another stove shop they were about half the install price and have been great to work with.

I am building an elevated hearth out of 2x10's (so 9 1/2" tall wood) and will have a 1" flag stone on top of that which the stove will sit on.
The stove will be sitting in a corner angled out into the room at a 45 deg. angle.

The wall behind the stove will be covered in some type of stone whether real stone or fake still remains to be determined.
Found some Tenn. Field stone I liked at local brick store but it was sold.
I for sure will be running this stone up to the mantle and am still deciding what to do above the mantle whether continue with stone of drywall or some other type of decorative product - still working on this.

To keep the hearth from going out into the room too far I am going to go the route of using a protected wall (1" air gap), this allows the corner of the stove to sit 6" from the closest combustable which will be the material fastened to wall studs. Other wise I would have to keep stove 11" from the closest edge of stone and with stone ranging from 1"-3" this now has the stove at least 14" if not more from the corner of the stove to the wall.

The stove height is 28 1/2" tall.

The hearth I built is 51" from inside corner to edges going along walls.
It then turns 90 degs. and then I have a 45 deg. angle going across the front of the stove giving me 12" of protected hearth in front of the stove ash pan or 16" in front of stove door to front edge of hearth.

The stove comes with a bottom heat shield and I did purchase the rear heat shield as well.
Will be using dbl. wall pipe inside room and designed roof trusses so pipe can run straight right up through ceiling/roof with no angles in flew pipe needed.

You will see in my attached photos a temporary mantle (just to get a feel for it's height) installed 29" above the flag stone on top of hearth (I think - right now sitting here icing foot so don't want to put shoes on to re-measure).
If I am understanding comments here the mantle must be at least 25" from stove top.
I am planning to build a mantle that will be on both walls and meet in corner and it will probably be around 4" thick and 12" deep possiable made out of a piece of walnut but if not walnut for sure wood.
I understand the it must not be within 6" of dbl. wall pipe comng from stove and I think I have this clearance but if not will probably reduce depth of mantle to accomidate proper clearance.

I don't plan to have any other wood (trim) coming info this area other then the mantle.

As for the wall behind the stove, I desided for the few extra dollars for added protection I put up cement "Wonder Board" on wall studs.
I understand that this was not needed but to be safe I am o.k. with speading a extra $20.
I plan to rip some wonder board material to make up my 1" spacers, attach these ripped pieces to the wonder board on wall studs thus giving me a 1" gap and then add another layer of wonder board as a backer for my stone work.
I will leave a 1" air gap and base of the surface above my hearth flag stone as well and a 1" gap under my mantle but I will probable close the walls ends to give a more finished look - still need ideas for this end closing.

At this point due to a long day rough wiring the addtion, and now a couple glasses of wine I think I have spelled it all and hope this gives you all the info you need to keep me going in the right direction.
Let me know if you need any more info...
 

Attachments

  • DSCN4503.JPG
    DSCN4503.JPG
    29 KB · Views: 437
  • DSCN4507.JPG
    DSCN4507.JPG
    29.8 KB · Views: 399
  • DSCN4502.JPG
    DSCN4502.JPG
    28.4 KB · Views: 530
  • DSCN4506.JPG
    DSCN4506.JPG
    30.7 KB · Views: 418
  • Like
Reactions: Ashful
I'm not sure you need the additional wall shield. The clearance is measured to the nearest combustible. In this case it's not the stone, it's the studs in the wall. I don't have dimensions but your hearth appears to have enough wiggle room for the Castine.

Ignore the vent location in this picture, but here are the hearth dimensions I used for the Castine. How does that compare to your hearth?

stove-layout-web.jpg
 
Finally getting back with some measurments.
Had a friend over that had a metal break and we started and finished the soffet and facia wraping.
I also started my rough wiring.
Some photos attached but now back to hearth building.

Compared to your drawing above:
Your 50" sides I have 51"
Your 34" sides I have 39"
For your corner of stove to wall 12 3/4" I am going to hold at 10" (keep in mind I am design with a 1" air gap for can go as close as 6" to nearest combustable).
As I see it the front edge of the ash tray will be 12" from the edge of my hearth.
So do you think I am good here???

Onto Mantle:
Stove is 29 1/2" tall, mantle can not be within 25" of top of stove, I have mantle at 29" above stove - should be good here correct?
Making own mantle so will cut depth of mantle once stove is installed understanding the it can not be within 6" of flu pipe - correct?

I just got back from store with the needed material to get a scratch coat of morter on wall behind stove.
Wall build up"
1/2 wonderboard (cement board) on 2x6 studs, rippping wonderboard strips to make 1" strips to run vertically on studs and will attach a second sheet on Wonderboard on these 1" strips thus making a 1" air gap at top and bottom of the wall.
Will attach metal lathe on second sheet of wonderboard and apply a scratch coat of morter that I will scratch lines into and let set up a few days - at that point will still need to pick rocks I want to use but have a few options to look at tommorow.

Can be changed but have a planned stove install for Jan. 8th.
Windows coming in on Jan. 4th and oh yea - Christmas is being thworn in the mix also - better get out and get the better half something other then a roll of 12-2 wire....
So a lot of planning and a few hours of work ahead of me but once I get started on the hearth (at least up to scratch coat) it shouldn't take too long.

Please send input asap due to me wanting get started on hearth wall in a.m.
 

Attachments

  • DSCN4512.JPG
    DSCN4512.JPG
    34.8 KB · Views: 321
  • Before a.JPG
    Before a.JPG
    33.3 KB · Views: 293
  • Day 1b.JPG
    Day 1b.JPG
    39.6 KB · Views: 344
  • Day 3 c.JPG
    Day 3 c.JPG
    35.7 KB · Views: 304
  • DSCN0377.JPG
    DSCN0377.JPG
    37.8 KB · Views: 338
  • DSCN0460.JPG
    DSCN0460.JPG
    44.4 KB · Views: 279
  • DSCN0563.JPG
    DSCN0563.JPG
    29.7 KB · Views: 270
You have plenty of wiggle room for this stove. Just be sure you have at least 16" from the front glass of the stove to the front of the hearth. The front of the ash tray is irrelevant.

Sounds like you understand the mantel requirements correctly. For the wall shield, just be sure it's ventilated top and bottom with a 1" opening. You can incorporate this into the stonework so that it looks quite intentional.
 
I thought of this question around 2 this morning, again planning on placing mantle at 29" above stove.
This mantle will be on both walls behind stove and meeting in corner.
i was planning on fastening the mantle to the first wall stud layer of wonderboard. This first layer of wallboard material will running from rooms subfloor to top of wall just under the trusses.

I was going run the insulated air gap wall up to the bottom of the mantle with keeping a 1" air gap under the mantle (and at the bottom of this second layer wall with this gap being 1" over finished hearth surface).

In doing so the air gap wall will go up to 1" below mantle and stop there - not continuing to ceiling due to mantle being installed on wall.

Is this acceptable?
 
Sounds ok.
 
Spent a few hours today riding around to a few stone shops to try and decide what type of stone we want to put behind our stove.
When I got back I started back on building the hearth wall.
It will be a "Protected" wall by having a 1" air gap.
Here are a few photos to show what I did for others that might be doing the same.

I put wonderboard on studs, ripped a few pieces of wonderboard to build the 1" air gap the will go up to 1" below where I am going to mount mantle.
Due to color of wondrboard it's a little hard to see but there are two layers with 1" in between the lower laying.

I will be putting down a 1" thick flag stone on top of raised heart so there is a 2" gap between current state of hearth (un-stoned) and bottom of second sheet of wonder board.

Plan to put metal lathe on and apply scratch coat of mortar tomorrow.
This way the wall will be ready for whatever stone we pick out.
 

Attachments

  • DSCN4525.JPG
    DSCN4525.JPG
    26.6 KB · Views: 367
  • DSCN4516.JPG
    DSCN4516.JPG
    34.1 KB · Views: 307
  • DSCN4520.JPG
    DSCN4520.JPG
    30.2 KB · Views: 299
  • DSCN4522.JPG
    DSCN4522.JPG
    27.2 KB · Views: 356
  • DSCN4523.JPG
    DSCN4523.JPG
    28.9 KB · Views: 324
  • DSCN4524.JPG
    DSCN4524.JPG
    23.5 KB · Views: 336
I had to spend to time today to do some Christmas shopping but I was still able to get metal lathe and scratch coat on.
It's starting to get below freezing around here and without having insulation in addition yet aI had to make a make shift plastic tent and put a small oil filled heater in corner on hearth to keep morter from freezing.

One thing I am getting my wife for Christmas is Diamonds....
Yes I wrapped up the new diamond saw blade I just bought.
I even wrapped up a roll of 12-2 wire.
Hope she likes them...
 

Attachments

  • DSCN4529.JPG
    DSCN4529.JPG
    28 KB · Views: 357
  • DSCN4528.JPG
    DSCN4528.JPG
    47.3 KB · Views: 357
Scratch coat is applied and dried and should be ready to go with a stone of some sort.

Next challange is how to mount mantle.
I have been thinking about this but it is quite possiable i should have done some more thinking before putting up the wall behind hearth - of well must work around this.

I am going to be using about a 3" think piece of oak as the mantle.
It will be set at proper height above stove and held 1" above air gap built into wall.
It will be on both walls (corner stove application) and meet in corner probably using a 45 deg cut on each mantle where they meet.
It will be about 40" long on each wall meeting in middle corner.

The challange is how to secure it to wall studs?

I have seen some have put a rod or long lag bolt into wall, drill a corrisponding hole in mantle and then epoxied mantle onto this rod/bolt.
I am o.k. with this idea but want to research some more many for the purpose of being able to replace the mantle should something fail like a board split due to heat etc.
If using the rod/bolt method it won't be an easy task to remove the mantle from wall.

Would like to design some method of attaching mantle to wall securely with also having the ability to remove some what easily.

Any ideas???
 
Updating:
Have ordered a few samples of stone to bring home and look at on wall.
Once we have some hopefully we can make a decission and I can start applying.
Had to delay the first stove install date due to not having this wall ready.

Today we install all the windows in the addtion - a big milestone.
 
Stone finally came in and I got it installed.
Put field stone on hearth base and grouted as well.
Put one coat of stain on oak trim on hearth.
Have not finished mantel - will wait until stove is installed in case I have to modify.
Did I say stove install - gues what - stove install is tomorrow....
 

Attachments

  • DSCN4730.JPG
    DSCN4730.JPG
    21.5 KB · Views: 507
  • DSCN4728.JPG
    DSCN4728.JPG
    25.8 KB · Views: 429
  • Like
Reactions: Ashful
Stove went in without a hitch.
Here's a shout out to Byler's stove shop.
It's been a great experiance working with the sales guys and installers.
They were patient with all mty questions and were informative when I had them.
If you live within a couple hours of this shop (Dover DE) I suggest you at least see what they have to offer as far as product and pricing. You might it was worth you trip - plus they have a nice Amish style food market with a nice playground for the family.

Now it's on to the mantle and a couple dozen other addition things to do.
 

Attachments

  • DSCN4741.JPG
    DSCN4741.JPG
    35.1 KB · Views: 413
  • DSCN0843.jpg
    DSCN0843.jpg
    103.8 KB · Views: 834
  • DSCN4754.JPG
    DSCN4754.JPG
    25.9 KB · Views: 416
  • DSCN4743.JPG
    DSCN4743.JPG
    18.5 KB · Views: 413
  • DSCN4746.JPG
    DSCN4746.JPG
    26.3 KB · Views: 443
  • DSCN4749.JPG
    DSCN4749.JPG
    18 KB · Views: 410
  • DSCN4753.JPG
    DSCN4753.JPG
    27.7 KB · Views: 9,335
It's looking very nice. That's going to be a great addition to the house and a popular room with the new stove. Congratulations.
 
Thanks to all for your comments and help along the way.
You all had a part of the project.

I will update photos as I progess with mantle/hearth finishing.
 
Status
Not open for further replies.