
I'm in my 2nd year on this stove and when I load onto hot bed of coals, leave damper open for 20 mins to really get ripping...after I close damper all they way or 1/4 the flame shifts to one side of stove. It shouldn't burn in his offset manor, right. Nice rolling fire with secondary burn but on,y on righ half of stove. Something not right... And we have to reload about every 2-3 hours! Not happyAre you saying you are loading 3 times in 6 hrs, and each time you are loading 5-6 splits? If so something is up, either the wood is tiny pcs, very low BTU or both. 5-6 decent sized splits of even a soft wood should get you more than 2 hrs a load.
Jotul c550 Rockland tips thread
- Thread starter rockreid
- Start date
-
Active since 1995, Hearth.com is THE place on the internet for free information and advice about wood stoves, pellet stoves and other energy saving equipment.
We strive to provide opinions, articles, discussions and history related to Hearth Products and in a more general sense, energy issues.
We promote the EFFICIENT, RESPONSIBLE, CLEAN and SAFE use of all fuels, whether renewable or fossil.
You are using an out of date browser. It may not display this or other websites correctly.
You should upgrade or use an alternative browser.
You should upgrade or use an alternative browser.
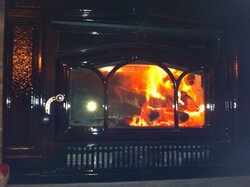
Looking for help. My stove really seems to chew through a lot of wood and I'm burning hot with damper closed as much as possible. I've noticed that when I close the damper I get a great looking fire with secondary burn and then the fire becomes offset and really burns more on the right side of the stove and then works its way across. (See pic) Shouldn't the fire burn evenly as you close the damper versus one side hotter than the other. We have to load every 2-3 hours and it seems like its not burning hot enough to be efficient.
Attachments
rkofler
Burning Hunk
Looking for help. My stove really seems to chew through a lot of wood and I'm burning hot with damper closed as much as possible. I've noticed that when I close the damper I get a great looking fire with secondary burn and then the fire becomes offset and really burns more on the right side of the stove and then works its way across. (See pic) Shouldn't the fire burn evenly as you close the damper versus one side hotter than the other. We have to load every 2-3 hours and it seems like its not burning hot enough to be efficient.
How is your wood? How long has it been split? What kind of wood? How large are the splits? The only way I could load every 2 hours is if I only put 2 or 3 small splits in. 5 or 6 larger splits should burn at least 4 or 5 hours with the air cut down 3/4. Have you checked your chimney cap?
Are you saying you are loading 3 times in 6 hrs, and each time you are loading 5-6 splits? If so something is up, either the wood is tiny pcs, very low BTU or both. 5-6 decent sized splits of even a soft wood should get you more than 2 hrs a load.
I load it once leaving the air control mostly open but keeping it from over firing, the wood burns to red ambers, then a reload the same way and last time a big load (basically filling the fire box before bed) Splits are roughly 3-4" thick about 18-22" long oak, first load is a V on the bottom with 3 splits across the V. Pretty much follow that unless the middle is filled with red ambers and then I put to shorter thicker splits north/south and then load across with splits. Just feels like I am burning like crazy. larger splits do last longer.
jatoxico
Minister of Fire
I load it once leaving the air control mostly open but keeping it from over firing, the wood burns to red ambers, then a reload the same way and last time a big load (basically filling the fire box before bed) Splits are roughly 3-4" thick about 18-22" long oak, first load is a V on the bottom with 3 splits across the V. Pretty much follow that unless the middle is filled with red ambers and then I put to shorter thicker splits north/south and then load across with splits. Just feels like I am burning like crazy. larger splits do last longer.
Well it's cold enough to be burning a lot of wood. I'm curious where your air control is at. If you have good draft rolling it's often been the case that when I shut the air down the temps in the box go up. This is true of many stoves and the 550 is no different. In that case you can get the longer burn times.
Sorry to assume anything but other posters have said the same thing so more a general comment.
Burning well seasoned oak of varied size- stopped by wood stove store and they think the seal around the door isn't tight enough so too much air is leaking in causing a burn that is faster and concentrated on one side. I did a test where you close the door tight on a dollar bill and if you can pull it out, your door and seal isn't tight enough. It was sliding out nearly all the way around. Good trick. We'll see how we fix it but at least I know the problem. Will post again when we get more info or resolved ( hopefully)!How is your wood? How long has it been split? What kind of wood? How large are the splits? The only way I could load every 2 hours is if I only put 2 or 3 small splits in. 5 or 6 larger splits should burn at least 4 or 5 hours with the air cut down 3/4. Have you checked your chimney cap?

update - placed new seal/rope around door. Burn is a bit better but still more fire on right side of stove. Not sure what next move is....Burning well seasoned oak of varied size- stopped by wood stove store and they think the seal around the door isn't tight enough so too much air is leaking in causing a burn that is faster and concentrated on one side. I did a test where you close the door tight on a dollar bill and if you can pull it out, your door and seal isn't tight enough. It was sliding out nearly all the way around. Good trick. We'll see how we fix it but at least I know the problem. Will post again when we get more info or resolved ( hopefully)!
AlMo
New Member
Hi Everyone,
Hopefully all of you have had a great wood burning season so far. My experience with the 550 has been a really long , learning process, but I feel I am finally getting the hang of it. Just thought I'd through out some observations for anyone new owners that purchase this unit
1). This unit needs to run hot for best efficiency. The snapstat will likely kick off around 350*, which in my opinion, is way to low. If possible, try to keep it off until your unit hits 500*. Believe it or not - its only an additional 15- 30 minutes of burn time for the oven to get to this temp IF you allow it to get there. Turning the air on prior to that will result in your oven taking up to 1 hour to achieve 500*.
2). Load your unit! Yes, its feasible to run this with just a couple of splits, but in time, you will learn to appreciate only having to load 3 - 4 times an entire day, while still maintaining an average temp of 450* the entire time.
3) If your having trouble with the raking coals forward method - it may be how your loading your wood. Is everything to one side of the unit? If yes, it will take much longer to burn through. I had better results leaving some coals at the bottom in the back, raking more up front.
4) After experimenting with mulitple different configurations, these are some of my temp readings and layouts.
6 splits all on right side, bottom splits sitting on the pan (no ash or coals), all coals pushed to left - this achieved longest cycle, but at a cost of lower temps in the entire house
6 splits center of the unit, bottom 2 sitting on coals - this achieved faster burn through, higher temps (reaching 600* +). Reducing the air when you get to this area, dropping to 1/2, then 1/4 if the flames cooperate. You might get spikes to 700*, but it won't last long due to the reduction in air on the bottom coals. Due to my drafting - I find that 1/2 seems to be optimal for me. YMMV however, and if you can get it down to 1/4 - that is excellent
**Personal favorite - 6 splits, all on left side, coals evenly raked across entire pan (this is not the rake coals forward method! )
This method appeals to me because of the longer burn times, the logs in the back actually burn , and IMO, the flames are easier to control once you get to the magic 500* mark.
The absolute fastest, hottest method of burning your wood , assuming you have a decent coal bed
spread coals, divide them in 1/2, pushing each 1/2 to one side. Put two splits E/W down so that they cover the center channel (make sure there is air gap going all the way to the back). Your using the coals on either side to support the splits. This is a variation of the 'Tunnel of Love ' method that someone posted on this site. It works wonders!
I'd highly advise you to keep a close eye on your oven if your going to do this. Temps will jump rapidly, and I have seen my temps peak well over 600* with air control on full blast. There seems to be a coorelation to the amount of available air in the box vs air temps, which is why you can (and will ) see higher temps with less wood. For this same reason, its actually safe to load this to the gills and not be afraid of the temps getting out of control (this assumes your there to monitor and lower air control when you reach your desired temp range).
Lastly - use the fans (after hitting 500*) if your attempting to heat an entire house. If its just the room , keep the fans on low.
Ansky
Member
Hi AIMo,
Just curious, how do you get 6 splits just on the left side? I think I'd have trouble just getting 6 splits in there at all.
Anyway, hi.... I'm new here. I just had my 550 rockland installed 12 days ago, so I'm just starting to get used to it. Overall, I'm happy with it. The wife likes the way it looks, so that's good too. My 2 complaints are the auto fan feature which everyone seems to complain about and also the rate at which I am burning wood.
For the first problem, I just bought a timer at Walmart, so I will keep the fan on manual, and hav the timer shut it off around 3am or 4am or so.
I'm not sure how to make my wood last longer. I seem to need to reload every 2 hours if I want to keep the temp between 500-600*. I keep the air control at about 1/4 and the fan at med/high. If I wait to reload longer than 2 hours, the temp will drop below 400* and I don't want to do that. So, every 2 hours or so, I add about 3 splits. They are 17" long and about 3-4" wide. Not sure what type of wood, but it's very dry...maybe too dry and that may be my problem. I usually spread out the coals, and add 2 long splits lengthwise in front and in back, and that add a 3rd split diagonal across the 2 lower splits. That will usually last me another 2 hours.
Any tips from you seasoned pros?
Thanks,
John from CT
rkofler
Burning Hunk
Hi AIMo,
Just curious, how do you get 6 splits just on the left side? I think I'd have trouble just getting 6 splits in there at all.
Anyway, hi.... I'm new here. I just had my 550 rockland installed 12 days ago, so I'm just starting to get used to it. Overall, I'm happy with it. The wife likes the way it looks, so that's good too. My 2 complaints are the auto fan feature which everyone seems to complain about and also the rate at which I am burning wood.
For the first problem, I just bought a timer at Walmart, so I will keep the fan on manual, and hav the timer shut it off around 3am or 4am or so.
I'm not sure how to make my wood last longer. I seem to need to reload every 2 hours if I want to keep the temp between 500-600*. I keep the air control at about 1/4 and the fan at med/high. If I wait to reload longer than 2 hours, the temp will drop below 400* and I don't want to do that. So, every 2 hours or so, I add about 3 splits. They are 17" long and about 3-4" wide. Not sure what type of wood, but it's very dry...maybe too dry and that may be my problem. I usually spread out the coals, and add 2 long splits lengthwise in front and in back, and that add a 3rd split diagonal across the 2 lower splits. That will usually last me another 2 hours.
Any tips from you seasoned pros?
Thanks,
John from CT
Don't be shy, John. Gotta load her up. Why six splits on the left side? Get as many as you can any way you can. My typical overnight burn: Pull all the coals to the front. Pull any ash from the back up against the coals so the back of the stove is clear to the bottom. But your biggest split in the back, then one or 2 decent size splits on top of that, whatever you can fit. Now put whatever you can fit on top of the coal bed in the front. If your splits were not around 20 inches or so, stack them all the way to one side, then fill in the side with some shorter splits. Takes a little geometry, but it's worth it. I leave air open til around 350 degrees, then close it a quarter, let it get up to around 450, close air to half, then around 550, closed 3/4. I usually don't close air all the way, my wood is simply not dry enough. I loaded the stove last night around 10pm. 6:45am I had enough coals in the back to just rake forward and throw some small splits on, away she went. Good luck!

Ansky
Member
Don't be shy, John. Gotta load her up. Why six splits on the left side? Get as many as you can any way you can. My typical overnight burn: Pull all the coals to the front. Pull any ash from the back up against the coals so the back of the stove is clear to the bottom. But your biggest split in the back, then one or 2 decent size splits on top of that, whatever you can fit. Now put whatever you can fit on top of the coal bed in the front. If your splits were not around 20 inches or so, stack them all the way to one side, then fill in the side with some shorter splits. Takes a little geometry, but it's worth it. I leave air open til around 350 degrees, then close it a quarter, let it get up to around 450, close air to half, then around 550, closed 3/4. I usually don't close air all the way, my wood is simply not dry enough. I loaded the stove last night around 10pm. 6:45am I had enough coals in the back to just rake forward and throw some small splits on, away she went. Good luck!
View attachment 94174
Holy cr@p! Are you serious? Wow. And the stove doesn't smoke like crazy with it packed like that?
I guess I need to get out of the regular fireplace mindset and think about this differently. With the fireplace, I would stack the splits making sure there was plenty of air to feed the fire. So I have been doing that as well with the insert and I could usually only fit 4 splits in there, tops. From now on I guess I need to cut the logs shorter, so I can pack them in tighter.
Question - do you only pack it like that at night before going to bed, or is that how you do it all the time?
rkofler
Burning Hunk
Holy cr@p! Are you serious? Wow. And the stove doesn't smoke like crazy with it packed like that?
I guess I need to get out of the regular fireplace mindset and think about this differently. With the fireplace, I would stack the splits making sure there was plenty of air to feed the fire. So I have been doing that as well with the insert and I could usually only fit 4 splits in there, tops. From now on I guess I need to cut the logs shorter, so I can pack them in tighter.
Question - do you only pack it like that at night before going to bed, or is that how you do it all the time?
Stove has to be pretty warm to load like this. My wife often loads during the day, doesn't quite pack it like this. Around 7:30pm I will usually load a few medium splits that I know will burn down by 10pm, but also not let the stove cool too much. If the stove cools I will throw in a few tiny pieces to heat it up a bit. Then I put in a load like you see in the picture. If you have 20 inch splits you will just lay those east/west. In the picture, the splits on the left were kind of short so I pushed them all to the left side. Then the splits on the right are around 12 inches laying north/south. You gotta have enough fuel in there to burn a long time, just like a car. Air is good for a quick hot fire, like first thing in the morning to warm the house up. Less air is better for a longer, not quite as hot fire. Imagine almost trying to create one solid block with the splits, that's what you need for a longer burn.
Ansky
Member
Stove has to be pretty warm to load like this. My wife often loads during the day, doesn't quite pack it like this. Around 7:30pm I will usually load a few medium splits that I know will burn down by 10pm, but also not let the stove cool too much. If the stove cools I will throw in a few tiny pieces to heat it up a bit. Then I put in a load like you see in the picture. If you have 20 inch splits you will just lay those east/west. In the picture, the splits on the left were kind of short so I pushed them all to the left side. Then the splits on the right are around 12 inches laying north/south. You gotta have enough fuel in there to burn a long time, just like a car. Air is good for a quick hot fire, like first thing in the morning to warm the house up. Less air is better for a longer, not quite as hot fire. Imagine almost trying to create one solid block with the splits, that's what you need for a longer burn.
Gotcha. Thanks for the info.
I'm just,starting to freak out about the quantity of wood that I will need. I thought for sure 11 days ago when I got this thing installed, I'd have plenty of wood to last the rest of the winter. Today I came to the realization that I've only got wood for about 2 more weeks! Ugh, oh. I love not using oil, but I need to really get on the ball with splitting more wood!
I figure I use about a full wheel barrow each day...about 20-25 pieces. And I start at 7am and load up at 11 pm before I go to bed. That's gonna add up to a LOT of wood over the course of a winter! And I cut and split myself. I guess I know what I'm doing whenever I have free time.
")
Ansky
Member
Is there a trick to getting the surround off with this unit? We are supposed to get an ice storm this weekend, and if we lose power, I want to take the surround off to get more heat. But I'm not sure how do to that.
Thanks.
John
Thanks.
John
rkofler
Burning Hunk
Is there a trick to getting the surround off with this unit? We are supposed to get an ice storm this weekend, and if we lose power, I want to take the surround off to get more heat. But I'm not sure how do to that.
Thanks.
John
You just have to lift it straight up about an inch or so and it will pull right off. You might want a helper, it is kind of heavy. I don't think you have to, but I usually take off the front grill and the bottom trim. Helps get your hand underneath the surround.
jotul rock550
New Member
Second year with the rockland 550 and very pleased. This forum has been so helpful, especially this thread.
Could someone please tell me where these temps are being recorded - I have placed a thermometer on the front left above the door and the temp never seems to rise above 350. Where are you getting the 600 - 700 readings - top of the stove with IR thermometer??
thanks.
Could someone please tell me where these temps are being recorded - I have placed a thermometer on the front left above the door and the temp never seems to rise above 350. Where are you getting the 600 - 700 readings - top of the stove with IR thermometer??
thanks.
Ansky
Member
Second year with the rockland 550 and very pleased. This forum has been so helpful, especially this thread.
Could someone please tell me where these temps are being recorded - I have placed a thermometer on the front left above the door and the temp never seems to rise above 350. Where are you getting the 600 - 700 readings - top of the stove with IR thermometer??
thanks.
Are you sure you read this thread?
")
As discussed here, most who use a magnetic gauge, place it in the slot where the fan air blows out. Yeah, it's hard to read there, but that's the only place you'll get a semi-accurate reading. I kind of like it there, because its hidden and doesn't take away from the units good looks.
bboulier
Minister of Fire
Last night I "filled up" the stove fairly ful about 11:00 - E/W splits (about 18 inches) on the left hand side and crammed some shorter splits on the right. Let the fire get up to about 475 at high manual fan and fully open. Damped down the air intake to about 1/8. Reduced the fan to a much lower level. Woke up about 7:30 (stove temp about160), raked coals to the front, and had no difficulty starting new splits.
Bryan
Bryan
Catfish Cleatus
Member
How much wood is everyone going through in a season with their 550 Rockland? Compared to other inserts and or stoves you have had? Do you burn 24/7 and if you do how often on average to you reload?
Riggs
Member
[quote author="Jotul Rockland - CT" date="1295488568"]My installer has been very reluctant to add in a bottom block-off plate. He claims that this is the wrong thing to do and can potentially increase creosote buildup..
My installer wants to use a 2" think insulated fire blanket that they cut to fit around the SS liner and then it's stuffed up around the liner where you would normally install the bottom block off plate. He does install the upper plate and I think he does the blanket instead of the lower plate to save time.
Do you guys think this is an acceptable method for blocking the lower end?
Thanks,
Riggs
Ansky
Member
My installer wants to use a 2" think insulated fire blanket that they cut to fit around the SS liner and then it's stuffed up around the liner where you would normally install the bottom block off plate. He does install the upper plate and I think he does the blanket instead of the lower plate to save time.
Do you guys think this is an acceptable method for blocking the lower end?
Thanks,
Riggs
I'm also interested in seeing what others think about this. I need to install a block off plate too, but stuffing a fire blanket up there sure would be a lot easier!
Riggs
Member
From what I've found...this is a quicker easier cheaper way of blocking off the bottom without all the cost associated with a bottom plate. What I'm curious about is if it's ok for a few seasons because Im just about max budget and having them build a bottom plate will surely put be over. Im thinking I'd add it next year or the following during a cleaning in the spring/summer
Ansky
Member
From what I've found...this is a quicker easier cheaper way of blocking off the bottom without all the cost associated with a bottom plate. What I'm curious about is if it's ok for a few seasons because Im just about max budget and having them build a bottom plate will surely put be over. Im thinking I'd add it next year or the following during a cleaning in the spring/summer
I was just going to make one myself during the off season. It doesn't look too difficult or costly using some sheet metal. Just time consuming. My issue is access. With the stove already there I don't want to have to pull it out to install the metal. But I could easily shove a fire blanket up there without having any issues at all.
Ansky
Member
From what I've found...this is a quicker easier cheaper way of blocking off the bottom without all the cost associated with a bottom plate. What I'm curious about is if it's ok for a few seasons because Im just about max budget and having them build a bottom plate will surely put be over. Im thinking I'd add it next year or the following during a cleaning in the spring/summer
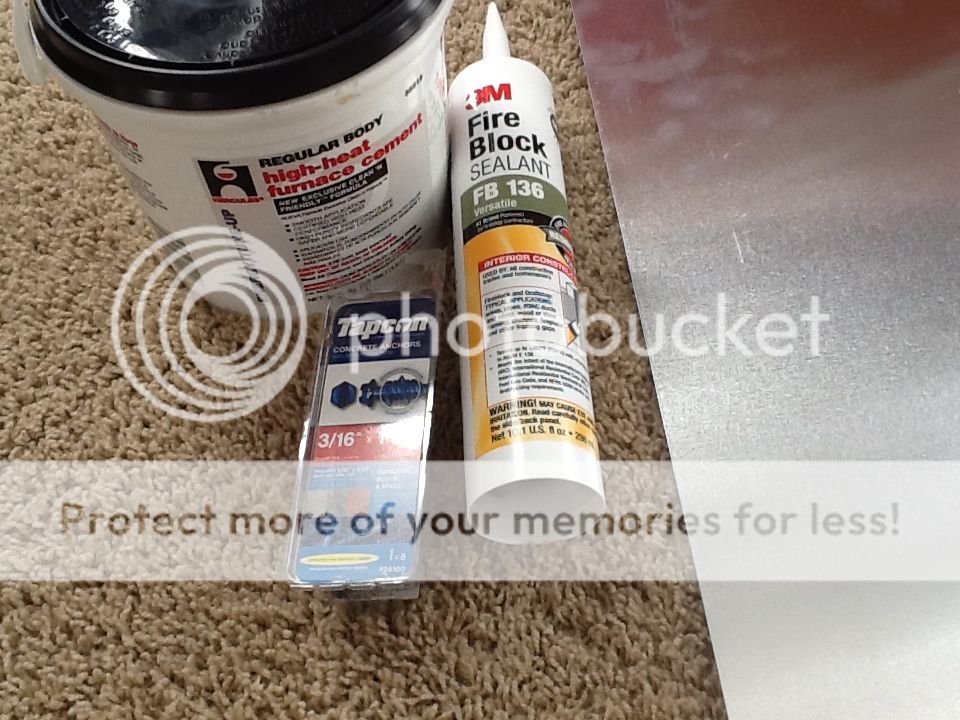
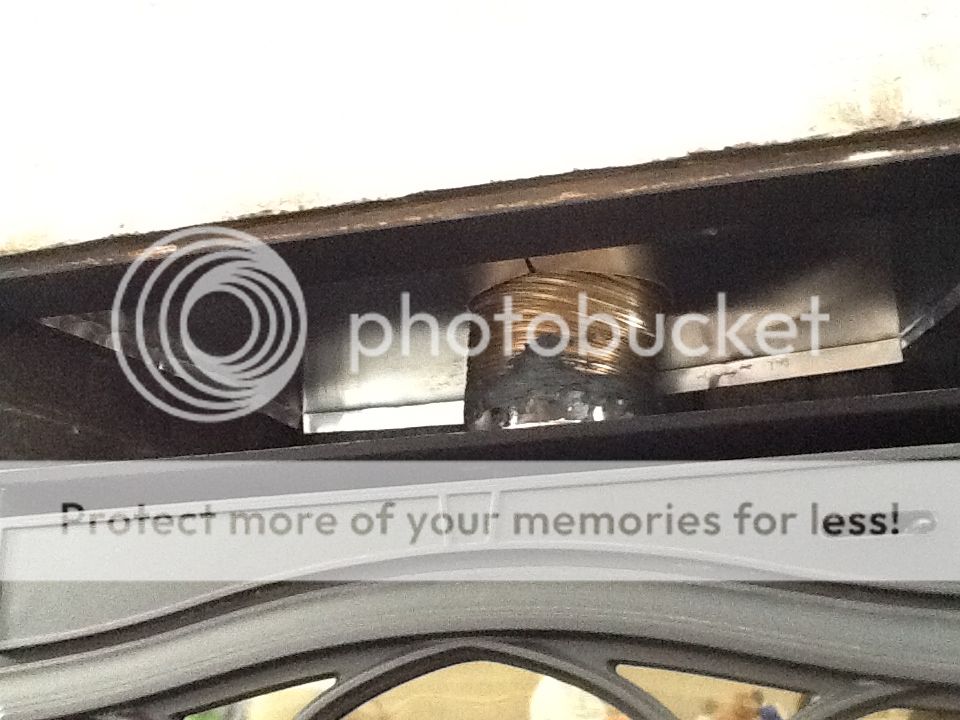
Well, I did it today. Here's the pics I just posted to another thread. Total cost was $80. Roxul was 42 and the aluminum sheet metal was 20. The rest was the adhesive and cement. It took me half a day, but it's done and I fired it up and I definitely notice a difference. The surround it getting much hotter than before, and I don't even have a raging fire going. Here's some pics of the process...
Here's my supplies. I bought a 3'x3' piece of alluminum sheet metal. That's all HD had, and it cose me over $20.

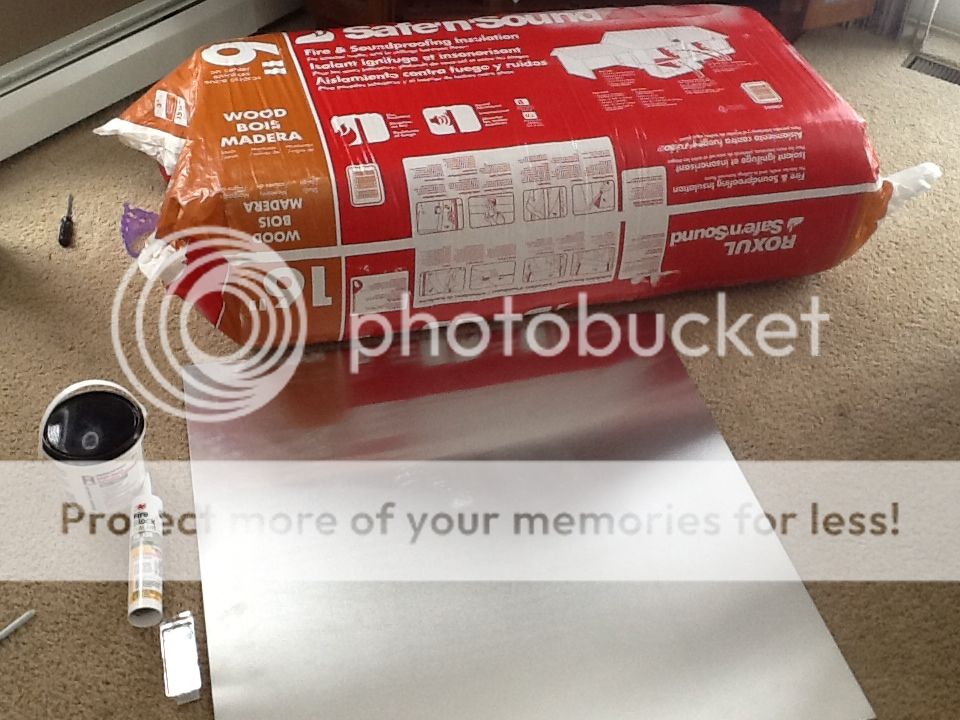
Here's the cement and sealant I used.
Before pic...

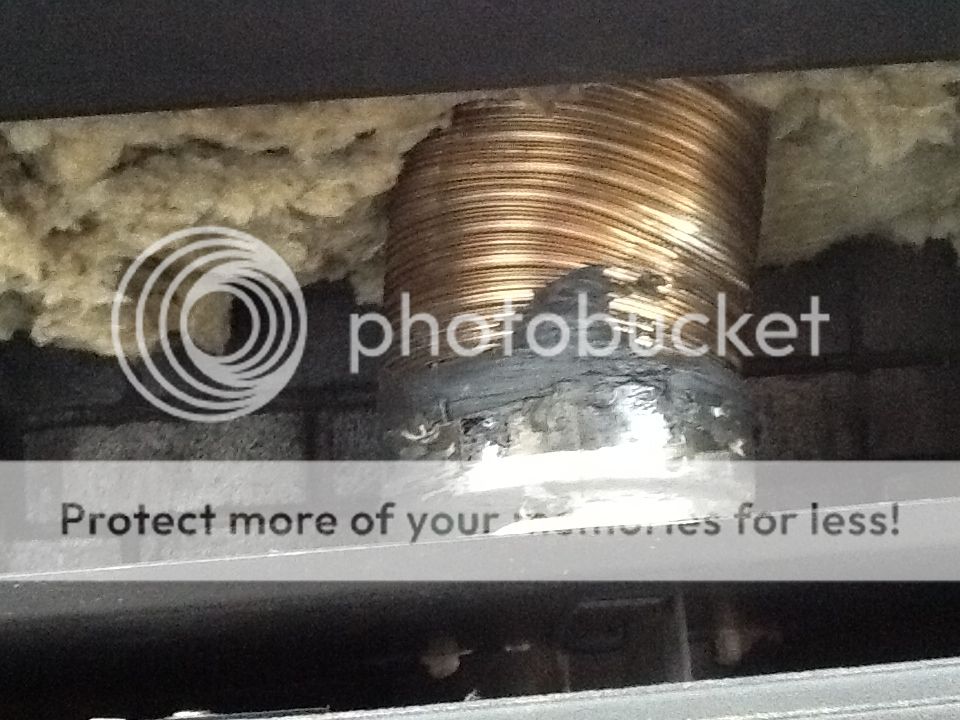
Stuffed as much insulation as I could up there.
I made a template out of cardboard first and then transferred it to the sheet metal.
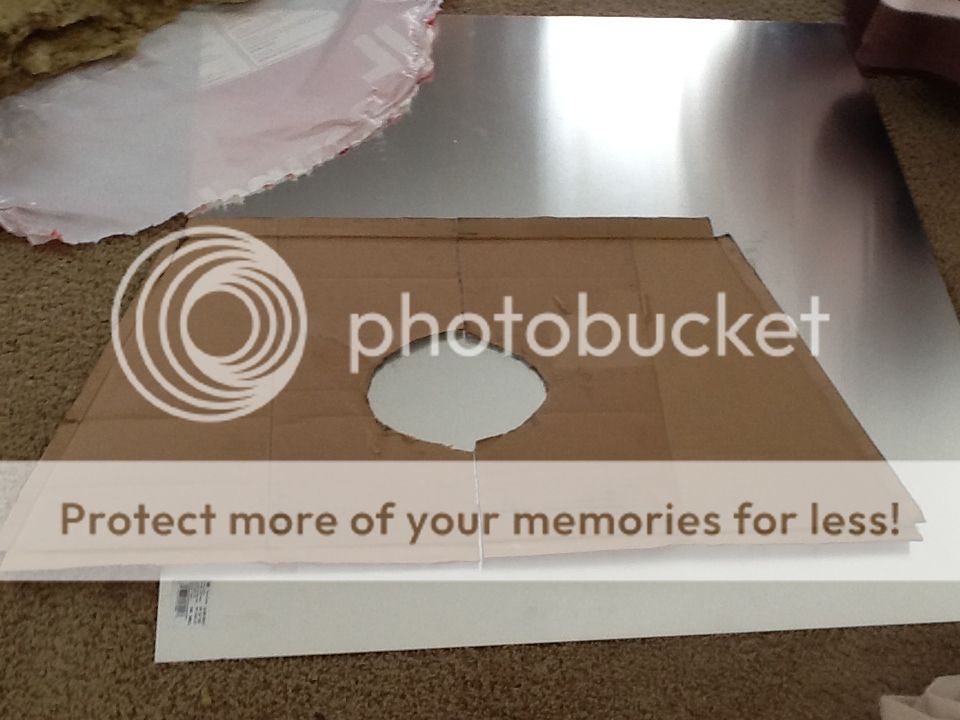
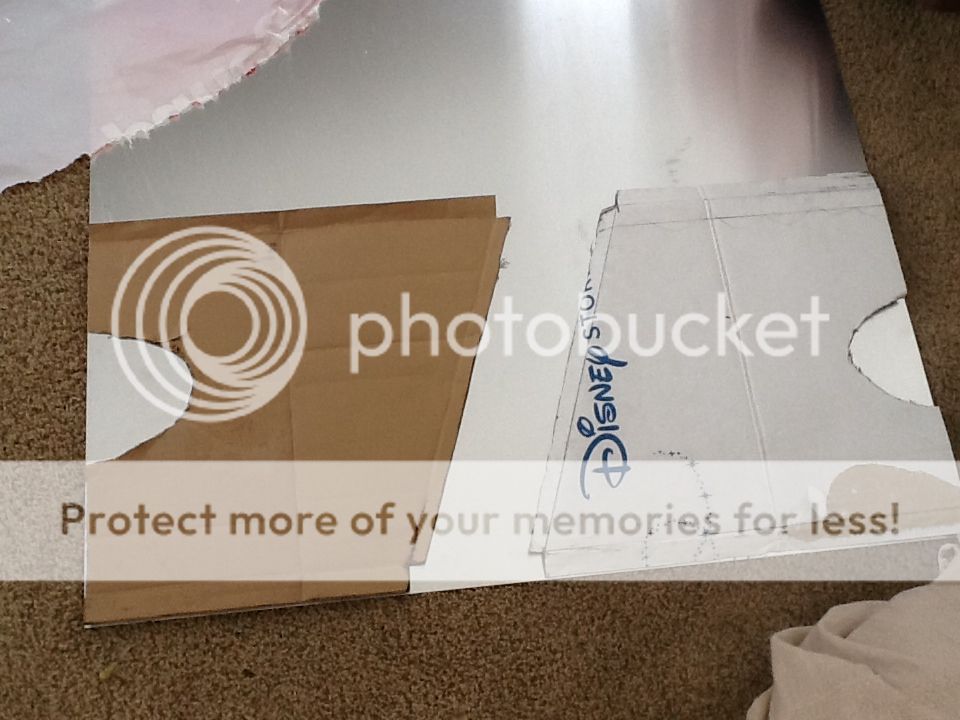
I had to cut it in half to fit it around the pipe.

Installed. Then I sealed up all the gaps and was good to go.
I did not, however, put the Roxul behind the stove or on the sides of the stove. I don't have a lot of space between the stove and the brick, so I didn't want to completely fill up that space and make the stove too hot.
Riggs
Member
so i've deciced on the Jotul C550 at this point..install will be in June and i'm curious what you guys think about this. so i know they claim you can use splits up to 24" in length...what are most guys throwing in there. i cut all my stuff to 18-20" and i'm getting ready to buck/split a lot and i'm curious if i should go the bit longer to help burn times?
go with 24" or stick with 18-20" ?
thanks, riggs
go with 24" or stick with 18-20" ?
thanks, riggs
Similar threads
- Replies
- 30
- Views
- 1K
- Replies
- 19
- Views
- 754
- Replies
- 3
- Views
- 405
- Replies
- 1
- Views
- 932