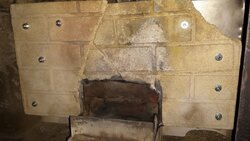
Protect or Fix that Flimsy Fire Brick Lining in your Wood Pellet Stove!!

  • Active since 1995, Hearth.com is THE place on the internet for free information and advice about wood stoves, pellet stoves and other energy saving equipment.

    We strive to provide opinions, articles, discussions and history related to Hearth Products and in a more general sense, energy issues.

    We promote the EFFICIENT, RESPONSIBLE, CLEAN and SAFE use of all fuels, whether renewable or fossil.
Status
Not open for further replies.
The firebox does not need the insulation, it is there for looks. The ones that work best with a fire are the cast iron fire brick in the Lopi Pioneer bay or Avalon Astoria

I was not aware that it was there for looks only, thought it was actually insulating the firebox. I asked the dealer service department and they recommended getting it replaced. Said that the heat could damage the stove. Hmm? Unfortunately this would have been covered under the warranty from the original owner, but not now since I purchased it. Doesn't transfer.
Thanks for that info Don2222.
 
I ended up using furnace cement on the joints that had cracked and laying the pieces on a piece of flat sheet metal I bought at the big orange box. It all held together and after a hour's bonding time I have it placed in the stove burning so as to cure; recommended by the furnace cement manufacturer. I will let you know if it held after the next thorough cleaning.​
 
it looks to me as though the firebrick & resulting air space provides insulation to minimize the chance of a hopper fire.
I would have to agree,.. not only protecting the internal components of the stove,.. but reflecting the heat back into the firebox where its supposed to be.
 
Just performed the same repair to my PelPro's fire brick, which fractured into multiple pieces during the middle of several weeks of -18C temperatures. Thank you to all who posted ...

I didn't bother with cement, just pieced it back together onto #22 steel and bolted it in eight places, with #8 bolts, washers, lock washers, and nuts. I was in a hurry, because the temperature was plummeting inside, so it wasn't remotely beautiful, but it is functional. (After the winter, I can remanufacture a better backing plate at my leisure.)

One thing I did to improve the repair in my case was cut a fold-down on the top of the steel, which would hang the entire assembly onto the "shelf" near the top of the stainless steel brick holder. I bought the PelPro used, and someone had welded on a brick holder that didn't hold the brick very well. Essentially, I cut the steel into an H shape, with a 1/2" fold along the bottom cut-in facing outward to help secure the brick, and another 1/2" fold facing backward to hang the entire assembly.

I know some have advised the fire brick isn't needed; I'm a little dubious about that: The steel plate on my older stove (England Stove Works) eventually warped under the heat. For the few dollars I spent, I'd rather be safe than sorry.

At any rate, my family and home are warm, thanks specifically to Don2222's instructions, as well as the advice from others.

I am grateful. Thank you!

--Doug Wilcox

20150215_191744.jpg
(Very messy. Sorry, Dad.)

Hello

Wish I knew of this before it broke, but yes we know how delicate that firebrick is and the weak part over the flame cutout!!

Oh Well, At least I can salvage it by using an inexpensive 12"x18" piece of # 22 guage sheet metal from Home Depot for $7.98!!
http://www.homedepot.com/h_d1/N-5yc...splay?langId=-1&storeId=10051&catalogId=10053

Just put it under the firebrick and trace it oout with a felt tip marker.

then either using metal cutting sheers or a nice jig saw with fine metal cutting blade and cut out the pattern. It is fine if it is a little less than the size of the firebrick and then it will not bee seen.

Then use High Temp RTV on the back of the brick, on the top of the sheet metal and on both sides of any break or tear in the firebrick.

Squeeze everything together and let dry. You can also get some bolts and washers to secure the corners if you want that nice mechanical connection, but note on the Pelpro any corner screws will not hit the back plane of the stove but check on your stove to make sure it does fit correctly. put something heavy on it to dry!

Good luck

See pics below
Click to enlarge
 
Wow, 2 pages of repairing the refractory backer when you could 1: Buy an expensive replacement or 2: Get 2 tubs or bags of Rutland Refractory cement compound from Amazon or your local hardware, build a form from wood the size and shape of the old backer, lay in some hardware cloth and pour your own for about 1/3 the cost of a replacement backer. Make a spare at the same time...

Simple.
 
I love the idea of molding a new one. That may be the spring project, rather than remanufacturing a new backing. I picked the cheapest, quickest solution with which I was already familiar.
 
I will say that it appears that the fire brick does contribute significantly to the ability to project heat out where it belongs. Before my fire brick repair, at near 0°F outside, my house would drop to 60 or 61°F. With the fire brick in place, at the same outside temperatures, it didn't go below 65°F.
 
I love the idea of molding a new one. That may be the spring project, rather than remanufacturing a new backing. I picked the cheapest, quickest solution with which I was already familiar.

We discussed it at length on a previous thread so use the 'search' button at the top of the page and type in backer board or replacement fake brick and I bet the thread pops up............

It's easy to do, like making a mud pie but you have to make sure all the air bubbles are out of the mix in the form and you have to bake the form and mix in your wife's oven (it don't stink but do it when you wife is away so you don't get hollered at) for a couple hours at 220 degrees to completely dry the mix and harden it before you remove the form. It has to be completely dry (no moisture in the mix) and no trapped air bubbles.

It's easy to do. I've made a couple for my stoves already. Takes some time but it's a lot cheaper than factory.
 
Status
Not open for further replies.