Hi all,
Had a great season with my M55. Unfortunately it seems that someone pushed a little too hard this morning on the daughter card and now the power button does not work. I put a meter on it and there is no continuity when depressing the button. The other buttons for the speed are OK.
I got the stove started tonight by shorting across the leads of the power button. Tomorrow I'm going to unsolder the #5 button and switch it out for the power button. This should get me through the season as I've never used #5 and don't expect that I would now that it's getting warmer.
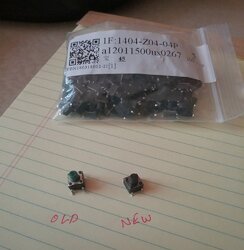
I looked up the price of replacement boards and 50-2109 runs about $130!. Since the board is actually OK and all I really need to do is replace the button I was hoping someone would have already done this and would know a Mouser or other electronics warehouse part number. I believe it's just a momentary on button. Anyone know where I can get one? I'm going to start looking online tonight to see if I can find something. If I do I'll post it here in case someone else runs into the same problem. If someone has a part number please let me know.
Thanks!
Dana
Had a great season with my M55. Unfortunately it seems that someone pushed a little too hard this morning on the daughter card and now the power button does not work. I put a meter on it and there is no continuity when depressing the button. The other buttons for the speed are OK.
I got the stove started tonight by shorting across the leads of the power button. Tomorrow I'm going to unsolder the #5 button and switch it out for the power button. This should get me through the season as I've never used #5 and don't expect that I would now that it's getting warmer.
I looked up the price of replacement boards and 50-2109 runs about $130!. Since the board is actually OK and all I really need to do is replace the button I was hoping someone would have already done this and would know a Mouser or other electronics warehouse part number. I believe it's just a momentary on button. Anyone know where I can get one? I'm going to start looking online tonight to see if I can find something. If I do I'll post it here in case someone else runs into the same problem. If someone has a part number please let me know.
Thanks!
Dana
 Good luck...
")