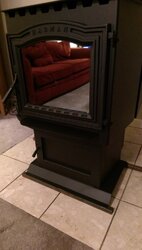
Just purchased a new P68 to replace our Earth Stove
- Thread starter EarthStove
- Start date
-
Active since 1995, Hearth.com is THE place on the internet for free information and advice about wood stoves, pellet stoves and other energy saving equipment.
We strive to provide opinions, articles, discussions and history related to Hearth Products and in a more general sense, energy issues.
We promote the EFFICIENT, RESPONSIBLE, CLEAN and SAFE use of all fuels, whether renewable or fossil.
You are using an out of date browser. It may not display this or other websites correctly.
You should upgrade or use an alternative browser.
You should upgrade or use an alternative browser.
bogieb
Minister of Fire
Just for future reference, in case someone else in need of help looks at this thread; NO, it is not okay to have a joint in the thimble - silconed or not, plain not okay..
alternativeheat
Minister of Fire
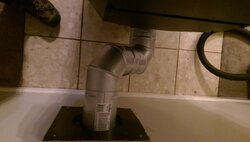
That will work. I think I'd have raised the hearth pad the inch personally, maybe use a piece of ply board 1/4" and 3/4" stacked .Then face off the 1" space that was left around the edge. But hey what ever works. What you're doing looks decent.Here is a shot of what the pipe situation is in the back.
View attachment 190163
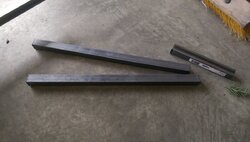
Here is a shot of the square tubing. I will cut it to size, weld it on the corners, seal up the ends, grind it and paint it.
Looks like you're gonna fire that sucker off soon here !
bogieb
Minister of Fire
Here is a shot of what the pipe situation is in the back.
View attachment 190163
Here is a shot of the square tubing. I will cut it to size, weld it on the corners, seal up the ends, grind it and paint it.
View attachment 190164
That looks pretty good. Like the tubing under the stove - it just blends in.
alternativeheat
Minister of Fire
I just wanted to say, you can run an OAK without changing that thimble by putting in a smaller separate one. You seem good at fabrication, you could probably fabricate one if need be ( I would).
alternativeheat
Minister of Fire
Oh I see, you mean the "Outlet" is higher, not output. Words indeed have meaning LOL !What I meant was the earth stove is HIGHER in height with it's output it's 18" on center from the ground vs. 10" OC with the harman.
alternativeheat
Minister of Fire
Ya you have never reported an issue, Tony , even in some of the brutal winter storms that have passed by your way in the last 3 years or so. So OAK may very well stabilize the OP's existing exhaust arrangement.Using an OAK,
my Outside pipe[avatar] faces the wind.. No house on that side to break any wind conditions but we never have any problems with smoke or whatever..
This is encouraging even to myself as I think about a future basement stove. That would really open up my install location possibilities.
Last edited:
That will work. I think I'd have raised the hearth pad the inch personally, maybe use a piece of ply board 1/4" and 3/4" stacked .Then face off the 1" space that was left around the edge. But hey what ever works. What you're doing looks decent.
Looks like you're gonna fire that sucker off soon here !
I'm thinking about actually doing that. This summer. We plan to replace the marble there with a new product. When I do that I may add additional thickness underneath with 2 sheets of 1/2" plywood. Then tile on top of that. We'll see.
I really would have liked to go straight out the back of the stove with a new thimble and reduce the distance the stove is from the wall from 12" to 2" but I now believe that there is a stud directly behind the stove which will eliminate that as a possibility.

alternativeheat
Minister of Fire
Depends how ambitious you are. You can cut a stud by building a square frame (to carry the stud) from the same material the stud is made of. It's just easier to fall between studs is all. If you think about it, if life were ideal, the thimble should be mounted to a box frame anyway.I'm thinking about actually doing that. This summer. We plan to replace the marble there with a new product. When I do that I may add additional thickness underneath with 2 sheets of 1/2" plywood. Then tile on top of that. We'll see.
I really would have liked to go straight out the back of the stove with a new thimble and reduce the distance the stove is from the wall from 12" to 2" but I now believe that there is a stud directly behind the stove which will eliminate that as a possibility.
One plus in having the stove off of the wall a bit is that it is much easier to get to things to clean and do maintenance such as the fines box clean out and cleaning the blower motors. There is stuff that you need to check & / or clean back there where hair and dust bunnies like to collect.
My dealer said he always installs them away from the wall slightly not for clearances but for ease of cleaning etc: I installed my own and held the rear of the stove 6 inches off the wall at my hopper. It also makes dumping pellets a bit easier since you are not slammed up against the wall trying to dump them.
I also like bumping up the 1" SQ tubing because that'll make it easier to clean under the pedestal. Although you have carpet and then a small amount of tile which the vac will get whatever I have all tile in the room my P68 is in so stuff tends to collect in certain areas like around the stove since there is no carpet for hair and dust to cling to. We have two Aussie dogs and two cats so we see plenty of fur and clean non-stop.
But main thing is by having the stove out some is that it is much easier to clean and work around. I wouldn't want mine slammed tight to the wall 2 inches away because that creates a tight situation if when and if you need to remove the rear panels to access stuff.
Well,
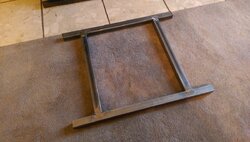
I picked up some 16 gauge square pipe mild steel and some primer and paint. I got the 4 pieces welded up and because of the lighter gauge steel an the fact I don't have a jig for this setup the frame I made bowed a little bit. But in testing it appears to have worked. The weight of the stove is enough to straighten things out. I just hope when I turn this on for the first time that there is not major vibration of some kind!
Just primed it and will paint it in about an hour or so. Hope that the paint dries quickly so I can get this thing rigged up tonight and the pipes glued up.
Here are a couple of shots.
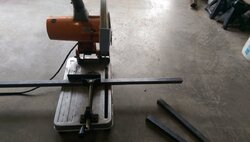
Cutting the metal.
Before I placed it under the stove. No paint yet.
Inserted under the stove.
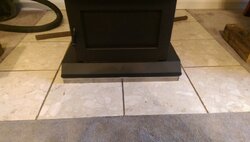
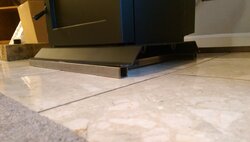
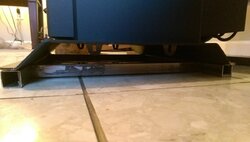
I picked up some 16 gauge square pipe mild steel and some primer and paint. I got the 4 pieces welded up and because of the lighter gauge steel an the fact I don't have a jig for this setup the frame I made bowed a little bit. But in testing it appears to have worked. The weight of the stove is enough to straighten things out. I just hope when I turn this on for the first time that there is not major vibration of some kind!
Just primed it and will paint it in about an hour or so. Hope that the paint dries quickly so I can get this thing rigged up tonight and the pipes glued up.
Here are a couple of shots.
Cutting the metal.


Before I placed it under the stove. No paint yet.

Inserted under the stove.


Just painted the riser. I am chomping at the bit to get this stove going! It's cold outside! LOL
So, once this paint dries I will slide it under the stove and set the two screws that I drilled for that will attach to the bottom of stove. Then I will position the stove so that the Pipe is all lined up and then I will start silicone the outside joint into the T. Then the wall thimble itself on the inside and outside. At that point I may continue on and get the rest of the pipes inside glued up and then fire the stove up. Might not be until midnight though so it may have to wait til tomorrow. I should probably let the paint dry longer then 3 or 4 hours before I put it under the stove. Tomorrow we're in the 20s for highs.
So, once this paint dries I will slide it under the stove and set the two screws that I drilled for that will attach to the bottom of stove. Then I will position the stove so that the Pipe is all lined up and then I will start silicone the outside joint into the T. Then the wall thimble itself on the inside and outside. At that point I may continue on and get the rest of the pipes inside glued up and then fire the stove up. Might not be until midnight though so it may have to wait til tomorrow. I should probably let the paint dry longer then 3 or 4 hours before I put it under the stove. Tomorrow we're in the 20s for highs.
Bioburner
Moderator
Highs in the 20's? Break out the shorts and t tops. We are not to see double digits till next Tuesday if lucky. Need to get some more corn.
Your project is looking good and the ease of operation, less fussy stove will hopefully make the $$$$ less of an issue when its running and the temps really get cold.
Gotta go feed the Bixby another bucket of corn, the temp just went below zero again.
Your project is looking good and the ease of operation, less fussy stove will hopefully make the $$$$ less of an issue when its running and the temps really get cold.
Gotta go feed the Bixby another bucket of corn, the temp just went below zero again.
Bioburner
Moderator
If it were not for adopting a 110 lb dog with nervous bladder I would be 1500 miles farther south
Ha!
Well in a few years our plans are to move further south. Winters are getting old for me. Sick of the cold, sick of the snow, sick of the ice. I am ready to be outside enjoying the rest of my life everyday of the year


Tonyray
Minister of Fire
yes.. I shudder to think of how my stove in these strong winds/winter storms we get might operate without the OAK.Ya you have never reported an issue, Tony , even in some of the brutal winter storms that have passed by your way in the last 3 years or so. So OAK may very well stabilize the OP's existing exhaust arrangement.
This is encouraging even to myself as I think about a future basement stove. That would really open up my install location possibilities.

UpStateNY
Feeling the Heat
I bet that Bernise loves it when you shovel snow. Nice looking dog that probably keeps you warm at night.
Good looking pup. We picked up another just last Monday night. Now we have two Aussies. One is 45 lbs. but the new on (Both a year old) is a big boy for an Aussie. He gets his nuts whacked tomorrow morning. LOL! Vet said he was one of the biggest he's seen. Tall, heavy and big. Not the size of yours though.If it were not for adopting a 110 lb dog with nervous bladder I would be 1500 miles farther south
Those dudes are tanks. Kinda like a tri colored Great Pyrenees. St Bernard ??
Bioburner
Moderator
Bernese Mountain dog. She was to big(110) for the breed so was not to be used for show or breeding. More aptly named Bee, short for Bernice, busy Bee as she can't seem to sit still. Likes the snow but not this ugly sub zero cold. To restless for a two dog night.
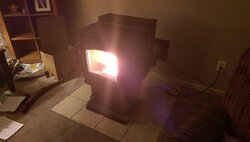
Stove is operating! Burning off some serious manufacturing stuff at the moment.
I have the feed rate set at 4 and the room temp set at 75 and the flame is super huge.
What are good settings for a newbie. The only way I can get the feed to slow is if I turn the room temp all the way down to 50.
I have the feed rate set at 4 and the room temp set at 75 and the flame is super huge.
What are good settings for a newbie. The only way I can get the feed to slow is if I turn the room temp all the way down to 50.
Holy cow that was some serious flames and heat! Until I figure this room temp thing out I switched it over to manual mode feed rate of 3 with setting of 3. Going to let it run on this setting the rest of the night.
So far no leaks at the joints which is a good thing!
So far no leaks at the joints which is a good thing!
alternativeheat
Minister of Fire
Congrats !
In room temp mode you need the room temp probe on the stove for one thing and placed about 3-4ft off the floor. A lot of us Harman folk attach it to the back of the stove in a coil with the probe itself sticking out to the side slightly, say two to three inches. Back there it will pick up room air returning to the distribution fan. But all that said, you will get a big flame if the stove is trying to make up heat in the room, the larger the differential of your setting compared with room temperature the longer and ultimately larger the large flame will occur. It will eventually cut itself back as the ESP is satisfied and as room temp gets closer to your setting. Stove temp ( or so called "constant burn") works solely on satisfying the ESP. Once your house stabilizes in temp, I think you will find Room Temp Auto ignition to use less pellets than Stove temp/constant burn ( depends how tight your house is). Your current setting of 3 and feed rate 3 probably correlates to about a two bag day with a p68 ( 24 hours) but it will be consistently that day in and day out.
A feed rate of 3-4 is normal and unlikely that you could tell much difference. Feed rate on a Harman is the most misunderstood control on this entire forum ! Read the sticky note article on what your Harman manual doesn't tell you, to learn more about Harman feed rate , it's at the top of the forum pages.
P series Harmans are not the quietest stoves on the market, fwiw. They are reliable, "heat machines" and easy to clean though. Being all steel they echo more sounds than cast iron might but they also radiate some heat as well as blow it out.
As soon as is reasonable for you, get that stove plugged into a surge protector.
Good luck and I hope it serves you well ! It will take you a while to learn the controls but the more you understand that Harman stoves kind of run their own coarse, the easier it will be for you. So many come in here as new Harman users and try to over ride the controls. Really they just ask you to feed them and keep them clean LOL.
Last edited:
Similar threads
- Replies
- 0
- Views
- 602
- Replies
- 9
- Views
- 2K
- Replies
- 7
- Views
- 2K
- Replies
- 30
- Views
- 6K


