Help with Jotul 3TDIC-2 setup

  • Active since 1995, Hearth.com is THE place on the internet for free information and advice about wood stoves, pellet stoves and other energy saving equipment.

    We strive to provide opinions, articles, discussions and history related to Hearth Products and in a more general sense, energy issues.

    We promote the EFFICIENT, RESPONSIBLE, CLEAN and SAFE use of all fuels, whether renewable or fossil.

rscottcush

Member
Sep 17, 2017
7
White Salmon, WA
Hi all,

I bought an old Jotul 3TDIC-2 and it came with all the interior parts in a cardboard box. For reasons not worth explaining here, I can't easily ask the previous owner any questions at this point. I have the original manual for it but it's very slim on info for how the parts go together!

Can anyone give me any guidance on exactly how the pieces go together inside? I've been messing around with it and have some ideas, but can't get any configuration that screams "ah hah, that's it!"

Maybe there's some forum angel out there with one of these who could send me a photo of the inside?

Fall weather is here and this is the only heatsource in our new yurt, so racing to get it up and running!

Thanks much,
Scott
 
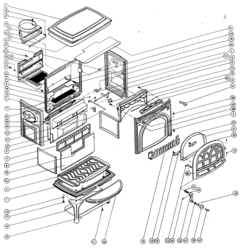
The manual has a pretty good exploded diagram. What area is not fitting correctly?
 
The F-3 is pretty self explanatory I think. The baffle can seem a little off at times, then all of a sudden it falls into place..what’s the issue exactly?
 
The manual has a pretty good exploded diagram. What area is not fitting correctly?

Thanks for the replies @begreen and @webby3650. The "installation and operating instructions" manual I was given with the stove doesn't have any diagrams, just a short written section entitled "assembling the stove" without any visuals. A friend who used to have a jotul came and looked at it, and it seemed like we got it together correctly. The only weird part was that the rear burn plate (at least what seems to us like the rear burn plate) is slightly curved along it's long axis and so doesn't sit down in the groove on the top of the bottom plate. Either it's just warped over the years, or we have it together wrong, or it's not supposed to sit down in that groove, or...

Anyway, if either of you could point me to a diagram online (maybe the version of the manual you're referring to?) so I can double check the way we have it assembled I'd appreciate it!

Now that I've used the stove a few times, the big issue that I'm having is that it dumps a ton of smoke into the room for 5 or 10 minutes when I first start a fire in it when it's cold. I know it has to warm up the flue and so a little smoke coming in is normal, but this an "open all the windows and take the baby outside" amount of smoke. It comes out of the cracked door and through the draft holes. I don't know if its related to having the plates in wrong, or some other issue, but I'm following the start-up instructions in the manual exactly and using dry wood. I'm used to more standard stoves with the pipe coming out the top where the smoke seems to have an easier route to the chimney... it seems like with this thing, the smoke has to make a circuitous route around the front of the top baffle, so what's the trick to keeping it from just pouring into the room until there's a good draft going on the chimney??

Real devil's bargain between being cold and smokey. Any advice would be greatly appreciated!

Thanks,
Scott
 
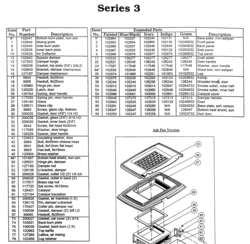
This is what I see in the manual. Sounds like you are missing the parts pages. I think I got this manual from Jotul's website. If the inner back plate (9) is warped it may need to be replaced.
Screen Shot 2017-09-30 at 9.43.22 AM.png Screen Shot 2017-09-30 at 9.43.52 AM.png
 
Last edited:
The smoking startup issue could be a draft problem assuming you are not closing the bypass damper until the stove is hot. Describe in detail the stove flue system from stove to chimney cap. Include pipe diameter, length of runs, elbows, chimney diameter or ID. Also, where is the stove located, basement or first floor and what is the outdoor temp?
 
The smoking startup issue could be a draft problem assuming you are not closing the bypass damper until the stove is hot. Describe in detail the stove flue system from stove to chimney cap. Include pipe diameter, length of runs, elbows, chimney diameter or ID. Also, where is the stove located, basement or first floor and what is the outdoor temp?

Thanks for the questions @begreen. The stove is actually in a yurt. We're in the Columbia River Gorge, where its been getting down into the low 40s at night. The pipe rises a couple feet (single wall 6") then 90s and exits out the wall through an 18" length of 6" double wall. That Ts into a cleanout T and then it rises through 10' of 6" double wall to a chimney cap. That gets the top about even with the bubble on top of the yurt roof (with is 16 feet laterally from the chimney).

I have to cop that after getting it all together I realized that the horizontal section leading out through the wall is sloping slightly downhill. I know that's not recommended, but not sure how much of an issue it would be with a short run like this?

With a bit of practice with my technique and materials now, I am usually able to get a fire started with minimal smoke coming into the room. It does seem to be very "unforgiving" though, compared to other woodstoves I've used in the past. Not sure if that's just a function of the way this stove is, or if it's some variable I can adjust.

Looking at the diagram you shared, I think I have it together right. Doesn't seem like the warped back burn plate not sitting quite right would be a big issue, but I guess I really have no idea about that...

Thanks much,
Scott
 
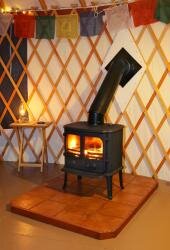
The chimney is on the short side. That's probably contributing to the smoke spillage. One option to help would be to eliminate the interior 90º and replace it with double-wall stove pipe using 45s in an offset. Here's a yurt installation I worked on up in the Skagit area that shows the 45º connection to the chimney. This Morso has a 12' chimney outside.Smoke spillage is minimal unless the temps are mild outside (>50º).

Yurt stove.jpg
 
The chimney is on the short side. That's probably contributing to the smoke spillage. One option to help would be to eliminate the interior 90º and replace it with double-wall stove pipe using 45s in an offset. Here's a yurt installation I worked on up in the Skagit area that shows the 45º connection to the chimney. This Morso has a 12' chimney outside.Smoke spillage is minimal unless the temps are mild outside (>50º).

View attachment 201109

Cool, thanks @begreen! I'm new to woodstove setup so didn't realize that the height of the chimney affected anything other that the location of the exhuast. I have some more pipe I could add to the stack (just need to find time to do it between all the other winter prep...).

The 45 is a cool twist. Are you recommending double wall for that just because it's closer to the wall than it would be with a 90? Also, what material is that white diamond around the stovepipe exit?

Thanks!
Scott
 
Double-wall stove pipe will keep the flue gases hotter. That improves draft. Is the stove connected to class A chimney pipe through the yurt wall and up for the whole chimney?

The inner white triangle is painted plywood. There is a DuraVent thimble surrounding the class A pipe section (the black square) that maintains proper 2" clearance from the class A pipe.
 
The inner white triangle is painted plywood. There is a DuraVent thimble surrounding the class A pipe section (the black square) that maintains proper 2" clearance from the class A pipe.

How do you support the chimney outside a yurt? I don't have a yurt, just curious!