noob to 6039,... any help?

  • Active since 1995, Hearth.com is THE place on the internet for free information and advice about wood stoves, pellet stoves and other energy saving equipment.

    We strive to provide opinions, articles, discussions and history related to Hearth Products and in a more general sense, energy issues.

    We promote the EFFICIENT, RESPONSIBLE, CLEAN and SAFE use of all fuels, whether renewable or fossil.

we7hills

New Member
Nov 22, 2017
17
Sixburgh, PA
Thanks for having me in the forum,... Lots of great info,...

Just got a used 6039,... It's the model with newer control panel and the under-firebox damper,...
It does not have plugs in the holes behind the firebox back board,
It does not have the FAK installed, and the FAK inlet behind the firebox is capped,...

I have been running the stove for 3 days now, usually on HR 4 with all other settings for combustion air, draft air, auger, and agitator in "A" (auto),... no apparent major issues or errors,... yet,... however,...

I've been searching threads and manuals, etc, but I still have a few clarifications / questions,...
Thanks in advance for any help and/or advice,...

1) What is the relationship between the FAK and the Manual Damper under the firebox? If I install the FAK from outside to the cabinet connection, and from there to the firebox, is that connection controlled or just wide open? Does the FAK installed negate the control of the manual damper? For those who mentioned a valve or butterfly on the FAK, where / how does it install? Thanks!

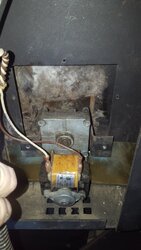
2) I opened the entire box to clean, inspect, and test the unit before running it for the first time,... there was large square opening around the agitator motor & mount with some insulation fragments. I see screw holes around the edge of the opening, but no cover - wide open. The room fan did not have much flow volume at the outlet, but there was a lot of flow from this hole. I searched but could not find any info or pictures for the cover that I think is missing. I did find one diagram that showed two-pieces of insulation, items 56 part #88121 Insulation Top Agitator; and item 57 part #88122 Insulation Bottom Agitator, but I still can't see a picture of what the items are. I fashioned a makeshift cover from a section of tin duct, but no insulation,... that improved the room air flow immensely,...
But, is this hole supposed to be covered? If so, what does the cover look like, and where does the two insulation parts go? Thanks, again!

3) I have noticed that I have to remove the fire-pot and agitator and actually "chip" the build-up off the bottom of the pot and of the tines,... It doesn't seem normal,... the pot looks like it may have sat for a long time with residue in it that caused it to corrode and pit. Could that be causing the hard, crusty build up? Or is it something else with burn or air settings? Thanks so much!

Where is the best place to get parts,... without taking out a second mortgage! :)

Happy Thanksgiving!
 
6039explodeddiagram0014.jpg


Hope this helps. Without taking the side panel off of mine I can't say if there is a plate covering that area or not, it doesn't look like it from this diagram.

The FAK/OAK. If you decide to install a ball valve you just put it inline anywhere you want. You will have to size the valve as close as possible to the pipe and then use reduction fittings if needed. You should be able to find a valve that will fit the pipe though. Mine is connected before the wall and then the pipe continues outside from the valve. The DF (draft fan) will regulate how much air is pulled through the FAK/OAK just like it does now with the manual damper. The only time I use the manual damper is when starting the stove up, otherwise it is closed completely once the stove is up and running. I also removed the small screw that stops the damper from closing completely, not a big deal to remove it or not.

The build up in the pot and on the agitator are carbon build up. Are you burning just pellets or corn? Burning just pellets you should get very little build up if the air mixture is proper. A crappy pellet will also cause this. You will have to soak the pot and agitator to make it easy to remove the carbon.

Parts. Well you will need to shop around depending on what you need. Most parts can be found much cheaper than USSC sells them for. First parts to get is a couple of knockout plugs. They will run you about $1.50 for two. Get those holes behind the fire brick plugged. It will make a huge difference.

ETA: Part #'s 49 and 50 are listed as insulation top and bottom, agitator.
 
Thanks so much,...
So you see what I am asking about for that insulation and cover area? The exploded view I have is the same, but with different numbers for the same parts. And even the "parts" web-sights don't provide an example or picture of these items,... if they are integral to a cover, or if there is no cover,... I am burning PelletPro hardwood pellets. Even after soaking the pot and agitator for an hour or more,... I still have to chip the black residue out of the bottom,... very hard, very brittle,...

Here is a picture of the opening around the agitator motor,...
 

Attachments

  • 6039 agitator opening.jpeg
    6039 agitator opening.jpeg
    96.3 KB · Views: 387
Looking at mine through the vents it looks like there should be a frame type plate that is recessed into the stove. I'll take off the side panel tomorrow and take a pic. The piece I'm talking about sure isn't shown on the exploded diagram.
 
WOW! Thanks! That would be great! If I can't find one, I can fabricate one,... so long as I know what it is I'm supposed to making! :)
 
Here ya go. Looks like a brass frame. You have where the screws attach and then it 90's back towards the stove internally and ends there. It doesn't 90 again to form a plate on the back. Also on top it 90's into the stove but on the bottom it does not. So it's a three sided frame.

IMG_2007.JPG
 
Thanks alot! That's what I'm missing,... Easy enough to build,...
but it also raised another question,... is that a zerk grease fitting on your agitator motor gear box?
Is that one of the "mods" I've read about on this site? Would you do the same thing for the auger motor gear box?

And, while your thinking about that,...

What is the 6039 "firepot" mod? I keep seeing people posting saying they did this mod or that mod, but haven't been able to find any descriptions of said mods,... How many "mods" are there for these stoves?

Thanks, again!
 
Last edited:
LOL, good eye ol' Steeler Fan. ;) Yes that is a zerk on the gear box. I added that the first year after reading on the old IBC forum. Those gear boxes are notorious for having about $0.00001 worth of grease in them when shipped. Also added one to the auger gear box. Then drill a weep hole and easy peasy to grease 'em up when needed. I used high temp grease. I no longer use the agitator so I haven't greased it in many years but still do the auger every year.

ETA: Now I remember, you have to remove all the gears because there isn't much room in the body. You can't drill with the gears in it without hitting the gears. So you have to remove them, put the body back together, drill both holes and then replace the gears. Also when you first open the box where the gears are will determine where you have to put the zerk as there isn't much room in there.

From what I remember if you decide to add a zerk to them be careful and take pics when taking them apart. I don't remember everything but I think there where small bushings and plastic gears that are colored and they have to be replaced exactly how they came apart. The old forum had a DIY with pics but that info is long lost. If you decide to do it take pics and post here for future reference would be great.

The pot mod. The only one I know of is for a clinker/klincker pot. That's what I run as I only burn corn, sometimes a corn/pellet mix but very seldom. The pot is deeper and you don't use the agitator at all. You make a fork out of 3/16" wired that fits into the pot and then you pull the clinker once a day, or longer depending on how hard you are burning. I do this while the stove is running, I have a few forks, when the clinker cools off outside in a metal bucket I just wack it and the clinker falls off and the fork is ready to use again. I can usually get around two weeks from each fork before they need to be replaced. If you think you'd be interested I can post pics of the pot and hangers. I used to make and sell the pots but lost access to the metal shop were we made them because of a move within the company to another location that doesn't have a metal shop.

The other thing to do is to put knockout plugs in the holes behind the firebrick, that forces the air around the heat exchanger better. They are easily removed when cleaning the stove.

If your firebrick breaks you can make a new one with castable refractory cement. It has to be the castable not just refractory cement. If your firebrick breaks save it and make a mold from it with wood. Then find some CRC, I got mine through ACE hardware online and they shipped it to the local store so I didn't have to pay shipping. I had to buy two buckets but each bucket will make two boards and is still cheaper than buying a board from USSC. The board I made over 10 years ago is still working so I have a lifetime of cement although I did make a board for another friend a few years back.

Other than that I can't think of much other than I saw a picture years ago of some guy that had cut the top off his stove and was using it to cook breakfast on the inner heat exchanger.

Now, I'll be cheering for the Pack Sunday night but I have bets on the Steelers and I'm giving them 14 points. I cheer with my heart but have to bet with my brain! It isn't hard for me to cheer on the Steelers as I had an Uncle play for them back in the 1940's. They've always been my go to team after the Pack.
 
Last edited:
  • Like
Reactions: we7hills and Mt Bob
LOL, good eye ol' Steeler Fan. ;) Yes that is a zerk on the gear box. I added that the first year after reading on the old IBC forum. Those gear boxes are notorious for having about $0.00001 worth of grease in them when shipped. Also added one to the auger gear box. Then drill a weep hole and easy peasy to grease 'em up when needed. I used high temp grease. I no longer use the agitator so I haven't greased it in many years but still do the auger every year.

ETA: Now I remember, you have to remove all the gears because there isn't much room in the body. You can't drill with the gears in it without hitting the gears. So you have to remove them, put the body back together, drill both holes and then replace the gears. Also when you first open the box where the gears are will determine where you have to put the zerk as there isn't much room in there.

From what I remember if you decide to add a zerk to them be careful and take pics when taking them apart. I don't remember everything but I think there where small bushings and plastic gears that are colored and they have to be replaced exactly how they came apart. The old forum had a DIY with pics but that info is long lost. If you decide to do it take pics and post here for future reference would be great.

The pot mod. The only one I know of is for a clinker/klincker pot. That's what I run as I only burn corn, sometimes a corn/pellet mix but very seldom. The pot is deeper and you don't use the agitator at all. You make a fork out of 3/16" wired that fits into the pot and then you pull the clinker once a day, or longer depending on how hard you are burning. I do this while the stove is running, I have a few forks, when the clinker cools off outside in a metal bucket I just wack it and the clinker falls off and the fork is ready to use again. I can usually get around two weeks from each fork before they need to be replaced. If you think you'd be interested I can post pics of the pot and hangers. I used to make and sell the pots but lost access to the metal shop were we made them because of a move within the company to another location that doesn't have a metal shop.

The other thing to do is to put knockout plugs in the holes behind the firebrick, that forces the air around the heat exchanger better. They are easily removed when cleaning the stove.

If your firebrick breaks you can make a new one with castable refractory cement. It has to be the castable not just refractory cement. If your firebrick breaks save it and make a mold from it with wood. Then find some CRC, I got mine through ACE hardware online and they shipped it to the local store so I didn't have to pay shipping. I had to buy two buckets but each bucket will make two boards and is still cheaper than buying a board from USSC. The board I made over 10 years ago is still working so I have a lifetime of cement although I did make a board for another friend a few years back.

Other than that I can't think of much other than I saw a picture years ago of some guy that had cut the top off his stove and was using it to cook breakfast on the inner heat exchanger.

Now, I'll be cheering for the Pack Sunday night but I have bets on the Steelers and I'm giving them 14 points. I cheer with my heart but have to bet with my brain! It isn't hard for me to cheer on the Steelers as I had an Uncle play for them back in the 1940's. They've always been my go to team after the Pack.
Pete,is the back of that box closed?as they show a flat gasket in the diagram.Or is it just a stuffer for the insulation?You can see the lip of it in the diagram.And,good catch,with that and the plugs fixed,should be a great stove.
 
Excellent Info! Thanks so much!
Sorry for all the questions,... but I am a sponge for knowledge,...
I worked for too many years in nuclear plants, and they conditioned me to be ultra-anal about details! :)

PS:

Here's a GREAT story from the aftermath in the wake of the Steelers / Packers Superbowl XLV in 2011,...

My wife and I were celebrating our 25th anniversary in Hawaii,..
I was in my Steeler gear, and we ran into two other couples on the beach, with one guy in Packer gear, and the other in Cowboy gear,...
I winked at the girls, and struck up a conversation with the Packer fan,...
We traded good-natured jibes about the other's respective teams, and he was jabbing me about the Pack beating the Steelers,... Then I said,
"Well,... I hate that the Steelers lost the Superbowl, but at least I am glad that if they had to lose, they lost to a classy team like the Packers and not to a low-life team like them wimpy, cry-baby Cowgirls,..." They cowboy fan's wife got this look of horror on her face and tried to signal me from behind him to not talk that way, but as me and the Packer guy were laughing and hi-fiving, the cryboy was coming at me like he wanted to fight! And I told the Packer fan,... "See,... See,... That's what I'm talking about! NO CLASS!"
It was hilarious!
 
Last edited:
  • Like
Reactions: Mt Bob
Excellent Info! Thanks so much!
Sorry for all the questions,... but I am a sponge for knowledge,...
I worked for too many years in nuclear plants, and they conditioned me to be ultra-anal about details! :)

PS:

Here's a GREAT story from the aftermath in the wake of the Steelers / Packers Superbowl XLV in 2011,...

My wife and I were celebrating our 25th anniversary in Hawaii,..
I was in my Steeler gear, and we ran into two other couples on the beach, with one guy in Packer gear, and the other in Cowboy gear,...
I winked at the girls, and struck up a conversation with the Packer fan,...
We traded good-natured jibes about the other's respective teams, and he was jabbing me about the Pack beating the Steelers,... Then I said,
"Well,... I hate that the Steelers lost the Superbowl, but at least I am glad that if they had to lose, they lost to a classy team like the Packers and not to a low-life team like them wimpy, cry-baby Cowgirls,..." They cowboy fan's wife got this look of horror on her face and tried to signal me from behind him to not talk that way, but as me and the Packer guy were laughing and hi-fiving, the cryboy was coming at me like he wanted to fight! And I told the Packer fan,... "See,... See,... That's what I'm talking about! NO CLASS!"
It was hilarious!
Wrong guy to ask,i seem to remember something about steel wool.Also appears this site has eliminated lots of older pposts,lots of good info gone.If i run across it,will post.As far as football,I was a fan of back east teams,being from MD,but quit watching the day kapernidick knelt.Period>
 
  • Like
Reactions: FirepotPete
Pete,is the back of that box closed?as they show a flat gasket in the diagram.Or is it just a stuffer for the insulation?You can see the lip of it in the diagram.And,good catch,with that and the plugs fixed,should be a great stove.

Depending on the exploded view you have, there are several gaskets around the agitator motor,... the rectangular one-piece with the hole(s) in it, #88111, goes between the agitator mount and the firebox wall, the one we were discussing, is two pieces #88121 and 88122, and it looks like they just stuffs into the frame that is used to hold them in place around the agitator motor & gearbox,...

My stove was missing that framework and insulation, as well as most of the other insulation around the fire box,...
Yep,I looked for quite a few manuals,the 2 piece are "stuffings,but appears to also be a flat gasket,which tells me the "box" adapter is enclosed,with a hole.
 
Pete,is the back of that box closed?as they show a flat gasket in the diagram.Or is it just a stuffer for the insulation?You can see the lip of it in the diagram.And,good catch,with that and the plugs fixed,should be a great stove.
That rockwool insulation just gets pushed to the back, the back is the inside wall of the fire box. If you look where the agitator goes through, right above it is the left side heat exchanger, also pressure switch nipple goes through next to the agitator. There are some boxed in opens spaces towards the back of the stove that you can get a wire in between the heat exchanger and the stove wall. It will knock down a bunch of ash if you get it in there.

Have you followed the link I have in my signature for cleaning?

Former zoomie sucker here too! Around 25 years at both pressurized and boiling water plants. Electrician, I&C Tech. With my I&C work that's why I love the control boards in these stoves. It really pisses me off that USSC didn't push the variables of the board. You can tweak it to burn just about anything. Great board IMO.

Ya they drive it into you to observe everything. Although there are a couple of plants over the years that I shook my head at when leaving wondering how they could be so much different safety and maintenance wise to the majority of the plants I'd been at. We have two right here on Lake MI, one was decommissioned a couple of years ago, a single banger, the other is still running, dual reactor.

Not familiar with the steel wool mod. I think that has something to do with certain stoves and the air wash IIRC.

LOL, football fans can be way too serious. I love the game but some of my friends live their lives around it and they aren't even directly involved in the game. I just hope it's a good game (I doubt it at this time) and no one gets hurt. I'll probably be in bed shortly after half time, will DVR it as I need to get up at 4am.

ETA: Just to make sure I'll pull the panel again tomorrow if I have time and pull the rock wool away to be sure. I'll be pretty busy tomorrow, up at 4am to bring son to work, wife broke her hip a couple of Sunday's ago so taking care of her and then in the afternoon pick the boy back up and then go put in 6 hours at a local store that needs some extra holiday help.
 
AH,so the "retainer is mostly for mounting the motor,as there is a hole in the side,it is not wide open.Thank you,Pete,I have learned.
 
AH,so the "retainer is mostly for mounting the motor,as there is a hole in the side,it is not wide open.Thank you,Pete,I have learned.
You guys got my curiosity up and now I'm going to pull the panel tonight. LOL I really thought I knew this stove inside and out, but from not using the agitator for many years I've just not paid much attention to that area except for making sure the pressure switch tubing was clean and in good shape.

I'll be back in a few with what I find in my stove behind the rock wool.
 
  • Like
Reactions: Mt Bob
OK, it's as a thought. Just the metal wall no gasket behind the insulation. The only gasket in that area is the part #27 for the agitator bracket.
So,the "framework" he is missing is not a box,with the back covered,it is to retain the insulation?
 
So,the "framework" he is missing is not a box,with the back covered,it is to retain the insulation?
Well without taking it apart, just going by his original post, he mentions air blowing out of that area from the room fan. I'm guessing it seals off part of the internal heat exchanger. I can't think of any other reason for air to be blowing out of that area. If it was from the draft fan you wouldn't feel blowing air in that area as it is on the other side of the stove and the draft fan shouldn't be drawing any air except through either the manual damper or the OAK.
 
Well without taking it apart, just going by his original post, he mentions air blowing out of that area from the room fan. I'm guessing it seals off part of the internal heat exchanger. I can't think of any other reason for air to be blowing out of that area. If it was from the draft fan you wouldn't feel blowing air in that area as it is on the other side of the stove and the draft fan shouldn't be drawing any air except through either the manual damper or the OAK.
OK my point is,if you pull out the insulation,is there a "back" to the angled framework?Then maybe a gap to the firebox?
 
OK my point is,if you pull out the insulation,is there a "back" to the angled framework?Then maybe a gap to the firebox?
It's just like a 3 sided window frame, left, right and top, nothing on the bottom. It appears that its only purpose is to seal off the internal fire box from the outside wall of the fire box.

It must be part of the heat exchange system on the sides. I'll have to borrow my step son's camera again and pull the room fan off and look around in there, never knew that air went around in there.

ETA: That frame doesn't hold the insulation in any way. The insulation has some sort of adhesive and sticks directly to the fire box wall. When I pulled it away it left some sticking to it and I had to scrape it to see if it was the wall or a gasket behind it.
 
  • Like
Reactions: Mt Bob