Montgomery ward wood stove #28

  • Active since 1995, Hearth.com is THE place on the internet for free information and advice about wood stoves, pellet stoves and other energy saving equipment.

    We strive to provide opinions, articles, discussions and history related to Hearth Products and in a more general sense, energy issues.

    We promote the EFFICIENT, RESPONSIBLE, CLEAN and SAFE use of all fuels, whether renewable or fossil.

JackThompson899

New Member
Nov 1, 2018
5
Pacific Northwest US
The bulk of the heat this thing is going to provide is going to be from radiation and natural convection from the appliance itself, not the flue pipe. Straight up through the roof is cheaper, more efficient, and easier to keep clean. The single-wall stove pipe you can run from the flue collar to the ceiling support box will give off some (minimal) additional heat. As soon as you penetrate the structure (either straight up or out and up), you must use Class A chimney components (including whatever you choose for penetrating the ceiling/roof, or wall), which are a good deal more expensive than single-wall stove pipe. Ideally ($$$-wise), you'd route the flue to minimize the Class A requirements, and that almost invariably means straight up is your best bang for the buck. Whatever heat you might think you're gaining by having lots of stovepipe wandering around inside will be more than offset by the cost of a lot of Class A chimney to go up outside the wall and the nightmare of trying to keep that thing clean and safe to operate. Rick

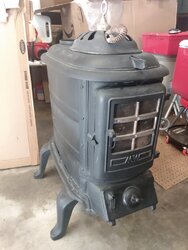
Hey guys, sorry to resurrect such an old thread, but I also have the same stove and this is the only place on the entire internet I've found mention of it or an image of it.

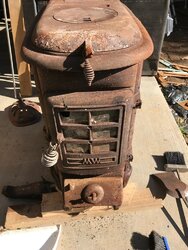
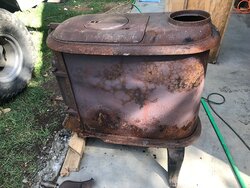
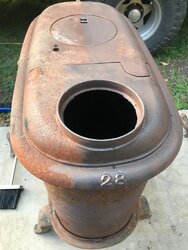
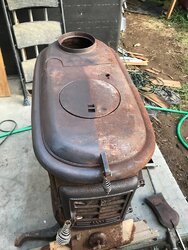
I've attached pictures of my stove that I am restoring, and I'm learning a lot just going through the thread on this site, great stuff!

I have a few follow up questions. (I'll be using this stove to heat a cabin in the woods)

For the inside, this seems to have basic 10 gauge steel for the sides and cast iron for the top and bottom.

I was looking at solutions for this (Since I don't know how it was originally configured) and instead of double lining it and putting KAO Wool between the steel sheets, or installing fire brick I think I'm going to line it with refractory cement. I'm thinking 1/4"-1/2" of cement lining the sides should be ok, but with all the discussions of heat radiation on wood stoves I'm reading, I'm wondering if lining this with refractory cement will screw up my heat radiation, or if it'll be ok.

There is a door in the front bottom for removing ash and allowing air flow into it, so I'm going to forge a steel grate for the bottom to keep the coals off the cast iron bottom and give me a void I can shovel from. I assume it had something like this before.

From the pictures, does anybody know if this stove is missing a bottom front shelf? In all the similar wood stoves I've seen they have a little shelf this one doesn't seem to have.
 

Attachments

  • IMG-4459.JPG
    IMG-4459.JPG
    191.7 KB · Views: 1,972
  • IMG-4471.JPG
    IMG-4471.JPG
    211.7 KB · Views: 596
  • IMG-4467.JPG
    IMG-4467.JPG
    133.8 KB · Views: 535
  • IMG-4466.JPG
    IMG-4466.JPG
    190.5 KB · Views: 1,252
This needs a new thread for better responses.
 
  • Like
Reactions: JackThompson899
Looks a bit like an early variation on the Ashley design.
 
Looks a bit like an early variation on the Ashley design.

Any thoughts on lining it with refractory cement to protect the 12 guage sides?

Someone mentioned in passing that I should leave gaps for expansion. I'm thinking maybe when I mix and spread the liner on I can use a concrete trowel and give it lines like on a sidewalk to do the trick.
 
A sidewalk uses felt/asphalt expansion joints, it's not just a crack in the concrete. A stove has a much wider range of temperatures to deal with.

Are you replacing the steel and adding refractory cement, or hoping the refractory cement will plug the holes in the old steel? Those are significantly different use cases.

I'm not replacing the steel, only cleaning it and giving it a cover of Stove Bright Metallic Black 6309 on the sides, and bottom, then some stove black on the cook surface up top.

The sides seem to be holding up, but might have some spots where it is somewhat worn, but not worn through.

The Stove Bright Metallic has some metal flakes in it, and can be (Reportedly) be used to provide minor additional thickness to the sides.

I had this stove appraised online by a specialist and here's what his recommendation was regarding refractory cement:

"At least 3/4 inch thick more is better
and leave expansion joints"

So expansion joints is what I'm wondering about. I'm assuming he means the same thing you're talking about, but I'm wondering if there's a special tool or guideline for creating expansion joints.
 
It's a 3 yr old thread. Not sure if they will respond, but the value will depend on the condition and the market. Generally speaking, these are not high value stoves.
 
It looks to be in nice condition. If the interior workings are also in good shape, to the right buyer that wants a classic look it might go for $4-500? Sell in Sept. or October for the best price.
 
  • Like
Reactions: D. Hermit
Price is very area dependent. Near me in the northeast, id put it at 250-350. Further south you go the more you can get for these types of stoves, as their selection for any type of wood stove is thin.
 
It takes some time to remove all that rust but you polished it back to be a nice looking stove. It looks like you also replaced the mica window. Great job It looks super. That is allot of sanding unless you used a wire wheel.