Hearthstone Phoenix 8612 Low Temperature Readings

  • Active since 1995, Hearth.com is THE place on the internet for free information and advice about wood stoves, pellet stoves and other energy saving equipment.

    We strive to provide opinions, articles, discussions and history related to Hearth Products and in a more general sense, energy issues.

    We promote the EFFICIENT, RESPONSIBLE, CLEAN and SAFE use of all fuels, whether renewable or fossil.

Ucanes92

New Member
Nov 6, 2019
12
Greensboro, NC
I am new to wood burning, hence any help that I can get is greatly appreciated.

Problem: I can't get my new Hearthstone Phoenix 8612 above the 325F to 350F Temperature Zone. I have read endless threads here where Phoenix owners raise their ovens into the low to mid 400's in about an 1 and ½ or so.

Location: Greensboro, North Carolina.

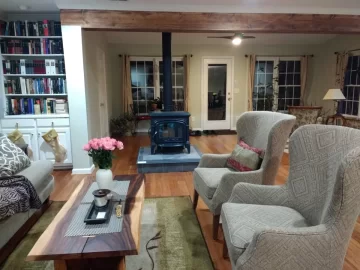
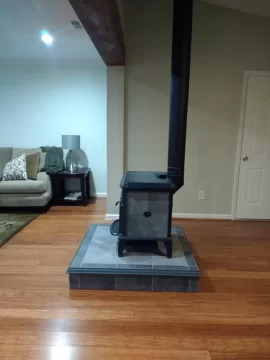
Unit: Hearthstone Phoenix 8612 floor Model on display that was never used (Brand New). Unit has been checked out by installer.

Measurement: This is based on measuring the top center stone (per the manual) using a StoneGard/Condar Stove Top Thermometer.

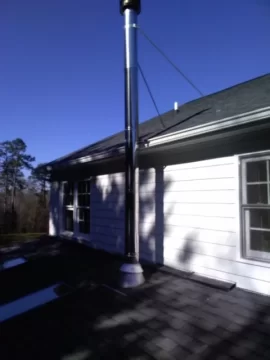
Installation: The unit was professionally installed (see attached pics) in my townhome. We have building permits and were approved by the Greensboro, NC city inspectors.
1) Inside: Selkirk, 6" Double Wall Stove pipe.
2) Outside: Selkirk, Class A Stainless Steel Chimney Pipe. Set up exceeds the 2, 3, 10 rule. Total flue is ~ 21' from the top of the stove to the top of chimney cap.
Wood:
1) I use Home Depot (European White Burch) just to get the fire going. This is very dry of course (10 to 12 range).
2) Sometimes I use Home Depot (Simple Simon, mixed hardwood). This is very dry of course (10 to 12 range).
3) I have also used mixed hard woods from a local guy, with moisture in the 14 to 20 range.
4) I have also used hard wood (ASH) from a local guy, with moisture in the 15 to 20 range.

Tech Support: I have spoken to Hearthstone Tech support and tried everything under the sun, read the Manual front to back including tech bulletin #21. This bulletin states that a hot burn is between 350F to 375F. This is due to a modification involving 3 ceramic boards just underneath the top stones, sometime back in the late 90's. The manual has a range between 300F and 500F.Clearly, some owners are able to get these numbers and better.

Observations: I can build a fire (top or bottom method) , though sometimes I have to crack open the stove front door for a few minutes (no biggie here). From a cold start during the first load I can get the temperature to about 200F with Primary Air mostly open. During the second load I can get to ~300F maybe 325F and this is usually about the 1 and ½ hour point. If I obsess and continue to feed logs, then I may hit 350F on a good day. I have tried reducing the Primary air by 25% to 50%, but that does not really do much for me. I may get the middle Secondary Burn Tube going sometimes, but not the others. Anything more will choke the fire. It seems to me that EPA Stoves post numbers that are produced under very strict and unique nonrealistic lab conditions in order to pass emissions. Am I wrong about this?

Bottom Line: I have read endless threads that include the following (more draft, more air, dryer wood, home environment, operator error, learning curve, expectations, etc). I feel that my setup is for the most part well configured, but clearly not optimum. In other words, can I can do better? What am I doing wrong? Any help is greatly appreciated.
 

Attachments

  • Chimney.JPG
    Chimney.JPG
    78.1 KB · Views: 194
  • Stove Installation 1.jpg
    Stove Installation 1.jpg
    205.1 KB · Views: 176
  • Stove Installation 2.jpg
    Stove Installation 2.jpg
    81.7 KB · Views: 172
How are you testing the wood? Those numbers seem low. Are you taking a room temperature piece of wood an resplitting it in half, then taking the reading on the freshly exposed face of the wood? If not, try that.

Get some construction cutoff 2x4s and mix them in with the firewood to get it hotter and burn off moisture in the wood faster.
 
How are you testing the wood? Those numbers seem low. Are you taking a room temperature piece of wood an resplitting it in half, then taking the reading on the freshly exposed face of the wood? If not, try that.
I am using a cheap moisture meter from HD. The wood has already been split. That's how I bought it from the guy. Sometimes I measure it indoors and sometimes outdoor. The Home Depot wood is already dry and fairly small.
 
A couple thoughts:

Confirming the thermometer is accurate might be interesting -- IR gun is a useful tool.

You say "continue to feed logs" -- do you load the stove full, run it through the whole burn cycle, and then reload on coals? That's the way to burn this (if it is like our Heritage).

Did you measure the draft? You're likely not too cold outside, causing lower draft.

Edit to add -- it took me a couple seasons to get competent at burning. This is an art; you'll improve with practice.
 
I am using a cheap moisture meter from HD. The wood has already been split. That's how I bought it from the guy. Sometimes I measure it indoors and sometimes outdoor. The Home Depot wood is already dry and fairly small.
Wood dries from the outside inward. Begreen wants you to split the wood again to check the moisture content close to the center of the piece of wood. This will give you a more accurate moisture content level.
 
I am using a cheap moisture meter from HD. The wood has already been split. That's how I bought it from the guy. Sometimes I measure it indoors and sometimes outdoor. The Home Depot wood is already dry and fairly small.
If you are reading the outer surface of the wood that is an inaccurate measure. It can be much damper inside. Damp wood does not put out as much heat. It takes a lot of energy to boil off the interior moisture.
 
I had s Phoenix. Wet wood is no 1 culprit. Too much draft could hurt too. I had a tall chimney and it needed a damper to slow things down and keep the heat in the box longer. 400 was my max I think
 
A couple thoughts:

Confirming the thermometer is accurate might be interesting -- IR gun is a useful tool.

You say "continue to feed logs" -- do you load the stove full, run it through the whole burn cycle, and then reload on coals? That's the way to burn this (if it is like our Heritage).

Did you measure the draft? You're likely not too cold outside, causing lower draft.

Edit to add -- it took me a couple seasons to get competent at burning. This is an art; you'll improve with practice.
1) Ok good, confirming the thermometer is something that I have not done yet since it is brand new. IR gun would be the next step.
2) Yes, I usually burn a full load then reload. I don't always wait for coals though.
3) No, I have not measured the draft in any technical form. Are you talking about using a draft gauge? Correct on the temperature situation. I keep the house at about 60F, but the coldest has been low 40's lately here in NC.
Thanks
 
If you are reading the outer surface of the wood that is an inaccurate measure. It can be much damper inside. Damp wood does not put out as much heat. It takes a lot of energy to boil off the interior moisture.
I have been measuring on the cut exposed side, and the probes are going with the grain.
 
Try again on the freshly exposed face of the wood. Press the probes in firmly.
 
1) Ok good, confirming the thermometer is something that I have not done yet since it is brand new. IR gun would be the next step.
2) Yes, I usually burn a full load then reload. I don't always wait for coals though.
3) No, I have not measured the draft in any technical form. Are you talking about using a draft gauge? Correct on the temperature situation. I keep the house at about 60F, but the coldest has been low 40's lately here in NC.
Thanks
(1) Yeah, maybe those stove top thermometers work alright, but the mechanical probe thermos for stove pipe are misleading junk, IME. At any rate, confirming data is a good idea.
(2) OK. Actually, reloading on a live fire makes our Heritage go nuclear -- 1000F pipe temps easy and quickly. I think your wood isn't dry. I'd try a full load of known dry wood (maybe Envirobricks?) and watch it closely.
(3) Yes, I meant with a draft gauge. If I had a new professional install that wasn't operating properly, I'd get the installer out to confirm that the draft is appropriate. Measuring yourself is easy, and gives you lots of real time information about what your stove is doing. Our Heritage requires 0.06" - 0.10", which is pretty high (compared to our Tundra 2, anyway).
Got it. I will knock out #1 (already have the IR and #2 ( already have the wood) over the weekend and try to establish a baseline with known data. Then proceed to re-split the existing wood, measure moisture, and then move on to #3 over the next week. Thanks again, and will keep you posted.
 
Got it. I will knock out #1 (already have the IR and #2 ( already have the wood) over the weekend and try to establish a baseline with known data. Then proceed to re-split the existing wood, measure moisture, and then move on to #3 over the next week. Thanks again, and will keep you posted.

Update: Built 3 fires over the weekend and took some data. Here are the results.

Item #1 (Thermometer): Took readings with my existing Stone Guard stove top thermometer and an IR Gun from Home Depot. Th IR gun was consistently higher by ~ 20 to 25 degrees higher. I am ok with this since it is consistently off. The thermometer is more crude device that you have to eyeball with very little temp graduations in between the 100 degree intervals. Again, I think I am ok here.

Item #2 (Wood):

Day #1: Built the fire using Home Depot's Mixed Hard Wood (Simple Simon), and European White Birch.
Load #1: @ 1/2h Temp =196F, @1h Temp =312F, @1 & 1/2h Temp =331F, @ 2 & 1/2h Temp =284F
Load #2: @ 3h Temp =325F, @ 3 & 1/2hh Temp =405F, @ 4 & 1/2h Temp =338F
This was a nice improvement, hence I am suspecting the wood.

Day #2: Built the fire using the mixed hard wood I bought from a local guy.
Load #1: @ 1/2h Temp =118F, @1h Temp =227F, @1 & 1/2h Temp =281F, @ 2& 1/2h Temp =251F
Load #2: @ 3 & 1/2h Temp =270F, @ 4 & 1/2h Temp =290F

Test Conditions (both days):
House Temp: Mid to High 60's at beginning of test
Outside Temp: Mid to High 30's
Primary Air 100% Open for the first 1/2 hour of very load
Primary Air 75% Open for rest of the time

Item #3 (Re-Splitting Wood): After the above results, I went ahead and re-split 5 pieces and performed moisture tests on all. Consistently came up with the numbers.
Pre-Split: Moisture of ~ 15 or so
Post-Split: Moisture of ~ 25 on the freshly cut side.

Hence, my wood is not ideal (as suspected). I have NOT begun to tackle Item #4 (Potential Draft Problems) yet, since I have dome some research and have technical thoughts on it that would be best suited after your feedback.

I am sorry for the long post, but so many generous people on this site took the time to make suggestions, hence I wanted you all t know that I appreciate it and put the work in.
Thanks
TO
 
It's hard to get fully seasoned wood. Best to assume it is not, no matter what the seller says. If you can get some ash this spring and stack it top covered, it should be ready by fall.
 
Update: Built 3 fires over the weekend and took some data. Here are the results.

Item #1 (Thermometer): Took readings with my existing Stone Guard stove top thermometer and an IR Gun from Home Depot. Th IR gun was consistently higher by ~ 20 to 25 degrees higher. I am ok with this since it is consistently off. The thermometer is more crude device that you have to eyeball with very little temp graduations in between the 100 degree intervals. Again, I think I am ok here.

Item #2 (Wood):

Day #1: Built the fire using Home Depot's Mixed Hard Wood (Simple Simon), and European White Birch.
Load #1: @ 1/2h Temp =196F, @1h Temp =312F, @1 & 1/2h Temp =331F, @ 2 & 1/2h Temp =284F
Load #2: @ 3h Temp =325F, @ 3 & 1/2hh Temp =405F, @ 4 & 1/2h Temp =338F
This was a nice improvement, hence I am suspecting the wood.

Day #2: Built the fire using the mixed hard wood I bought from a local guy.
Load #1: @ 1/2h Temp =118F, @1h Temp =227F, @1 & 1/2h Temp =281F, @ 2& 1/2h Temp =251F
Load #2: @ 3 & 1/2h Temp =270F, @ 4 & 1/2h Temp =290F

Test Conditions (both days):
House Temp: Mid to High 60's at beginning of test
Outside Temp: Mid to High 30's
Primary Air 100% Open for the first 1/2 hour of very load
Primary Air 75% Open for rest of the time

Item #3 (Re-Splitting Wood): After the above results, I went ahead and re-split 5 pieces and performed moisture tests on all. Consistently came up with the numbers.
Pre-Split: Moisture of ~ 15 or so
Post-Split: Moisture of ~ 25 on the freshly cut side.

Hence, my wood is not ideal (as suspected). I have NOT begun to tackle Item #4 (Potential Draft Problems) yet, since I have dome some research and have technical thoughts on it that would be best suited after your feedback.

I am sorry for the long post, but so many generous people on this site took the time to make suggestions, hence I wanted you all t know that I appreciate it and put the work in.
Thanks
TO

Hi Folks, just wanted to follow up on this problem from last year. By the time I stated this thread last year, burning season was almost over. Hence, I was basically lefts at step #4, draft test. So, I purchased a Dwyer MARK II manometer, ~ $25 or so.

Here are my draft test results. The tests were all performed on different days to account for the varying weather conditions.
Test #1 = 0.14 wc , Test #2 = 0.18 wc , Test #3 = 0.14 wc , Test #4 = 0.11 wc

Hence, according to the technical note from Hearthstone, the draft should be between 0.06wc to 0.1 wc . Ok, so I am definitely over drafting. Again, I have a 21' Chimney, and live in a 2 story townhome. No adjustment can be made to the chimney height.

After reading further posts/threads I installed a pipe damper in December of 2020.
Here are my test results (30 minutes into the burn with a good fire)

Primary Air Open, Open Damper, Draft is ~ 0.12wc, after closing Damper 0.1wc
Primary Closed, after closing Damper 0.09wc
I have run this test several times under different conditions , and the draft will reduce by -0.02wc to -0.03wc. This is an improvement, but not a game changer for me.

Conclusions: I am definitely over drafting but can't reduce my chimney height. I have added a damper, with minimum success at reducing the draft. One benefit of adding the damper, is that the oven stays hotter longer. But again after 2 loads, I can't seem to get above the 300F to 325F range. Sorry for the long post, but I want everyone to have the details.

Any help would be greatly appreciated.
Thanks
 
Did you fix the fuel quality issue?

Interesting that you have that much draft? Some members here have added an additional key damper for a total of 2 to get things tamed down.

How long is a completely packed initial load lasting until down to just coals that will light off the next full load?
 
1) Fuel: Fuel Quality is good. It was never that bad to begin with. Keep in mind that most (not all) the tests have been run with ultra dry (Simple Simons) wood as suggested by the folks here last year.

2) Damper: I have actually installed 2 dampers as well. Still don't see any major improvement in the draft, but it has helped. Again, usually improve by ~ -0.02wc to -0.03wc. In other words. I am still drafting at about 0.08wc (best case) with the 2 dampers closed.

Burn Times (2020) : Last year's burn time (prior to the dampers) was ~ 2h &30 min. to maybe 2h &45 min. before I reloaded. Usually coals. This was from a cold start with the primary air 100% open or 75% open. Stove was usually at ~ 250 F to 300F.

Burn Times (2021). This year's burn time (with the dampers) is ~ 2h &40 min. before I reloaded. Usually coals.

Here is the entire sequence from cold start to re-load:
1) From a cold start with the primary air 100% open, and the Damper open.
2) At the 1/2 hour (if I have a good roaring fire), with the primary air 100% open, close the Damper.
3) At the 1hour, close the primary air, keep the damper closed.
4) At the 2h &40 min. the Re-load.

I have also tried many (and I men many) different combos. This post would never end. At this point, this mystery/problem is of the Sherlock Holmes type. I certainly can't figure this out.
Thanks for the quick response
TO
 
2) At the 1/2 hour (if I have a good roaring fire), with the primary air 100% open, close the Damper.

Make a huge adjustment in your routine to shake things up. Try reducing your primary air with the stove control, at 15 minutes into your burn instead of waiting till 30 minutes. Possibly sooner.
If it doesn't kill the fire you may be onto something. You may simply be letting the stove get away from you. Tough to get control at that point with some setups.

I'd try variations of this maneuver before even goofing with the pipe damper.

OK, great. BTW, I tried all of those primary air settings/times last year prior to the damper. Reducing the air helped some, but sometimes it would kill the fire. Despite doing that, draft measurements were still too high, hence I went the damper route. I am home today, and will take a fresh look at the primary air angle. It seems that working this stove has become a Calculus problem. It just seems too hard.
Thanks again
TO
 
  • Like
Reactions: moresnow