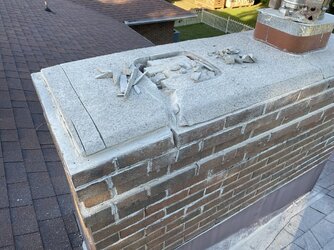
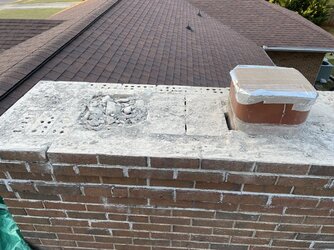
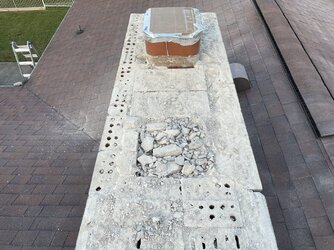
Went up and dug around some of the cracks on the crown this afternoon to see how hard the concrete was. Pretty solid. But after scraping the caulk from the flue joint, the concrete was still damp and moldy, and it revealed there is no real expansion joint, maybe 1/16" gap at most. Both flue tiles have minor vertical cracks on all 4 sides, and wondering if they would last another 20 years along with whatever we decide to do. My wife almost had me convinced to go the chase cover route, but after seeing that, wonder if it would be the better to go ahead and demo the old crown, get rid of the dummy flue tile, replace the other tile and then pour a crown? Or if the tiles still have a lot of life left, cut the dummy down flush with the rest of the crown and then cover with the SS chase cover and extending the collar all the way to the top of the flue tile as Rockford suggests for that application? Either way, I think for time sake, I will contract the re-pointing. Total chimney is roughly 74 sq ft, but the quotes are only for joints that have been caulked or have larger shrinkage cracks. Estimates for repointing range from $660 to $782 to $987. Everything is line itemed, but not sure how any of them would respond to just doing the re-pointing.
Stainless cover vs full chimney cap over masonry crown
- Thread starter Kvic
- Start date
-
Active since 1995, Hearth.com is THE place on the internet for free information and advice about wood stoves, pellet stoves and other energy saving equipment.
We strive to provide opinions, articles, discussions and history related to Hearth Products and in a more general sense, energy issues.
We promote the EFFICIENT, RESPONSIBLE, CLEAN and SAFE use of all fuels, whether renewable or fossil.
You are using an out of date browser. It may not display this or other websites correctly.
You should upgrade or use an alternative browser.
You should upgrade or use an alternative browser.
64 sq ft not 74Went up and dug around some of the cracks on the crown this afternoon to see how hard the concrete was. Pretty solid. But after scraping the caulk from the flue joint, the concrete was still damp and moldy, and it revealed there is no real expansion joint, maybe 1/16" gap at most. Both flue tiles have minor vertical cracks on all 4 sides, and wondering if they would last another 20 years along with whatever we decide to do. My wife almost had me convinced to go the chase cover route, but after seeing that, wonder if it would be the better to go ahead and demo the old crown, get rid of the dummy flue tile, replace the other tile and then pour a crown? Or if the tiles still have a lot of life left, cut the dummy down flush with the rest of the crown and then cover with the SS chase cover and extending the collar all the way to the top of the flue tile as Rockford suggests for that application? Either way, I think for time sake, I will contract the re-pointing. Total chimney is roughly 74 sq ft, but the quotes are only for joints that have been caulked or have larger shrinkage cracks. Estimates for repointing range from $660 to $782 to $987. Everything is line itemed, but not sure how any of them would respond to just doing the re-pointing.
fire_man
Minister of Fire
I had the exact same difficult decison to make - rip out the old crown on a 6'X3" chimney and pour a new one or install a SS Cover.
The idea of domolishing the old crown which was 6" thick with rebar reinforcement was intimidating. I was concerned not only with damaging the top flue tile but displacing the lower ones with all the pounding. I could have poured a new crown on top, but that was still way more work than just adding the SS cover.
I'm pretty good at DIY stuff but installing a new crown on this chimney seemed over my head - pun intended.
Here is a link from my original thread: https://www.hearth.com/talk/threads/stainless-steel-chimney-crown-cover.169074/
Last edited:
Thank's fire_man, I did read through that, and it was what started me thinking of going that route. I was mostly set on it until the one of the local sweeps estimator said he wouldn't recommend it because they had seen concrete that had rotted out due to moisture retention under the SS. Having less than total confidence in what he said after reading through yours and some other posts on here, I wanted to see what others here thought, and I'm grateful for all the input. My problem is I keep going back and forth because I enjoy working with my hands and seeing a finished product, but then realize time is a factor as well.I had the exact same difficult decison to make - rip out the old crown on a 6'X3" chimney and pour a new one or install a SS Cover.
The idea of domolishing the old crown which was 6" thick with rebar reinforcement was intimidating. I was concerned not only with damaging the top flue tile but displacing the lower ones with all the pounding. I could have poured a new crown on top, but that was still way more work than just adding the SS cover.
I'm pretty good at DIY stuff but a new crown on this chimney seemed over my head - pun intended.
Here is a link from my original thread: https://www.hearth.com/talk/threads/stainless-steel-chimney-crown-cover.169074/
How much repointing did you end up doing, and how time consuming was it?
fire_man
Minister of Fire
I did major repointing since the scaffolding was already set up and every joint was accessible. The repointing alone took about 1 full weekend. The entire job to rebuild the badly damaged top section of the chimney, install the SS cover and repoint was a major project which took me at least a month of full time weekends. But I don't do this stuff often and I am a little OCD about doing stuff right. I think this job would have taken much much longer if I tore out the old crown and poured a new one. The SS cover was challenging to install since it was so large but it really did not take that long to install. Either way I had to rebuild the damaged area and repoint many of the old joints.Thank's fire_man, I did read through that, and it was what started me thinking of going that route. I was mostly set on it until the one of the local sweeps estimator said he wouldn't recommend it because they had seen concrete that had rotted out due to moisture retention under the SS. Having less than total confidence in what he said after reading through yours and some other posts on here, I wanted to see what others here thought, and I'm grateful for all the input. My problem is I keep going back and forth because I enjoy working with my hands and seeing a finished product, but then realize time is a factor as well.
How much repointing did you end up doing, and how time consuming was it?
Also, I don't understand the OP estimator's moisture concern with a SS cover " he said they don't recommend it because it will cause moisture to get trapped causing condensation that will rot out the crown." How is a SS cover worse than topcoating a crown with crownsealer? If anything there is more airflow between the SS cover and crown.
Top coating with crown sealer is worthless from what I have seemI did major repointing since the scaffolding was already set up and every joint was accessible. The repointing alone took about 1 full weekend. The entire job to rebuild the badly damaged top section of the chimney, install the SS cover and repoint was a major project which took me at least a month of full time weekends. But I don't do this stuff often and I am a little OCD about doing stuff right. I think this job would have taken much much longer if I tore out the old crown and poured a new one. The SS cover was challenging to install since it was so large but it really did not take that long to install. Either way I had to rebuild the damaged area and repoint many of the old joints.
Also, I don't understand the OP estimator's moisture concern with a SS cover " he said they don't recommend it because it will cause moisture to get trapped causing condensation that will rot out the crown." How is a SS cover worse than topcoating a crown with crownsealer? If anything there is more airflow between the SS cover and crown.
I tend to be the same way when doing things, and my wife knows that, which is why I think she is in favor of the SS cover. She doesn't want to deal with the possibility of me being frustrated if things do go so well.I did major repointing since the scaffolding was already set up and every joint was accessible. The repointing alone took about 1 full weekend. The entire job to rebuild the badly damaged top section of the chimney, install the SS cover and repoint was a major project which took me at least a month of full time weekends. But I don't do this stuff often and I am a little OCD about doing stuff right. I think this job would have taken much much longer if I tore out the old crown and poured a new one. The SS cover was challenging to install since it was so large but it really did not take that long to install. Either way I had to rebuild the damaged area and repoint many of the old joints.
Also, I don't understand the OP estimator's moisture concern with a SS cover " he said they don't recommend it because it will cause moisture to get trapped causing condensation that will rot out the crown." How is a SS cover worse than topcoating a crown with crownsealer? If anything there is more airflow between the SS cover and crown.
I was thinking the same thing about the crown seal, yet everyone one of the estimates includes it.
It is included because it is a fast easy way to make a decent profit.I tend to be the same way when doing things, and my wife knows that, which is why I think she is in favor of the SS cover. She doesn't want to deal with the possibility of me being frustrated if things do go so well.
I was thinking the same thing about the crown seal, yet everyone one of the estimates includes it.
The majority of it that I see is lifting off the crown.
I looked at doing that when I first realized it was leaking, but there were definitely mixed reviews about it online (and on here), so I started looking at alternatives and ended up here.Top coating with crown sealer is worthless from what I have seem
fire_man
Minister of Fire
One trick to reduce frustration and stress if you decide to go with the Chase cover is to oversize it so the Length and Width give a 1/2" gap on all sides. That way if the crown is not perfectly rectangular or your measurments are a little off, there is wiggle room. I discussed this with Rockord and they agreed, especially since my Crown was so large and slightly irregular and difficult to measure accurately. This had the additional benefit of providing a better drip edge so the water shed further from the brick.
I tend to get hyper-focused on things, so decided to take out the dummy flue and relieve some pressure. Fortunately I work from home and can readjust my schedule some. Couple of pictures of the result.
The company that did the install is replacing the liner after I sent them pictures, so I messed around with that some too to see if I could pull it out to look at the flue, but no dice. However when I loosened the connection on the stove, I shined the light up into the smoke chamber and thinking maybe that needs to be cleaned?
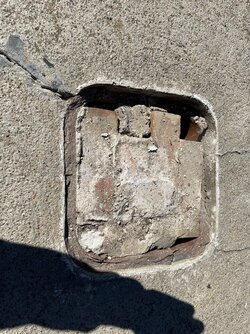
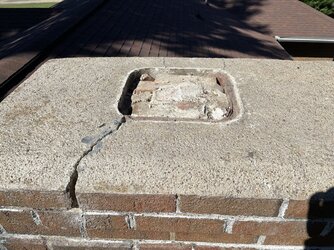
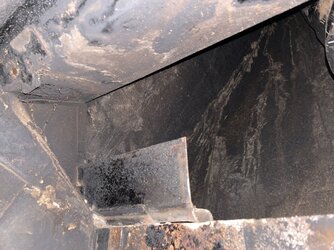
The company that did the install is replacing the liner after I sent them pictures, so I messed around with that some too to see if I could pull it out to look at the flue, but no dice. However when I loosened the connection on the stove, I shined the light up into the smoke chamber and thinking maybe that needs to be cleaned?


Mine isn't too bad, about 3/16 difference in both length and width. If I remember right, you ordered the 20 gauge. What led you to go with that over the standard? I know it's thicker, just not real familiar with metal gauge. I have yet to contact them, but was going to ask if they can powder coat, and would also need a 5" skirt to reach the first row of brick.One trick to reduce frustration and stress if you decide to go with the Chase cover is to oversize it so the Length and Width give a 1/2" gap on all sides. That way if the crown is not perfectly rectangular or your measurments are a little off, there is wiggle room. I discussed this with Rockord and they agreed, especially since my Crown was so large and slightly irregular and difficult to measure accurately. This had the additional benefit of providing a better drip edge so the water shed further from the brick.
I was going to ask you about that. If I do decide to go that route, a 2x4 is going to give an 1 1/2 inch lip. I was thinking with that 4th row sticking out as doublebogey pointed out, would it work to use a 1x4 against the brick, then another 1x but raised up about 1/2" that would give the groove, followed by a 2x4? Or is that too much overhang, and does the groove need to be rounded?That was one thing I forgot a poured crown needs a drip groove as well
fire_man
Minister of Fire
I ended up ordering the standard 24 gauge cover. I started out ordering the heavier gauge since that is how I usually think but Rockford actually talked me out of it. They said the only reason I should go with the heavier gauge is if I was really worried about bad hail storms which we just don't get.
Honestly, If money was not an issue and we had a bholler in the area I would have preferred a poured overhanging concrete crown. I think they look better. But I was determined to do it myself and I knew if I tried to do the masonry work my wife would have become a chimney widow for months.
Honestly, If money was not an issue and we had a bholler in the area I would have preferred a poured overhanging concrete crown. I think they look better. But I was determined to do it myself and I knew if I tried to do the masonry work my wife would have become a chimney widow for months.
That's good to know, as we don't normally get hail storms here either.I ended up ordering the standard 24 gauge cover. I started out ordering the heavier gauge since that is how I usually think but Rockford actually talked me out of it. They said the only reason I should go with the heavier gauge is if I was really worried about bad hail storms which we just don't get.
Honestly, If money was not an issue and we had a bholler in the area I would have preferred a poured overhanging concrete crown. I think they look better. But I was determined to do it myself and I knew if I tried to do the masonry work my wife would have become a chimney widow for months.
Yeah, if we didn't need to have the patio done as well, I would look to have someone do the complete job. Actually, if I wasn't paying for a wedding next month, we could farm both of them out.
Well you probably won't get anyone to do the work this season anymore regardless. If they are available I would question why. We are pretty much booked up for next spring summer for masonry alreadyThat's good to know, as we don't normally get hail storms here either.
Yeah, if we didn't need to have the patio done as well, I would look to have someone do the complete job. Actually, if I wasn't paying for a wedding next month, we could farm both of them out.
Doublebogey
Burning Hunk
You never know what an architect is thinking I guess. My brothers and I rebuilt a chimney in my parents neighborhood. 12 feet long, 5 feet wide, 15 feet tall, one 13 inch square tile poking through the middle. I still think that thing looks rediculous despited the fact that we put some beautiful limestone on it.If it's just a dummy flue absolutely remove it. I don't know why some masons did that. It's just stupid
Doublebogey
Burning Hunk
No need to overthink the drip groove too much. 1/4inch deep or so with a standard tuck pointing grinder blade on the bottom edge all the way around. Maybe halfway back to the brick. You are breaking surface tension from carrying water all the way to the face of the masonry.I was going to ask you about that. If I do decide to go that route, a 2x4 is going to give an 1 1/2 inch lip. I was thinking with that 4th row sticking out as doublebogey pointed out, would it work to use a 1x4 against the brick, then another 1x but raised up about 1/2" that would give the groove, followed by a 2x4? Or is that too much overhang, and does the groove need to be rounded?
I don't think the guy that told you that concrete would rot out under the stainless was a very straight shooter. If the stainless is shingled properly the concrete under should stay dry forever.
I chose the heavy gauge for two reasons. First, the cost wasn't at all unreasonable for the upgrade. The tops of chimneys get beat up by weather... More than ony other masonry feature on a house. I consider mine a lifetime fix. Second, I was a little concerned about noise from heavy rains hitting the surface. I applied 5 or 6 inches of textroflash peel and stick flashing along the bottom of the outermost horizontal surface to help dampen sound (or maybe it was a down weathermate product, i forget which). We had some crazy storms this year and I never heard a peep from the chase cover and my chimney is only 15 feet tall. Maybe what i did was overkill but I am happy with the results none the less.
My neighbor has a 25 plus foot tall flue, an uninsulated liner, and a stainless crown that was field fabricated by the installers and he said he can hear the rain hitting it in heavy downpours. That is why I took extra measures.
Thanks, and your right I do tend to overthink things.No need to overthink the drip groove too much. 1/4inch deep or so with a standard tuck pointing grinder blade on the bottom edge all the way around. Maybe halfway back to the brick. You are breaking surface tension from carrying water all the way to the face of the masonry.
I don't think the guy that told you that concrete would rot out under the stainless was a very straight shooter. If the stainless is shingled properly the concrete under should stay dry forever.
I chose the heavy gauge for two reasons. First, the cost wasn't at all unreasonable for the upgrade. The tops of chimneys get beat up by weather... More than ony other masonry feature on a house. I consider mine a lifetime fix. Second, I was a little concerned about noise from heavy rains hitting the surface. I applied 5 or 6 inches of textroflash peel and stick flashing along the bottom of the outermost horizontal surface to help dampen sound (or maybe it was a down weathermate product, i forget which). We had some crazy storms this year and I never heard a peep from the chase cover and my chimney is only 15 feet tall. Maybe what i did was overkill but I am happy with the results none the less.
My neighbor has a 25 plus foot tall flue, an uninsulated liner, and a stainless crown that was field fabricated by the installers and he said he can hear the rain hitting it in heavy downpours. That is why I took extra measures.
I know the stainless cover would work, but with the house being one story, and the chimney very visible my wife and I just don't think the 5" skirt would have looked good. So, no turning back now.
EbS-P
Minister of Fire
I really like my multi flue cap. It’s screened to keep critters and debris out but won’t ever clog with creosote. It protects the entire crown. It’s been through a couple cat 1 hurricanes since we have owned the house. 40” of rain in 48 hours and nothing down either flue that we could see when we got back to town 10 days later. Fast on and off to clean top down. Dummy flue or not both would be covered. Others may have different feelings. No snow load here to worry about. I think they look nice.
Evan
Evan
fire_man
Minister of Fire
Is yours hip and ridge, or flat top? Definitely not opposed to doing a multi flue cap. Neighbors just had a hip and ridge cap installed, and it looks huge. With our home I would lean toward flat top, and may still do it in the future. Right now it's all about the Benjamins, and trying to get two needed repairs done with the funds available.I really like my multi flue cap. It’s screened to keep critters and debris out but won’t ever clog with creosote. It protects the entire crown. It’s been through a couple cat 1 hurricanes since we have owned the house. 40” of rain in 48 hours and nothing down either flue that we could see when we got back to town 10 days later. Fast on and off to clean top down. Dummy flue or not both would be covered. Others may have different feelings. No snow load here to worry about. I think they look nice.
Evan
In most cases I think flat tops look better. I agree most of the time I think the hip and ridge caps look to bigIs yours hip and ridge, or flat top? Definitely not opposed to doing a multi flue cap. Neighbors just had a hip and ridge cap installed, and it looks huge. With our home I would lean toward flat top, and may still do it in the future. Right now it's all about the Benjamins, and trying to get two needed repairs done with the funds available.
Spent a little over half a day on this. Took longer because I decided to remove the liner that is going to be replaced. They had that thing jammed in at an angle at the stove connection, and it took forever to get it loose.
Still need to clean it up some, but was happy to see it wasn't open like some of the videos I've watched. Still need to read up on what to do from here.
Thinking now I may go ahead and repoint it myself as well, but man what a mess the grinder makes. Not looking forward to that part of it. Even wearing a respirator I feel like I still got some in my nose.


Similar threads
- Replies
- 5
- Views
- 386
- Replies
- 4
- Views
- 2K
- Replies
- 17
- Views
- 953
- Replies
- 8
- Views
- 1K

