
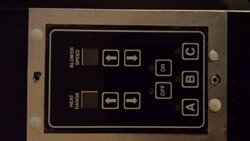
I just acquired a used 6039 from a friend and It looks like it needs a new circuit board. I've searched the web a bit and I can't seem to find the correct board. The previous owner says the stove is about 10 years old. The attached pic is the board that I have. Can you help?
Looking for correct circuit board for older USSC 6039.
- Thread starter Rustyblade69
- Start date
-
Active since 1995, Hearth.com is THE place on the internet for free information and advice about wood stoves, pellet stoves and other energy saving equipment.
We strive to provide opinions, articles, discussions and history related to Hearth Products and in a more general sense, energy issues.
We promote the EFFICIENT, RESPONSIBLE, CLEAN and SAFE use of all fuels, whether renewable or fossil.
You are using an out of date browser. It may not display this or other websites correctly.
You should upgrade or use an alternative browser.
You should upgrade or use an alternative browser.
- Status
- Not open for further replies.
FirepotPete
Minister of Fire
I just acquired a used 6039 from a friend and It looks like it needs a new circuit board. I've searched the web a bit and I can't seem to find the correct board. The previous owner says the stove is about 10 years old. The attached pic is the board that I have. Can you help?
That's the older 3 button board. You will want to go with the 4 button. You will pay for either and the 4 button will give you more options to work with and the stove will run better. As far as I know you can only get them from USSC. The boards aren't cheap, but they are the heart and brain of the stove, so make sure you handled the new one properly. Discharge any static from your body and make sure you have a good ground for the stove and a protective type power supply or the new one could become toast quickly.

That's the older 3 button board. You will want to go with the 4 button. You will pay for either and the 4 button will give you more options to work with and the stove will run better. As far as I know you can only get them from USSC. The boards aren't cheap, but they are the heart and brain of the stove, so make sure you handled the new one properly. Discharge any static from your body and make sure you have a good ground for the stove and a protective type power supply or the new one could become toast quickly.
Thank you for the reply. I've seen several sites selling the 4 button, but I wondered if it would work with this older stove. I will definitely use this information in my purchase and repair.
mustangwagz
Feeling the Heat
Yes board will work with the old stove. i too have an older version of the 6039 (no manual draft style) it all works. The new 4 button board is HIGHLY adjustable. lets ya tweek the stove to its best performances.
Hello again! Well I was finally able to purchase the control board (new, 4 button). I am in the process of installing and I was wondering if it matters how you connect the internal tstat wires to board (black and white)? I haven't connected them yet because I need to get this right. Also, i know that this board has a lot of functionality, but will it allow me to install an external tstat to my unit (older unit, no manual draft)? Can I download a manual for this newer style circuit board?Yes board will work with the old stove. i too have an older version of the 6039 (no manual draft style) it all works. The new 4 button board is HIGHLY adjustable. lets ya tweek the stove to its best performances.
Lake Girl
Moderator
Lake Girl
Moderator
Not sure if the new board is the same as the one for the 6041 ... this may help with t-stat hookup
https://www.hearth.com/talk/threads/6041-thermostat-wiring.57598/
https://www.hearth.com/talk/threads/6041-thermostat-wiring.57598/
FirepotPete
Minister of Fire
http://www.manualslib.com/manual/185231/United-States-Stove-6039hf.html?page=13#manual
Make sure the tstat you are using is a millivolt type. The wires should be 18 gauge. If it's a wired connection you are limited to 15' from the stove because of voltage drop. Some people will go a gauge or two higher to try and get around this but I'm not going to tell you to do that, it's up to you.
If you are going with a wireless then you don't have to worry about how far away except how far the transmitter will work from to the receiver on the stove.
If on the board where the tstat connections are made it show + and - then I guess you'd want to make sure the polarity is right. On my stove it doesn't and this is only making an open or closed circuit so I can't think of any good reason why the polarity would make a difference, but it might so check it out first.
And there is more to adjusting with that board than the link above, but that link will get you started. I'll type up some directions for tweaking the settings in a little while.
FirepotPete
Minister of Fire
Not sure if the new board is the same as the one for the 6041 ... this may help with t-stat hookup
https://www.hearth.com/talk/threads/6041-thermostat-wiring.57598/
I don't know if they are selling them to replace the 6039 board. It would work from what I've seen but there are some differences. The 6041 has an ignitor, the 6039 doesn't. The original 4 button 6039 board has heat ranges HR1-HR9, the 6041 has the ranges as Pr1-Pr5 or Cr1-Cr5 to change from pellets to corn. Otherwise they adjust the same and most of the error codes are the same, I'm sure it would work, just a little different.
Thank you all so much for the info. This is a great site for getting me started. I'll still need to research more for the internal t-stat connections. I'll get right on it.
My mistake! I assumed the small round switch inside the unit that's labeled "Honeywell" was a thermostat. I've now discovered it is a pressure switch. I have two brown wires leading from it. Does it matter how these wires attach to the circuit board where it is indicated for pressure?Thank you all so much for the info. This is a great site for getting me started. I'll still need to research more for the internal t-stat connections. I'll get right on it.
FirepotPete
Minister of Fire
My mistake! I assumed the small round switch inside the unit that's labeled "Honeywell" was a thermostat. I've now discovered it is a pressure switch. I have two brown wires leading from it. Does it matter how these wires attach to the circuit board where it is indicated for pressure?
Yes, if you are looking at the pressure switch the connection nearest the hose will go to BC2 on the board, that's the bottom connector, the other wire goes to BC3 that is right above it.
Thank you very much FirepotPete! Circuit board is now installed and the stove itself is ready to go. Next step is venting. I have a few pieces of stainless Duravent, but I have buy most of it. I intend to burn corn and wood pellets so does my vent have to be all stainless? I know Duravent does sell other vent that is not suitable for corn or other biofuels. Will galvanized vent work?Yes, if you are looking at the pressure switch the connection nearest the hose will go to BC2 on the board, that's the bottom connector, the other wire goes to BC3 that is right above it.
FirepotPete
Minister of Fire
Thank you very much FirepotPete! Circuit board is now installed and the stove itself is ready to go. Next step is venting. I have a few pieces of stainless Duravent, but I have buy most of it. I intend to burn corn and wood pellets so does my vent have to be all stainless? I know Duravent does sell other vent that is not suitable for corn or other biofuels. Will galvanized vent work?
No you need to go with the Duravent stainless. Even that can corrode from the corn. I haven't had a problem with it (that's what I have) just the end cap outside is starting to show signs of pin holes starting. I have a spare and will change if I think it needs it. The problem is when corn burns it puts out nitric acid. The acid itself doesn't do much but when moisture gets to it then the damage starts. That's why at the end of the heating season I do a good cleaning and then run a hopper of pellets through just to minimize the left over acid from the corn.
I'll tell you right now, even mixing in oyster shells with the pellets/corn or corn alone I had zero luck running the stove without major clinker issues. It banged and made so much noise, would hang up. That's when I decided that I was either going to run 100% corn in a clinker pot, with no agitator, or 100% pellets with the original pot and agitator.
Good luck!
I'm sure glad I asked these questions on this site. This newbie needs all the help he can get! You have me second guessing my intentions - likely a good thing. I'll still go with the stainless vent, but I'll run it a while before I try corn- if I try it at all. Thank you very much once again for all the information. Hopefully next weekend I'll be able to report back on how it's burning and heating. I have all electric heat and hopefully this will allow some of those heaters to shut down. More to come.........No you need to go with the Duravent stainless. Even that can corrode from the corn. I haven't had a problem with it (that's what I have) just the end cap outside is starting to show signs of pin holes starting. I have a spare and will change if I think it needs it. The problem is when corn burns it puts out nitric acid. The acid itself doesn't do much but when moisture gets to it then the damage starts. That's why at the end of the heating season I do a good cleaning and then run a hopper of pellets through just to minimize the left over acid from the corn.
I'll tell you right now, even mixing in oyster shells with the pellets/corn or corn alone I had zero luck running the stove without major clinker issues. It banged and made so much noise, would hang up. That's when I decided that I was either going to run 100% corn in a clinker pot, with no agitator, or 100% pellets with the original pot and agitator.
Good luck!
FirepotPete
Minister of Fire
I'm sure glad I asked these questions on this site. This newbie needs all the help he can get! You have me second guessing my intentions - likely a good thing. I'll still go with the stainless vent, but I'll run it a while before I try corn- if I try it at all. Thank you very much once again for all the information. Hopefully next weekend I'll be able to report back on how it's burning and heating. I have all electric heat and hopefully this will allow some of those heaters to shut down. More to come.........
Don't let me scare you from using corn, corn/pellet mix. A lot of people make it work, for some reason I couldn't. And as far as the pipe goes, I'm still with the original pipe, 10th year, 8th year of burning 100% corn and haven't had to replace any of it. So with some proper maintenance that pipe will last for a long time, even burning corn.
I was finally able to get my stove up and running last weekend. I ran it for a few hours each day, but was nervous about leaving it on overnight as I didn't have an OAK hooked up. After some research, I decided to purchase the FAK from USSC and attach per directions. I've seen some applications with a ball valve, but I chose not to install one. I was able to disassemble the firepot and discovered that the cap is missing from the outlet under the firepot. The stove seems to operate correctly, but now my flame seems a bit lazy. After shutting down and performing a quick cleaning, the results are un-noticeable. Upon reading some of your other posts, I will check behind the immitation brick board to see if the holes are plugged and I will also do a thorough cleaning. My first question is: How should the flame look? Currently it's a nice orange lazy flame, much like a dying campfire. Secondly, will installing a ball valve make a difference? Does to much air make a lazy flame? I've only operated the stove on automatic settings thus far - never north of HR-5 for extended periods and only fed it premium hardwood pellets. It seems to be very hungry. Is there anything else that I should do at this point for the stove to operate more efficiently?Don't let me scare you from using corn, corn/pellet mix. A lot of people make it work, for some reason I couldn't. And as far as the pipe goes, I'm still with the original pipe, 10th year, 8th year of burning 100% corn and haven't had to replace any of it. So with some proper maintenance that pipe will last for a long time, even burning corn.
I want to thank all of you for the valuable advice given on this forum. Without it, I would'nt know if my unit is installed right or operating properly/safely. Kudos to a great source of information.
FirepotPete
Minister of Fire
The ball valve comes in handy during the off season and when cleaning the stove, when the door is open you will get cold air coming through it and also if it's cold out but you are not running the stove a natural draft through the stove occurs. You won't get direct cold air coming into the house but the stove itself will get cold, all that iron/metal will throw cool air off of it.
I run mine without the cap, that cap is just a frost plug for auto motor blocks, if you want to put it in and drill holes in it you can get them at an auto store. Either way you need air to get to the firepot.
As far as what the flame should look like, is it just lazy on HR1 or lazy all the time? With the FAK/OAK installed you should have plenty of air available so your DF setting probably need to be adjusted, or you have an air leak. Check the door seals with a dollar bill. Put the bill in the door in different places and try pulling it out. If there is no or very little resistance then the door gasket needs to be replaced.
Also, do you have a manual draft plate under the firepot?
That makes a lot of sense. I may install a ball valve before the season is over. My stove is an early model without a manual draft. The gasket around the door does look a bit suspect, so I will experiment with that greenback. That looks like an easy repair. It seems the flame is lazy on all settings (different from when I ran it without the FAK). I've really only run the stove on auto settings up to this point. I've got a lot to learn with this new control board - baby steps. More to come.......
- Status
- Not open for further replies.
Similar threads
- Replies
- 22
- Views
- 408
- Replies
- 2
- Views
- 529
- Replies
- 4
- Views
- 1K
- Replies
- 2
- Views
- 756