
wanted to get clarification on if you are supposed to seal the small gap between where the top plate collar connects to the liner itself. Thanks
Air gap top plate
- Thread starter Ctwoodtick
- Start date
-
Active since 1995, Hearth.com is THE place on the internet for free information and advice about wood stoves, pellet stoves and other energy saving equipment.
We strive to provide opinions, articles, discussions and history related to Hearth Products and in a more general sense, energy issues.
We promote the EFFICIENT, RESPONSIBLE, CLEAN and SAFE use of all fuels, whether renewable or fossil.
You are using an out of date browser. It may not display this or other websites correctly.
You should upgrade or use an alternative browser.
You should upgrade or use an alternative browser.
Hogwildz
Minister of Fire
Yes, seal it with silicone. Also put a bead of silicone where the underside of the top plate meets the top edge of the old tile.
Seal the storm collar to the pipe with silicone also. Work the silicone in with your finger, don't just pump a bead on there and let it go.
Seal the storm collar to the pipe with silicone also. Work the silicone in with your finger, don't just pump a bead on there and let it go.
Hogwildz
Minister of Fire
I assumed he was talking about the top plate at the top of the stack. If so, it should get no where near hot enough to bother the silicone. Mine has been fine since 2006.
Not sure how relevant it is, but my cap is the kind that covers both flues in the chimney and has mesh sides.
Hogwildz
Minister of Fire
So you have a large screen cap covering the entire top of the old chimney with 2 flues? Yes silicone the top plate where the liner passes through. And another thing to consider, is that having two flues at same height next to each other may cause downdraft from the woodburner stack, down the other stack. The flues should be a 2 separate heights.
So, to clarify.. sealant is needed on the top surface of the flue tile, where the top plate rests. Not where the liner passes through the plate.
The multi-flue cap may cause trouble with downdrafts, but we have several setups just like this that have no issues at all.
The multi-flue cap may cause trouble with downdrafts, but we have several setups just like this that have no issues at all.
Hogwildz
Minister of Fire
I disagree, seal where the liner passes through. If not, what keeps blowing wind/snow & insects etc out?
Silicone will not last if it's touching the liner, it's not intended for that type of heat. If yours has lasted, it's because you don't run yours hot I guess. After the liner passes through the top plate, there should be a clamp and then a storm collar which prevents water infiltration. Or even better, the top plate would have a raised clamp built into it, then the cap makes the final seal rather than a storm collar.I disagree, seal where the liner passes through. If not, what keeps blowing wind/snow & insects etc out?
WoodyIsGoody
Minister of Fire
I assumed he was talking about the top plate at the top of the stack. If so, it should get no where near hot enough to bother the silicone. Mine has been fine since 2006.
I agree. I've used it at the top of the liner without problem for years at a previous house. And I had an old Avalon that ran super hot. It's amazing how much heat dissipates by the top of the stack. I guess even if it failed after years it would still be better than nothing. And it will eventually fail, probably more from UV rays than heat.
So I'm curious, why do you guys have silicone out in the open like this? If it was installed correctly, there would be no need for sealant in this location. There should be a storm collar or a plate that's designed in a way that prevents water from being able to get near the liner.
Attachments

WoodyIsGoody
Minister of Fire
So I'm curious, why do you guys have silicone out in the open like this? If it was installed correctly, there would be no need for sealant in this location. There should be a storm collar or a plate that's designed in a way that prevents water from being able to get near the liner.
Well, if you like the belt and suspenders approach you can do both. But the heats not a problem and, in this particular install, UV rays are pretty minimal with tree shade.
I'm a big fan of, if it ain't broke, don't fix it.
Hogwildz
Minister of Fire
Ah, your photos make sense to a degree.So I'm curious, why do you guys have silicone out in the open like this? If it was installed correctly, there would be no need for sealant in this location. There should be a storm collar or a plate that's designed in a way that prevents water from being able to get near the liner.
Looks like there are a few different configurations. My DuraLiner top plate has a gap between the rigid liner & the top plate opening. There is a raised lip, but still an opening. The liner extends up 18", then cap to top of liner. What you have looks like the cap mounts to the plate opening lip directly. And that I would not seal either as it appears to be self sealing.
Storm collars should ALWAYS be sealed. Just the metal storm color to metal liner ain't exactly a water tight sea, as we have already read on here a few times. sealing is a sure way to guarantee no storm collar leaks. Won't be hot enough up there to effect the silicone at all.
I guess it is a matter of what set up you're working with.
Hogwildz
Minister of Fire
Again, I disagree. If anyone gets their stack up there hot enough to hurt the silicone, they have far worse problems below. Silicone is good to about 600 degrees. If you ahve read any of my posts in the last 11 years, you would know I run hot at times. But with proper burning habits, the top aint no where near that. Maybe an old wide open smoke dragon, but they don't live in this place.Silicone will not last if it's touching the liner, it's not intended for that type of heat. If yours has lasted, it's because you don't run yours hot I guess. After the liner passes through the top plate, there should be a clamp and then a storm collar which prevents water infiltration. Or even better, the top plate would have a raised clamp built into it, then the cap makes the final seal rather than a storm collar.
A storm collar must be sealed.
From the DuraLiner installation manual: Pg11 if you don't believe me:
"Attach the storm collar, and seal with non-
hardening silicone (500°F) sealant."
Not sealing a collar is just asking to end up back on the roof and sealing it later on. Guaranteed.
Last edited:
Our liner storm collars use a worm drive clamp that seals down leaving really no possibility of water infiltration on a flex liner. These we rarely use, only if our sealable top plate won't work for some reason.Again, I disagree. If anyone gets their stack up there hot enough to hurt the silicone, they have far worse problems below. Silicone is good to about 600 degrees. If you ahve read any of my posts in the last 11 years, you would know I run hot at times. But with proper burning habits, the top aint no where near that. Maybe an old wide open smoke dragon, but they don't live in this place.
A storm collar must be sealed.
From the DuraLiner installation manual: Pg11 if you don't believe me:
"Attach the storm collar, and seal with non-
hardening silicone (500°F) sealant."
Not sealing a collar is just asking to end up back on the roof and sealing it later on. Guaranteed.
With your reasoning, silicone would hold up just as well on stovepipe then. For some it's possible, almost all others it wouldn't hold up. I see dozens and dozens of set ups a season, I'm telling you, regular silicone isn't up to the task.
Hogwildz
Minister of Fire
Worm drive or not, it is a hose clamp straightened out.Our liner storm collars use a worm drive clamp that seals down leaving really no possibility of water infiltration on a flex liner. These we rarely use, only if our sealable top plate won't work for some reason.
With your reasoning, silicone would hold up just as well on stovepipe then. For some it's possible, almost all others it wouldn't hold up. I see dozens and dozens of set ups a season, I'm telling you, regular silicone isn't up to the task.
Look, I get it, you have to be right, cause your a sweep.
I installed mine as the manufacturer installation instructions stated.
Comparing silicone on stove pipe vs the top of a stack? Really? So your saying it is as hot at the top of a run, than it is on the stove pipe inside the house? If that's the case, how hot is it up top? Over 500 or 600 degrees? Man, must be seriously hot on the stove pipe then huh?
Been doing construction since 90, roofed for 13 of that. Ive dealt with every pipe, & ways to seal them. And EVERY storm collar manufacturer stated seal the storm collar. It's simply common sense. Not who is right or wrong, just common sense. While urethane caulk is my first choice, silicone, if one who knows how it should be installed and worked, will last a damn long time.
I ain't just some DIY homeowner tooting my horn.
So, we can agree to disagree. You do as you do, and I'll use what I know works for me. That cool.
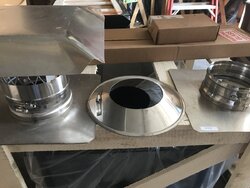
The install was 2 weeks ago. The installer used a storm collar (what you have in middle of picture above) on top of a top plate (presumably a similar one with the small lip you described, Hogwildz). Originally, installer went with a more standard top plate for a liner, but determined that the heavy wall flex liner being used might require a stronger setup.
Storm collar to liner Connection looks to have maybe a 1/16 inch or so gap in spots where it meets liner. Liner sticks up from collar about one inch. While I doubt significant amounts of water will get in that small opening, I want to ensue that the wrap insulation on liner stays in good shape and not sure if small amounts of moisture will impact it.
The silicone would be easy enough to apply to this very small gap. Just want to make sure there would be no drawbacks to it being used to seal that spot.
WoodyIsGoody
Minister of Fire
I installed mine as the manufacturer installation instructions stated.
There's a lot to be said for installing according to manufacturers instructions. This is why I rarely hire "professionals" anymore. Whether it's to install a built-in fridge, washer/dryer (you would think this would be easy, no?), gas fireplace, tile shower, etc. In every case they take shortcuts and don't follow the manufacturers instructions. And when you point that out, they argue with you.
I had to make a special flight to our vacation rental in Hawaii because the boneheaded "professional" installers couldn't replace a stacking washer/dryer according to very simple manufacturers instructions. When I flew out there I asked them to meet me on site because the thing was shaking itself apart on the spin cycle. I put a level to it and it wasn't even close (floor was perfectly level). When they arrived I asked them if they followed the manufacturers install instructions, they looked at me like I was crazy but said "yeah". I asked them if it was level, one of them took a step back, looked at it and said it was. I asked them if they had a level. They looked at me dumbfounded. They looked around and shook their heads no so I pulled one out of my back pocket. 1/2 hour later they had it leveled, it never shook again and the owner of the adjacent condo was happy to have their peace and quiet back. I flew home $1200 poorer and four days lost. At least I got to jump in the ocean a few times.
Then there was the time I bought a built-in fridge...I could go on and on.
I've had enough with "professionals". I just do it myself now.

WoodyIsGoody
Minister of Fire
Hogwildz
Minister of Fire
The silicone will be fine. If you want to go the extra mile, you can use urethane, but urethane takes long to cure. Both will do the job. I seal all storm collars, and if you can see a gap, you already know you will be up there at some point sealing it, so might as well do it now and be done with it. Sucks to have to deal with when it is raining, or worse yet, when there is a foot of snow on the roof.The install was 2 weeks ago. The installer used a storm collar (what you have in middle of picture above) on top of a top plate (presumably a similar one with the small lip you described, Hogwildz). Originally, installer went with a more standard top plate for a liner, but determined that the heavy wall flex liner being used might require a stronger setup.
Storm collar to liner Connection looks to have maybe a 1/16 inch or so gap in spots where it meets liner. Liner sticks up from collar about one inch. While I doubt significant amounts of water will get in that small opening, I want to ensue that the wrap insulation on liner stays in good shape and not sure if small amounts of moisture will impact it.
The silicone would be easy enough to apply to this very small gap. Just want to make sure there would be no drawbacks to it being used to seal that spot.
Remember, silicone only works well when applied well. Make sure you clean the area with rubbing alcohol, brake cleaner or similar product the cleans the factory oils off the area your working, but leaves no residue. Otherwise the sealant will not adhere well. Silicone should be worked in with your finger, in both directions.You can even work it in with a swirling motion, looking similar to a welding seam. Just don't pump it on in a bead and call it good, it must be worked into the surface.
Hogwildz
Minister of Fire
His is dura liner so there is a layer of insulation. But we use high temp silicone at the top all the time if you are over 650 at the top of the liner you are running way to hot. But we do not seal the gap between the top plate and liner it just isnt nessecary. We do seal the storm collar but in this case with a multi flue cap it foesnt matter.Silicone will not last if it's touching the liner, it's not intended for that type of heat. If yours has lasted, it's because you don't run yours hot I guess. After the liner passes through the top plate, there should be a clamp and then a storm collar which prevents water infiltration. Or even better, the top plate would have a raised clamp built into it, then the cap makes the final seal rather than a storm collar.
If the tip is cut right and you know how to do it you can get a good seal without working it.The silicone will be fine. If you want to go the extra mile, you can use urethane, but urethane takes long to cure. Both will do the job. I seal all storm collars, and if you can see a gap, you already know you will be up there at some point sealing it, so might as well do it now and be done with it. Sucks to have to deal with when it is raining, or worse yet, when there is a foot of snow on the roof.
Remember, silicone only works well when applied well. Make sure you clean the area with rubbing alcohol, brake cleaner or similar product the cleans the factory oils off the area your working, but leaves no residue. Otherwise the sealant will not adhere well. Silicone should be worked in with your finger, in both directions.You can even work it in with a swirling motion, looking similar to a welding seam. Just don't pump it on in a bead and call it good, it must be worked into the surface.
And you are right there can be an issue with multiple flues at the same height. But honestly in my experience those problems are pretty rare
Similar threads
- Replies
- 4
- Views
- 488
- Replies
- 14
- Views
- 895
- Replies
- 30
- Views
- 2K
- Replies
- 2
- Views
- 397