Jotul F600 Burn tube assembly--repair or replace

  • Active since 1995, Hearth.com is THE place on the internet for free information and advice about wood stoves, pellet stoves and other energy saving equipment.

    We strive to provide opinions, articles, discussions and history related to Hearth Products and in a more general sense, energy issues.

    We promote the EFFICIENT, RESPONSIBLE, CLEAN and SAFE use of all fuels, whether renewable or fossil.

paredown

Burning Hunk
Jan 11, 2009
183
Lower Hudson New York
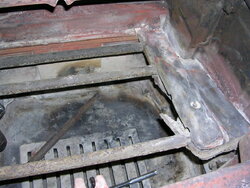
I recently found that I have damaged the right side manifold on the burn tube assembly. I'm guessing this happened when I fell asleep after starting, with the side door cracked open.

My local stove guy sells individual parts so I can buy just the right side (door) manifold, but I don't know how the tubes connect into the manifold, or how you would determine if the tubes need replacing.

I did find this old thread that says you should replace the whole assembly--but not too much explanation for that claim:
https://www.hearth.com/talk/threads...ul-f600-firelight-inside-guts-of-stove.76480/

Anyone know how if replacing the single part makes sense, or how to do so, and whether or not I would be better buying the whole thing as a unit? (It is expensive--I see it on Rocky Mountain stoves for $240, vs the $35 or so for one side.)

Dean
 
Last edited:
The question will be what other damage was done? Maybe get in touch with the folks at the Preston Trading Post in Preston, CT and ask to speak with their service dept.. They have a good Jotul repair crew there. Take several pictures showing the damaged side and the other side. And the condition of the burn tubes and send them to them once you have made contact.
http://prestontrading.com/contact/
 
Thanks. begreen. Preston--aka Stove World is where I just picked up new set of cast top plates and a new fiberglass blanket. I didn't see the damage to the manifold until I let the stove cool off enough to clean a little inside and install those items. They're the ones who list all the parts separately, so I will call them and see what they suggest...

The same thread/link I posted is the one in which the poster describes replacing the cast plates with fire brick--that may be next since this is the second set of top plates since I have owned the stove.
 
See if you can talk personally with one of their Jotul service techs. Good folks there and they know Jotuls.
 
Hey guys- I can personally tell you its probably better to swallow the pill and replace the whole unit. Jotul wants it replaced as a whole unit too, prob easier logistically for them- cost is about 285 dollars now. The cast baffles are about 65 each and the blanket is around 40 bucks. Taking the top off is easy, to get them in correctly, sealed up correctly and probably time to reseal the top plate gasket and reseal the corners of the stove with furnace cement. Firelights are more prevalent to getting air leaks amongst its' seams. I've redone a few in the past couple of seasons. Take a candle to the front upper seams to see if its leaking even though I hear when you say you probably caused the overheat from leaving the side door open. I'm happy to hear you give her extra air with the side door as opposed to the ashpan door, a strict no-no for Jotuls. Good luck with her.
 
Well this took a while. First I ordered loose parts--but not everything was there. A second conversation, and I ordered the complete set up.

I finally got around to it today. Since the right side had moved pretty severely as it warped, the right back bolt holding the manifold sheared off, so I did a bunch of extra work, finally drilling out the old bolt and rethreading to a larger size. (I'll forget this happened and wonder why the wrench doesn't fit on that side.)

As the linked thread says, taking the top off is the way to go, but you can do this without removing the collar.

First remove the fiberglass blanket--fold it in thirds towards the center, and sneak it out the front.
Then lift up the center of the matching cast plates so the center hinge unhooks, and then remove each side separately through the front.

Then find the two bolts that hold the center part of the lid--one on each end of the oval. You can reach these from inside, even with the burn tubes in place. Lift off the center plate, and then work from the top to find the four bolts holding the rest of the top on. Doing it this way makes lifting the plate off a little easier.

You can then easily access the bolts holding the manifolds in place. On mine (older) there is a single bolt per side into the back plate. (I did notice that the new manifold casting--marked with the same part number--has provision for a front bolt on each side as well. I debated drilling and tapping a hole, but I was worried that the casting was not thick enough--the back section is quite thick where the bolt goes, so I assume they beefed up the front for the extra bolts as well.

It seems to work best to slide the two sides of the manifold together, and then set it into place as a unit. You can move the right side to the outside of the firebox to adjust the width once in place. I did glop some furnace cement in the edges and on the ends per the previous thread.

You can then replace the main lid section and attach the four bolts from the center opening like you removed them. (I replaced the gasket while it was off, and put cement into the top corners where it had cracked out (and a few other places besides, while you have a good view.).

Then install the center oval and its two bolts from below--I replaced the gasket on this as well.

Finally, slide the baffle plates up the front, get them in to position, then lift centers like drawbridge so the hinge portion connects and lower in place. Sneak blanket up front (still in thirds) and unwrap to sides. I used a putty knife to make sure that the blanket was lying flat towards the back--you can't really see it, but you can feel it.

And you are done!

(Although tomorrow's project is to replace the full set of gaskets on doors, glass, ash pan and side door..._)
 
Last edited:
  • Like
Reactions: begreen
Got smarter this time--purchased the official Jotul Gasket set, which has a handy-dandy chart of all the stoves, and what size goes where.

Got everything stripped out, wire-brushed and new gaskets glued in place, even redid the window gaskets while I was at it. Be careful with the little clips holding the glass in.

Someone's advice was to set gasket with glue and then close whatever you are working on, so the gasket gets clamped while it sets--this worked a treat, and while one side was setting I was working on a different bit.

If I had anything left in the house to burn, I would have fired it up for a celebratory burn, but alas, it may have to wait until next fall...

I forgot to take a picture of how bad the old manifolds were--I am kicking myself that I was too intimidated to take this stove apart right after we got it, knowing that it had been over-fired. My advice to anyone in a similar position--bite the bullet, ask the experts on this board, and rebuild it right--start with it in proper shape, and then you will know where you are at.
 
Good deal. This will ensure that the right size and density gaskets are in place. Would it be possible to scan and post the gasket chart? That could be helpful info for others.
 
Found a picture--I did take one of the worse side where I spotted the damage originally... This is looking down from the top, at the RH manifold, and you can see that the section of it that should hold the burn tubes has actually cracked clean away.
 

Attachments

  • 2017-05-22 23.06.21.jpg
    2017-05-22 23.06.21.jpg
    205.6 KB · Views: 1,110
Last edited:
This should work--I scanned the leaflet into a pdf. On reading it, I realized that their recommendation is to remove the doors--vertical works fine, but the cement can drip if you are not careful....
 

Attachments

  • Jotul_Gasket_Directions.pdf
    2.2 MB · Views: 571
Thanks very much. I put a copy in the Jotul wiki article.
 
I've been crazy busy this year--house projects mainly, but I did want to check back in and bump this thread, and let everyone know that the overhaul--the new burn tube assembly and the full set of gaskets has made this a different stove!

I'm getting nice consistent slow burns, nice ash and good heat--even though I don't have (for the first time) any good wood--no time to split. (I've got a couple of ash down (ash borer), so those will go in pretty much as is, and some white oak that I may have to burn green to stay warm...

Anyways, I wanted to reiterate--if your stove needs rebuilding, do it sooner, not later. You'll save on wood and stay warmer!
 
  • Like
Reactions: 2fireplacesinSC
Paredown - This was a really helpful post. Thank you.
 
  • Like
Reactions: paredown
Do you need to take the top off to get the blanket and the baffles back in ?

I believe my stove has three baffle plates , two flat and one curved I believe goes on the right side. Although I am having trouble finding it in the drawings.... is there three plates or am I mistaking another piece for something else? The baffle plates shifted out on me during transport so I wasn’t able to take a good mental note of how /where they fit into the stove.
 
Hi I have a practically brand new jotul f600 stove I had to take out all the loose parts to lighten it up enough for me to get it in my suburban. I of cores took pictures but lost my phone and therefore the pictures I'm having trouble finding a diagram of how to put everything back in. I didn't take apart the manafold at top but did take out the blanket thanks note I have bin reading posted for over an hour but don't know if I'm using wrong language in my search I now no how to remove top of stove replace mana fold ECT just not sure how to put the loose parts in bottom of stove